Do you have a question about the Hitachi TM3030 Plus and is the answer not in the manual?
Details the warranty terms, coverage, and limitations for the microscope.
Lists conditions and situations not covered by the warranty.
Outlines instructions and procedures for system installation and relocation.
Explains safety alert symbols (WARNING, CAUTION) and their meanings.
Details safety notices (NOTICE, NOTE) for property and system protection.
Covers safety notes on abnormal conditions, laser light, and device usage.
Lists warnings described in the manual and their locations, including humid/dusty places and electric shock.
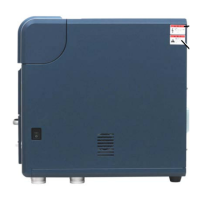
Shows the locations and content of warning and caution labels affixed on the microscope unit.
Provides notices regarding power supply, cable connections, and detector care.
Covers application installation, PC screen settings, and handling PC freezing.
Outlines environmental and physical requirements for the installation site, including amplitude and magnetic field.
Provides precautions and steps for installing the TM3030Plus application software.
Step-by-step guide on how to start the TM3030Plus system, including power and LED indicators.
Instructions and precautions for loading specimens and adjusting their height for observation.
Procedures for safely removing and replacing specimens in the microscope chamber.
How to select and adjust observation conditions like voltage, magnification, and mode.
Explains how to select image signals (BSE, SE, Mix) and observation modes.
Steps to initiate image observation after system setup and specimen loading.
Methods for locating the desired field of view using XY knobs or image shift.
How to adjust the magnification using buttons, mouse dragging, or preset values.
Manual and automatic methods for adjusting image brightness and contrast.
Procedures for manual and automatic coarse focusing to achieve a clear image.
Steps for manual fine focusing and astigmatism correction for sharp images.
How to save captured images, including setting image properties and file format.
Procedures for properly shutting down the microscope unit and the PC.
How to start and stop the electron beam irradiation and observation process.
How to select observation conditions (5 kV, 15 kV, EDX) for optimal imaging.
How to select image signals (BSE, SE, Mix) and observation modes.
How to change magnification using buttons, mouse dragging, or preset values.
How to adjust image brightness manually or automatically.
How to adjust image contrast manually or automatically.
Automatically adjusts brightness and contrast for optimal image display.
How to adjust image focus manually using buttons or mouse dragging.
Automatically adjusts image focus for clarity.
Adjusts brightness and contrast levels automatically for optimal image quality.
Guides the user through aligning the electron beam axis for optimal performance.
Corrects electron beam distortion for clearer images, especially at high magnification.
Instructions for replacing the electron source filament when it fails or is disconnected.
Step-by-step guide for aligning the electron beam axis.
Lists potential error messages encountered during system operation and their countermeasures.
Explains calibration commands for X, Y, Z measurements, and flatness correction.
Step-by-step guide for capturing 3D images, including specimen height and insertion direction.
How to measure distances and angles between points on an image.
Operations for calibrating 3D measurement for improved accuracy, covering X, Y, Z, and Flat.
How to create, edit, and apply calibration conditions using the Condition table dialog.
Details calibration procedures for X, Y, Z, and Flat measurements.
Calibrates the horizontal (X) and vertical (Y) size of the image for accurate measurements.
Calibrates the height (Z-axis) measurement using a specimen with known height.
Executes flatness calibration to correct sensitivity variations in the BSE detector.
Describes calibration methods using a tilted specimen stub for height measurements.
Demonstrates flat calibration using a tilted specimen stub.
Demonstrates Z calibration using a tilted specimen stub after flat calibration.
| Brand | Hitachi |
|---|---|
| Model | TM3030 Plus |
| Category | Microscope |
| Language | English |