12
MAINTENANCE
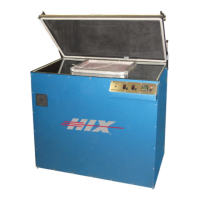
LID REALIGNMENT
NOTE: The light and vacuum are sealed under the lid by means of
rubber gasket on the underside the lid frame. This rubber
gasket may compress over time. If light is seen from the
sides of the unit, or if the vacuum does not occur, the rubber
gasket may be compressed or the lid is out of alignment.
These problems can be alleviated by realigning the hinges.
1. Begin with the lid in the open position. Remove the plastic cap
from the lid end of one of the gas springs. While holding the lid,
pull end of gas spring straight out and off of the ball connector
as you continue to manually hold the lid up.
CAUTION: It is important to do this operation with the lid up, failing
to do so could cause injury due to the sudden release of
pressure on the gas spring!
2. Gently lay lid back down onto the glass and turn on the vacuum
switch.
3. Loosen 1/4” Allen-head capscrews on the side of the exposure
unit (2 on each side). (See fi gure above)
4. Loosen 1/4” Allen-head capscrews from the back of exposure
unit. (2 on each side).
5. The vacuum pull will self align the hinges.
6. With the vacuum still applied, retighten the 1/4” allen screws at
the sides of the unit.
Gas Spring and
Plastic Cap
1/4” Allen-head
Capscrews
1/4” Allen-head
Capscrews
5
EXPOSING
EXPOSING A SCREEN
Maximum screen sizes:
One 24” x 42” or Two 21” x 24”
NOTE: Put the screen in the center of the glass. Keep at least 2”
from any edge of the glass to prevent damage to the vacuum
blanket rubber.
1. Place your screen frame in the center of the glass, screen side
down with your output image in place.
2. Place bleeder cord on top of and inside the frame and across the
image. (See illustration below) NOTE: This cord facilitates quick
blanket draw down and releasing of the vacuum after exposure
and the vacuum has been turned off.
3. Close the blanket lid and latch the lid shut.
4. Turn the Main Power switch “ON”.
5. Turn the Vacuum switch “ON” and allow the blanket to pull down
tight to the screen and the glass.
6. Set the timer on the desired exposure time for the type of emul-
sion and screen you are going to expose. See “Determining
Your Optimum Exposure Time” on page 6 or your fi lled in chart
on page 7 if you have already determined your exposure time.
7. Press the “Start” button located to the right of the timer dial to
begin the exposure.
8. At the end of the selected time, the lamp will extinguish.
9. Turn the vacuum switch off, release and open the lid and remove
the screen frame. If another screen is to be exposed, do this within
90 seconds or a brief warm up of the lamp will be necessary as
described in the “Initial Startup” instructions on page 3.
Bleeder Cord
Screen
 Loading...