Do you have a question about the Holybro Pixhawk 4 S500 V2 Basic Kit and is the answer not in the manual?
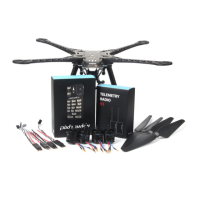
Lists components included in the Pixhawk 4 package, detailing cables and modules.
Details the electronic components of the kit, including autopilot and telemetry radio.
Instructions for attaching the landing gear components to the vertical pole.
Steps to connect the power management board to the landing gear assembly.
Instructions for mounting the drone arms onto the power management board.
Guidance on connecting the 8*3 2.54mm horizontal pin to the PWM cable.
Details on mounting the motors onto the drone arms and routing cables.
Instructions for installing the GPS module and mast onto the drone frame.
Steps for attaching the FrSky receiver to the drone's main board.
Guidance on securing the Holybro telemetry radio to the drone frame.
Instructions for attaching the Pixhawk 4 flight controller to its mounting plate.
Steps for assembling and attaching the battery mount to the drone frame.
Explains how to connect various components to the Pixhawk 4 flight controller.
Connect vehicle via USB, select firmware, and prepare for upgrades.
Guide to choosing the correct Holybro S500 airframe in QGC software.
Instructions for calibrating the radio transmitter with the flight controller.
Steps to calibrate the drone's internal sensors like gyroscope and accelerometer.
Configuration of flight modes (Stabilized, Altitude, Position) using a single channel.
Procedure for calibrating the Electronic Speed Controllers (ESCs) for motor control.
Detailed steps for the ESC calibration process, including battery connection.
| Flight Controller | Pixhawk 4 |
|---|---|
| Motors Count | 4 |
| Frame | S500 V2 |
| ESC | 30A ESC |
| GPS | M8N GPS |
| Telemetry | Radio Telemetry 433 / 915 MHz |
| ESCs | 30A |