Do you have a question about the Honda CB400F and is the answer not in the manual?
Importance of authorized dealer service for safety and reliability.
Details on wood and steel crating for the CB400F.
Steps to remove the outer carton cover and internal securing straps.
Instructions for carefully removing crate components.
Detach master cylinder and remove front shipping brace.
Remove rear shipping brace and its bracket.
Remove front fender and parts cartons from the crate.
Free the motorcycle by removing retainers and nails from the crate base.
Unpack all loose items and check them against the provided illustration.
Loosen engine mounting bolt and remove shipping retainer.
Install handlebar on lower holders and secure with upper holders.
Mount the master cylinder and align its holder with the throttle grip switch.
Reinstall clutch lever, ensuring proper cable routing and free operation.
Mount the speedometer/tachometer unit onto the fork bridge and headlight bracket.
Center ignition switch and route wires into the headlight case.
Route and install front turn signal wires and units.
Plug headlight contacts into the socket and install the headlight.
Mount the front fender brace with cable guide.
Mount the front fender using bolts and washers.
Press and secure the brake hose grommet into the fender bracket clip.
Thoroughly clean the front brake disc with a degreasing agent.
Mount the speedometer gearbox, ensuring tabs align with slots.
Scrape preservative from brake pads and reinstall the inner pad.
Mount front wheel and install axle holders on fork legs.
Route speedometer cable through fender grommet and cable guide.
Connect speedometer and tachometer cables to their respective units.
Check for proper routing of speedometer and tachometer cables as illustrated.
Ensure all wire harnesses and cables are routed correctly.
Verify proper routing of wire harnesses and cables on both sides of the frame.
Route turn signal wires and install signal units.
Mount the taillight bracket using flange bolts.
Connect turn signal and taillight wires to the main harness color-to-color.
Position and install the seat lock bar with washers and nuts.
Mount the seat using hinge pins, washers, and lock pins.
Install gearshift pedal and rubber, aligning punch marks.
Fit the rubber onto the kick starter pedal.
Install and adjust rear brake pedal, aligning punch marks.
Install and adjust rear view mirrors.
Service battery, connect breather tube, and install in compartment.
Fill the crankcase with the recommended engine oil.
Adjust cam chain tension as described in the manual.
Check and adjust tappet clearance using a feeler gauge.
Inspect and adjust the point gap as per the shop manual.
Use a timing light to check and adjust ignition timing.
Synchronize carburetors using a vacuum gauge set.
Verify the battery charging system for voltage and amperage.
Adjust drive chain and check tire pressure.
Torque specs for handlebar holders, master cylinder, and speedometer mounts.
Torque specs for front fender, caliper pin nut, axle nut, and brake pads.
Torque specs for gearshift pedal, rear brake pedal, and engine mounting bolt.
Procedures for checking and adjusting brake, clutch, and fuel systems.
Checks for engine oil, ignition timing, carburetors, and electrical components.
Post-ride checks covering performance, handling, and leaks.
List of parts for front wheel, fender, headlight, taillight, and turn signals.
Parts for pedals, speedometer gearbox, and various fasteners.
List of parts for mirrors, headlight socket, rubber components, and battery strap.
| Displacement | 408 cc |
|---|---|
| Compression Ratio | 9.4:1 |
| Cooling System | Air-cooled |
| Transmission | 5-speed |
| Front Suspension | Telescopic fork |
| Front Brakes | Single disc |
| Rear Brakes | Drum |
| Dry Weight | 172 kg |
| Bore x Stroke | 51mm x 50mm |
| Fuel System | 4 x Keihin carburetors |
| Rear Suspension | Dual shocks |
| Max Power | 37 hp at 8, 500 rpm |
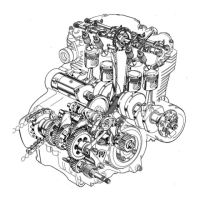
| Engine Type | Air-cooled, 4-stroke |
| Max Torque | 31.4 Nm @ 7, 500 rpm |