Do you have a question about the Honda TRUNK NET and is the answer not in the manual?
Introduces symbols warning of hazards and providing advice for safe operation.
Defines hazard symbols like DANGER, WARNING, CAUTION, and NOTICE with their implications.
Explains icons indicating the working environment and necessary safety items for the task.
Outlines general safety rules, vehicle protection, and handling of parts during installation.
Stresses the importance of using only specified parts and tools for accessory installation.
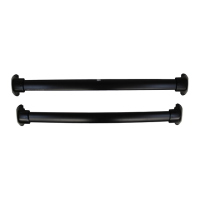
Lists all components included in the trunk net kit for user verification.
Enlists the required tools and supplies for performing the trunk net installation.
Describes removing existing clips and enlarging the holes in the trunk lining for installation.
Details the process of inserting turn nuts into the vehicle's interior panel.
Explains how to secure anchors and reiterates repeating steps for the opposite side.
Covers attaching the trunk net and performing a final check for proper installation.
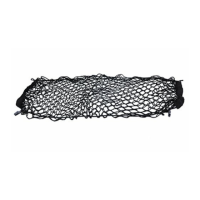
The document provides detailed instructions for installing a trunk net in a Honda Civic, outlining the process from preparation to final inspection. The trunk net is designed to secure items within the vehicle's trunk, preventing them from shifting or rolling around during transit. This accessory enhances the utility of the trunk space, making it more organized and preventing potential damage to cargo or the vehicle's interior.
The primary function of the trunk net is to provide a flexible barrier that holds items in place within the trunk. It attaches to four anchor points located on the interior sides of the trunk, creating a secure compartment. This helps in managing various types of cargo, from groceries and sports equipment to luggage and smaller loose items. By keeping items contained, the net prevents them from sliding around, which can be particularly useful during sudden stops, turns, or acceleration. This not only protects the cargo from damage but also reduces distractions for the driver by eliminating the noise of shifting items. The net's design allows it to stretch and adapt to different shapes and sizes of objects, offering versatile storage solutions. When not in use, the net can be easily detached or folded away, minimizing its presence in the trunk.
The installation process for the trunk net is designed to be straightforward, requiring common household tools and a few specialized items. The general view of the trunk net installation shows the net secured by four anchors within the trunk, indicating its widespread coverage. The installation begins with the removal of two existing clips in the trunk lining, which serve as initial points for modification. These clip holes are then enlarged using an 8 mm drill bit, a crucial step that requires precision and care to avoid damaging the trunk lining. The instructions emphasize holding the trunk side lining securely during drilling, highlighting the importance of stability for accurate hole enlargement. A ruler is recommended to ensure the holes are enlarged to the specified 10 mm (0.39 in.) diameter, ensuring a proper fit for the subsequent components.
After drilling, turn nuts are inserted into the newly enlarged holes. These turn nuts provide a robust and threaded base for securing the anchors. The instructions include a "SECTION VIEW" to illustrate the correct orientation and insertion of the turn nuts into the vehicle panel. Once the turn nuts are in place, the anchors are secured using screws. Each anchor assembly involves a screw, a nut, and the anchor itself, which are tightened to create a firm attachment point for the net. The process is repeated for all four anchor points, ensuring a balanced and secure installation. The document specifies that two screws, two nuts, and two anchors are used for each side, totaling four anchors for the entire net.
The final step in the installation is to attach the trunk net to the secured anchors. The net features loops that hook onto the anchors, allowing for quick and easy attachment and detachment. The illustration shows two loops connecting to two anchors on each side, effectively creating a taut and functional net across the trunk space. This design allows for flexibility in how the net is used, as it can be partially or fully deployed depending on the cargo needs. The entire procedure is then repeated for the other side of the trunk, ensuring symmetrical and complete installation.
While the document does not explicitly detail maintenance features for the trunk net, the nature of the product suggests several implicit aspects. The net itself is likely made from durable, flexible materials that can withstand the rigors of daily use, including stretching, friction from cargo, and exposure to varying temperatures within the trunk. Regular inspection of the net for any tears, fraying, or damage to the loops would be a simple maintenance task to ensure its continued effectiveness. If the net becomes soiled, it can likely be cleaned with mild soap and water, given its typical material composition.
The installation instructions emphasize the importance of proper tool usage and careful execution, which indirectly contributes to the longevity and maintenance of the installed components. For instance, the use of a file to deburr drilled holes prevents sharp edges from damaging the net or other components over time. Applying touch-up paint to any exposed metal after drilling helps prevent rust and corrosion, preserving the integrity of the vehicle's structure and the installed hardware. The instruction to "Tighten by specified torque" ensures that all fasteners are securely fastened, preventing loosening that could lead to wear or failure.
The "Check After Installation" step is a critical maintenance-related feature, requiring a thorough inspection to ensure all parts are installed properly. This final check helps identify any loose components, incorrect alignments, or missed steps that could compromise the net's functionality or safety. By ensuring a correct initial installation, the need for future adjustments or repairs is minimized. The use of a handy remover for clips suggests that the installation is designed to be reversible, allowing for removal or replacement of components if necessary, which is a key aspect of long-term maintenance. Overall, the emphasis on careful installation and quality components ensures that the trunk net remains a reliable and useful accessory for the vehicle.
| Category | Automobile Accessories |
|---|---|
| Color | Black |
| Dimensions | Varies by model |
| Material | Nylon |
| Compatibility | Honda vehicles with trunk hooks |