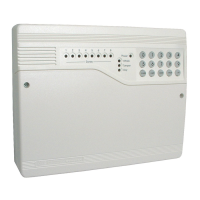
10
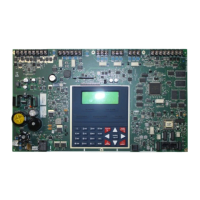
Figure 2.4 Connections to the Accord.
Testing the Installation
Power-up and Initial Test Procedure
When the Accord control panel has been installed in accordance with the preceding
safety and wiring instructions the system should be tested. The test procedure is
outlined below.
Note: Before the test commences all auxiliary devices such as powered sensors
(PIRs), remote keypads, alarm sounders, etc, must be connected.
The Stand–by battery should not be connected at this point.
+
BELL
–
–
BELL
TAMP
–R
STRB
+
–
c
n/c
n/o
–
+
+
BELL
–
–
BELL
TAMP
–R
STRB
+ Supply/Hold-off
Trip/Signal Negative
– Supply/Hold-off
– Tamper return
Strobe – signal
AC
AC
BAT+
BAT–
GND
Primary
AC Mains transformer
Secondary
+
–
Stand-by Battery
Max 7.2 Ahr
Live
Earth
Neutral
To a.c. mains input
MAINS AND BATTERY CONNECTIONS
+
AUX
–
LS
TRIG
K'PAD
FULL
SET
PART
SET
NIGHT
SET
TEST ISOLATE
CODE CHIME
ESCAPE LOG EASY SET
123
456
789
¹
0#
ZONES
1
2
3
4
5
6
7
8
TAMPER
DAY
POWER
kpad
+ve
–ve
F1 Battery: 1 A, 20 mm Anti-surge
F2 Keypad/Auxiliary: 500 mA, 20 mm Anti-surge
F3 Bell: 500 mA, 20 mm Anti-surge
Mains Fuse: 100 mA, 20 mm Anti-surge
FUSE RATINGS
CONNECTIONS FOR BELL AND STROBE
CONNECTIONS FOR SAB
KEYPAD AND
LOUDSPEAKER WIRING
ZONE
TAMP
ZONE
1
ZONE
5
ZONE
4
ZONE
3
ZONE
2
ZONE
1
ZONE
8
ZONE
7
ZONE
6
ZONE WIRING
Normaly closed (Open for zone activation)
16
Ω
 Loading...