INSTALLATION AND MAINTENANCE INSTRUCTIONS
SPECIFICATIONS
Normal Operating Voltage: 15-32 VDC
Stand-By Current: 2.3 mA @ 24 V
Alarm Current: 40 mA (assumes all six LEDs solid on)
Temperature Range: 32ºF to 120ºF ( 0ºC to 49ºC)
Humidity: 10 to 93% Non-condensing
Dimensions: 6.8" H x 5.8" W x 1.0" D
Accessories: IDP-ACB Cabinet and chassis
Wire Gauge: 12-18 AWG
Max. IDC Wiring Resistance: 25 ohms
External Power Supply Voltage: Regulated 24 VDC
Ripple Voltage: 0.1 volts RMS maximum
IDC (Supervised and power limited)
DC Voltage: 18-28 volts power limited
Frequency: DC
Alarm Current: 90mA per circuit
Standby Current 6 circuits: 42mA Maximum @18 VDC
56mA Maximum @24 VDC
66mA Maximum @28 VDC
BEFORE INSTALLING
If the modules will be installed in an existing operational system, inform the
operator and local authority that the system will be temporarily out of service.
Disconnect the power to the control panel before installing the modules. This
system contains static sensitive components. Always ground yourself with a
proper wrist strap before handling any circuits so that static charges are re-
moved from the body. The module housing should also be grounded.
NOTICE: This manual should be left with the owner/user of this equipment.
GENERAL DESCRIPTION
The IDP-Zone-6 Six Zone Interface Module is intended for use in an intelli-
gent alarm system. Each module provides an interface between the intelligent
alarm system and a conventional alarm system loop. A common SLC input is
used for all modules, and the initiating device loops share a common super-
visory supply and ground. Otherwise, each monitor operates independently
from the others. Each module has its own unique address.
A pair of rotary code switches is used to set the address of the first module
from 01 to 94 (or 01 to 154 for panels that support 159 addresses). The re-
maining modules are automatically assigned to the next five higher addresses.
Provisions are included for disabling a maximum of two unused modules to
release the addresses to be used elsewhere. Each module also has panel con-
trolled bicolor LED indicators. The panel can cause the LEDs to blink, latch
on, or latch off.
Included:
(5) 1 x 4 Terminal Blocks (2) 1.25" Stand offs (3) Shunts
(4) Machine Screws (2) Nuts (1) Long Power Supply Jumper
(6) 3.9k Ohm End of Line Resistors
C0202-00
Shipped on Board:
(2) Shunts in Class A/B position
(Shipped in Class B position, remove shunts for Class A)
COMPATIBILITY REQUIREMENTS
To ensure proper operation, this module shall be connected to a compat-
ible Honeywell Farenhyt series system control panel (list available from
Honeywell). A list of compatible two-wire System Sensor Smoke detectors for
use with the IDP-Zone-6 is available on the System Sensor website at system-
sensor.com.
COMPONENTS
The following is a description of the IDP-Zone-6 mounting framework:
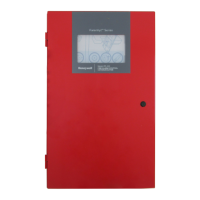
• One or two IDP-Zone-6 modules can be installed in a IDP-ACB cabinet
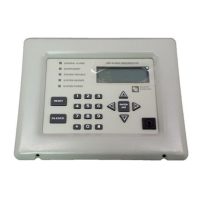
FIGURE 1. IDP-ACB CABINET
0
1
2
3
4
5
6
7
8
9
0
7
8
6
5
4
3
2
1
9
10
11
12
13
14
15
BASE ADDRESS
ADDRESS
DISABLE
NONE
ONE
TWO
THREE
0
1
2
3
4
5
6
7
8
9
0
7
8
6
5
4
3
2
1
9
BASE ADDRESS
ADDRESS
DISABLE
NONE
ONE
TWO
THREE
10
11
12
13
14
15
C0234-05
The IDP-ACB cabinet has a built-in chassis that will accommodate one or two
IDP-Zone-6 modules. For cabinet dimensions refer to the IDP-ACB instruction
manual.
The front IDP-Zone-6 module positions of each chassis are offset below the
rear IDP-Zone-6 module positions so that all of the status indicators are visible.
INSTALLATION STEPS
1. Cabinet Mounting
In a clean, dry area, mount the backbox using the four holes provided in the
back surface of the cabinet (Figure 2).
I56-2733-010
12 Clintonville Road, Northford, CT 06472-1610
Phone: 203-484-7161 Fax: 203-484-7118
www.Farenhyt.com
IDP-Zone-6
Six Zone Interface Module
Farenhyt™ Series
1 I56-2733-010
7/1/2022