EasyManua.ls Logo

Honeywell NOTIFIER Pearl - User Manual

Honeywell NOTIFIER Pearl
2 pages
Print Icon
To Next Page IconTo Next Page
Loading...
B1
A6
B6
B2
A7
B7
B3
A8
B8
B4
B9
B5
CAUTIONS & WARNINGS
Cables & Wiring
Electro-sensitive Devices (ESD)
Take suitable ESD precautions when removing or installing printed circuit boards
(PCBs). Failure to comply will shorten life of the equipment and may invalidate any
warranty.
This is CE Marked to show that is conforms to the requirements of the following
European Community Directives:
- The EMC Directive 2004/108/EEC, by the application of the following EMC standards:
EN61000-6-3: Electronic compatibility (EMC) generic emission standard for Residential,
Commercial and light industrial environments.
EN50130-4: EMC Product family standard: Immunity requirements for components
of fire, intruder and social alarm systems.
- The Low Voltage Directive 2006/95/EE, by the application of the safety standard:
EN60950-1: Safety of information technology equipment.
- The Construction Products Directive 89/106/EEC, by the application of the following
standards:
EN54-2: Fire detection and fire alarm systems - control and indicating equipment.
EN54-4: Fire detection and fire alarm systems - power supply equipment.
WARNING: The PSU enclosure contains high voltage
circuitry. To avoid electric shock, do not remove the PSU
enclosure or allow the entry of conductive materials/fluids.
CAUTION: BATTERIES!
Risk of explosion if the battery is replaced by an incorrect type.
Take care when batteries are fitted.
It is normal for lead-acid type batteries to discharge hydrogen while being charged. The
panel enclosure is adequately ventilated to dissipate this hydrogen.
DO NOT seal the panel enclosure or mount the panel in a sealed enclosure or cavity.
WEEE Directive
This product contains electrical and electronic equipment that must be disposed of
suitably at the end of its service life. Contact your Local Authority to determine the
procedures for the disposal of waste electrical and electronic equipment.
Loop 1 (OUT)
Sounder Circuit 2
Digital Input Circuit 1
Digital Input Circuit 2
Network cable (IN)
Network cable (OUT)
Sounder Circuit 1
Loop 2 (OUT)
Loop 1 (IN)
Fire Relay output circuit
Fault Relay output circuit
Loop 2 (IN)
Repeater (RS485)
+
+
-
-
M3 Earth stud (x6)
Screen wires
AUX Output
997-659-000-2
Pearl Panel - Basic Installation Guide
Dispose of batteries in accordance with local regulations.
This basic installation guide describes where to bring cabling and wiring in to the panel.
This information can be found in the Installation & Commissioning Manual in Section 5.3.1 Base PCB Wiring Connections. When bringing cables
through the wall-mounting plate, use the recommended cable entry apertures as illustrated below. This is a top view of the mounting plate. The
back row of apertures are shown as A1 to A8 and the front row are shown as B1 to B9. The recommended cable entry aperture for the primary
supply cable is indicated.
Checking For Damage
1 Carefully remove the Pearl fire control panel from its packaging. Do not discard this packaging
until an inspection of the product has been completed (refer to step 4 below).
2 Inspect the product for any damage that may have occurred in transit.
3 If no damage is evident, proceed with installation.
4 If product appears to have been damaged, do not proceed with installation. Return to supplier,
re-using same packaging wherever possible. Include written details of damage.
Wall Mounting
The Pearl fire control panel has been designed to simplify the installation process and reduce the risk
of product contamination prior to starting system commissioning. To this end, the panel electronics
need not be installed until required for the commissioning process. With reference to the instructions
overleaf (which also contains a wall-mounting template for drilling the required holes), screws (B -
see overleaf) are provided for securing the enclosure to the wall plate. Screws for the wall-mounting
plate are not provided.
Inspection & Testing
Inspection and Testing should conform to any national, regional or local standards applicable for the specific installation.
Before connecting any field wiring to the panel the following tests must first be carried out:
- Check the continuity of all cable runs (including screens).
- Check the isolation between all cores and between cores and screen / earth. Minimum isolation of 2Mohms is required.
- Check that the screen of all signal cables is not grounded to earth elsewhere in the building and that it is installed in accordance with recommendations –
refer to relevant wiring installation sections in the Installation & Commissioning Manual.
- Check that signal cables are not run in cable trays, or similar, alongside power cables for this and other equipment.
Having successfully carried out the above tests and once any faults found have been rectified the panel is ready for connection of external cables and
wiring. The recommended cable entry points for connection to the Base PCB are shown above. Connect the screen drain wires to the nearest earth stud
in the enclosure.
External Power Connection
The Pearl fire alarm control panel receives power from a 230V, 50Hz primary supply.
Open and lock out the main circuit breaker before connecting any wiring. DO NOT connect power until
panel is ready to perform commissioning tests.
The external primary supply cable must be brought in and terminated at the Mains Termination Block
(MTB) provided. Connect the Neutral (blue) wire to termination point ‘N’ and connect the Phase or Live
(brown) wire to termination point marked ‘L’. Terminate the primary earth wire to the stud located to the
lower-right of the MTB using the ring terminal, plain and spring washers and M4 nut provided. The
cable used for the primary supply must conform with the electrical wiring specifications of the country
and local requirements. MAKE SURE the supplied MTB safety cover (A) is fitted over the wiring
termination screw heads after the mains supply wiring termination has been made.
Primary supply cable gland and cord anchorage bushing used to route the primary supply cable through
the 20mm cable aperture MUST have a minimum flame retardant rating of UL94V0. Recommended
alternatives are given in the Installation & Commissioning Manual.
Battery Installation
The enclosure requires the installation of 12Ah batteries. Two are required. The standby batteries should be located in the enclosure as shown in the diagrams
overleaf.
Allow a sufficient air gap between them (10mm recommended) to allow for heat dissipation.
Primary Supply
Remove the door before installing the enclosure on the wall bracket.
Ensure adequate clearance is provided (> 200mm) to the left of the panel to allow unrestricted
access to the internal equipment with the door open.
A1
A2
A3
A4
A5
230Vac
230Vac
L
N
FUSE: 1.6A (T) 250V HRC
NL
L
N
FUSE: 1.6A (T) 250V HRC
A
Question and Answer IconNeed help?

Do you have a question about the Honeywell NOTIFIER Pearl and is the answer not in the manual?

Summary

Checking For Damage

Wall Mounting

CAUTIONS & WARNINGS

Electro-sensitive Devices (ESD)

Take ESD precautions when handling PCBs to prevent damage and warranty invalidation.

PSU High Voltage Warning

Warning: PSU enclosure contains high voltage. Avoid shock by not removing enclosure or allowing conductive materials.

Battery Safety Precautions

Caution: Risk of explosion if battery is replaced with incorrect type. Take care when fitting batteries.

WEEE Disposal Directive

Product contains electronic equipment requiring special disposal at end of service life. Contact local authority.

Cables & Wiring

External Power Connection

Battery Installation

Inspection & Testing

Overview

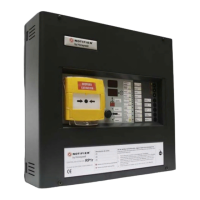
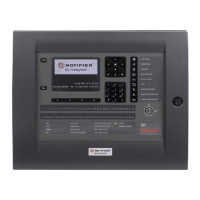
The Pearl Panel is a fire control panel designed for simplified installation and commissioning, ensuring efficient setup and reliable operation in various environments. It serves as the central hub for fire detection and alarm systems, providing control and indicating functions, as well as power supply capabilities.

Function Description

The Pearl Panel acts as a comprehensive control and indicating equipment for fire alarm systems. It receives power from a 230V, 50Hz primary supply and manages various circuits, including two loops (Loop 1 and Loop 2), two sounder circuits (Sounder Circuit 1 and Sounder Circuit 2), and two digital input circuits (Digital Input Circuit 1 and Digital Input 2). It also features an auxiliary output, a repeater connection (RS485), and network capabilities (IN/OUT). The panel is equipped with fault and fire relay output circuits, allowing it to interface with other building systems and provide critical status indications.

The panel's design prioritizes safety and compliance with European Community Directives, including the EMC Directive 2004/108/EEC, the Low Voltage Directive 2006/95/EE, and the Construction Products Directive 89/106/EEC. It adheres to standards such as EN61000-6-3 for generic emission, EN50130-4 for immunity requirements, EN60950-1 for information technology safety, EN54-2 for control and indicating equipment, and EN54-4 for power supply equipment.

Usage Features

The Pearl Panel is designed for ease of installation and use. The enclosure is wall-mounted, with a template provided for drilling the necessary holes. The panel electronics are designed to be installed only when required for commissioning, reducing the risk of contamination during the initial setup phase. Adequate clearance (over 200mm) to the left of the panel is recommended to allow unrestricted access to internal equipment when the door is open.

Cabling and wiring are streamlined, with recommended cable entry apertures clearly illustrated on the top view of the mounting plate. The primary supply cable, for instance, has a dedicated entry point and must be terminated at the Mains Termination Block (MTB). The panel requires two 12Ah batteries for standby power, which should be installed with a sufficient air gap (10mm recommended) for heat dissipation.

The panel's design includes features that simplify maintenance and troubleshooting. For instance, the PSU enclosure contains high voltage circuitry, and users are warned not to remove it or allow conductive materials/fluids to enter to avoid electric shock. The enclosure is adequately ventilated to dissipate hydrogen produced by lead-acid batteries during charging, and it should not be sealed or mounted in a sealed cavity.

Maintenance Features

Maintenance of the Pearl Panel involves several key steps to ensure its longevity and reliable operation. When handling printed circuit boards (PCBs), suitable Electro-sensitive Device (ESD) precautions must be taken to prevent damage, which could shorten the equipment's life and invalidate its warranty.

Before connecting any field wiring, a series of tests must be performed:

  • Continuity Check: Verify the continuity of all cable runs, including screens.
  • Isolation Check: Ensure isolation between all cores and between cores and screen/earth, with a minimum isolation of 2Mohms.
  • Screen Grounding Check: Confirm that the screen of all signal cables is not grounded to earth elsewhere in the building and is installed according to recommendations in the Installation & Commissioning Manual.
  • Cable Routing Check: Verify that signal cables are not run in cable trays or similar alongside power cables for this or other equipment.

After successfully carrying out these tests and rectifying any faults, the panel is ready for connection of external cables and wiring. The recommended cable entry points for connection to the Base PCB are clearly indicated. Screen drain wires should be connected to the nearest earth stud in the enclosure.

The panel is designed for easy battery replacement, with clear instructions on how to install the two 12Ah batteries. Users are cautioned about the risk of explosion if batteries are replaced by an incorrect type.

At the end of its service life, the product, which contains electrical and electronic equipment, must be disposed of suitably. Users are advised to contact their Local Authority to determine the correct procedures for the disposal of waste electrical and electronic equipment and batteries, in accordance with local regulations.

Honeywell NOTIFIER Pearl Specifications

General IconGeneral
TypeFire Alarm Control Panel
Operating Temperature32°F to 120°F (0°C to 49°C)
Battery Backup24V DC, 7Ah
NAC Circuits2
Relative Humidity93% RH noncondensing
DisplayLCD Display
CertificationsUL, FM, MEA

Related product manuals