EasyManuals Logo

Honeywell RTH8500D User Manual

Honeywell RTH8500D
64 pages
To Next Page IconTo Next Page
To Previous Page IconTo Previous Page
Page #10 background imageLoading...
Page #10 background image
69-1725-1 10
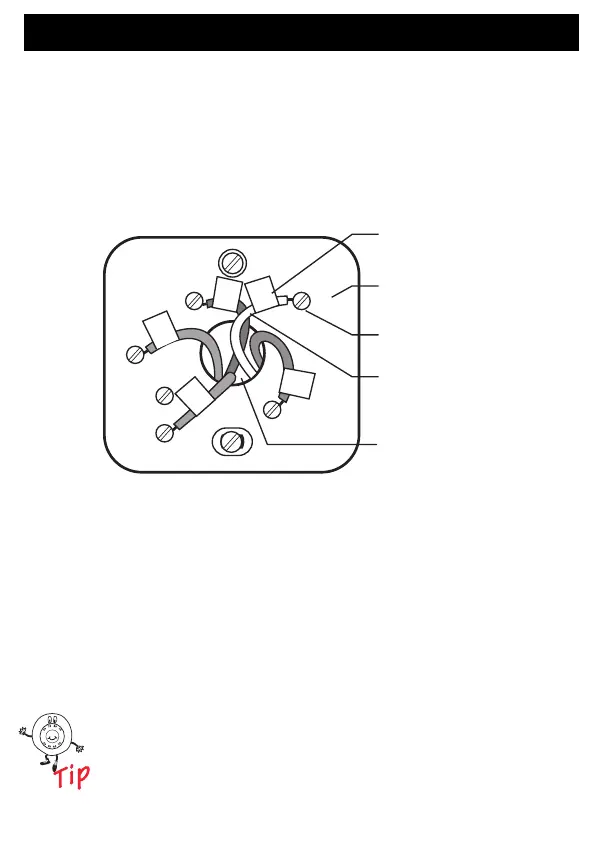
Step 5. Label Old Thermostat Wires
1. As you disconnect each wire, use the enclosed wire labels to
wrap a wire label around each wire that matches the letter
designation. Do not allow the wires to fall into the wall opening
after the wires are disconnected.
2. Remove any remaining part of the old thermostat from the wall.
When connecting the wires to the new thermostat, refer to
the wire labels. Do not connect wires to your new thermostat
based on the color of the wire.
Y
G
R
C
R
OLD THERMOSTAT
WIRE HOLE
M22039
WIRE
SCREW
TERMINAL
LETTER
DESIGNATION
WIRE LABEL
W
W
G
Y
R
RC

Questions and Answers:

Question and Answer IconNeed help?

Do you have a question about the Honeywell RTH8500D and is the answer not in the manual?

Honeywell RTH8500D Specifications

General IconGeneral
Programmability7-day programmable
Wi-FiNo
Operating ModesHeat, Cool, Auto, Off
Filter Change AlertYes
Backup BatteryYes
DisplayTouchscreen
Power SourceBattery or Hardwired
CompatibilityGas, oil, electric, and heat pump systems
StagesUp to 2 Heat/2 Cool
Fan ModesAuto, On, Circulate
Temperature Range40°F to 99°F (4°C to 37°C)
Hold FeatureYes

Related product manuals