Do you have a question about the Honeywell SIXCOMBO and is the answer not in the manual?
Details multi-criteria sensing for smoke and CO, voice alerts, and operation modes.
Step-by-step guide for enrolling the detector's services into the control panel.
Procedure to delete a device from the controller within 24 hours of initial enrollment.
Instructions for selecting the desired voice language for the detector.
Guidance on properly mounting the detector after enrollment and verifying signal strength.
Procedures for performing alarm and functional tests on the smoke detector.
Procedures for performing alarm and functional tests on the CO detector.
How to silence audible alarms for smoke and CO conditions temporarily.
Information on the CO sensor's limited life and end-of-life reporting.
Steps to test communication path strength with the control panel.
Explanation of the multi-color top LED and side LED window indications.
Instructions for cleaning the detector to ensure proper function.
Guidelines for safely replacing the detector's batteries.
Details on symptoms of CO exposure at various concentration levels.
Technical details including electrical, physical, and operating parameters.
Lists the safety and regulatory standards the device complies with.
Information regarding FCC rules, interference, and user modifications.
Links and resources for documentation, support, and warranty details.
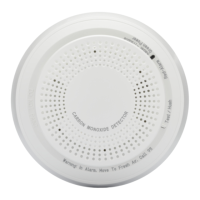
This document describes the Honeywell SiXCOMBO, a combination smoke and carbon monoxide (CO) detector with a built-in wireless transmitter. It features a voice output and a 360-degree viewable LED ring. This device is designed for use with Honeywell control panels that support SiX series devices.
The SiXCOMBO detector utilizes multi-criteria sensing, employing four sensing elements to react faster to threats while minimizing false alarms. These elements include:
Additionally, the device incorporates low-temperature sensing, which monitors ambient temperature and reports if the temperature drops below 41°F (5°C).
The device supports a "One Go / All Go" feature, meaning that if all smoke detectors in the system are programmed for this mode, they will all sound an alarm when one detects a threat. It also provides CO Detector End-of-Life reporting, indicating when the detector needs replacing, and smoke detector maintenance reporting, signaling when the detector needs cleaning. Low battery detection is also included.
The SiXCOMBO detector offers various operational modes indicated by its multi-color top LED and side LED windows, along with distinct sounder patterns and voice announcements.
Power-Up: Upon power-up, the top LED blinks green every 2 seconds, the side LEDs are dark, and the device is silent. Voice welcome instructions are provided after the first power-up or after a default reset.
Normal (Standby): In normal operation, the top LED blinks green every 10 seconds, side LEDs are dark, and the device remains silent.
Smoke Alarm: During a smoke alarm, the top LED blinks red every 10 seconds, side LEDs blink red, and the sounder emits a Temp-3 pattern with a voice smoke warning.
Thermal Alarm: For a thermal alarm, the top LED blinks red every 10 seconds, side LEDs blink red, and the sounder emits a Temp-3 pattern with a voice smoke warning.
CO Alarm: In a CO alarm, the top LED blinks red every 10 seconds, side LEDs blink blue, and the sounder emits a Temp-4 pattern with a voice CO warning.
Powered Down: When powered down, all LEDs are dark, and the device is silent.
Enrollment: The smoke, heat, and CO sensors each have unique MAC ID numbers (serial numbers) that are enrolled in separate zones. Once enrolled, the device is linked to the current controller until removed. Enrollment involves removing the detector from its base, putting the control panel in Zone Programming mode, pulling the battery tab (or pressing a test switch if already powered up), and allowing the device to attempt enrollment. Successful enrollment is indicated by a steady green LED for 3 seconds and a voice announcement. If enrollment fails, the process can be retried by pressing a test switch. All services (smoke, heat, and CO) are automatically enrolled in sequential zone numbers with default attributes for Fire No Verification (smoke and heat) and Carbon Monoxide (CO).
24-Hour Enrollment Deletion: Within 24 hours of initial enrollment, the device can be deleted from the controller by pressing and holding both the Smoke and CO test switches simultaneously for 5 seconds, then releasing, and then pressing and holding both buttons again for one second. This resets the device to factory defaults and removes its communication link data, allowing re-enrollment.
Language Selection: The device supports language selection. To change the language, press and hold both the Smoke and CO test switches simultaneously for 5 seconds until a welcome message is announced, then release. The green light will flash rapidly. Then, press the Smoke test button for English or the CO test button for Spanish.
Testing: The device has two test buttons: one for smoke testing and one for CO testing. It can be functionally tested using canned smoke and canned CO.
Smoke Test (Alarm Test): Press and hold the Smoke Test button for 1 to 2 seconds. The detector will sound, illuminate, and send a smoke alarm signal to the control panel.
Smoke System Test (Functional Smoke Test): Press and hold the Smoke Test button for 3 to 5 seconds to enter functional smoke test mode. Spray canned smoke into the detector to verify its functionality.
CO Test (Alarm Test): Press and hold the CO Test button for 1 to 2 seconds. The control panel should display and sound a CO alarm.
CO System Test (Functional CO Test): Press and hold the CO Test button for 3-5 seconds to enter functional gas test mode. While the green LED blinks, spray a small amount of canned CO into the CO gas entry port. Upon successful gas entry, the detector will go into CO alarm.
Hush Feature / Alarm Silence: The audible alarm for smoke and CO conditions can be silenced for 5 minutes by pushing the "Test/Hush" button. Low chirping can also be silenced for 12 hours. The hush feature will not operate at high smoke or CO concentrations.
CO Sensor End-of-Life Feature: When the CO sensor reaches its end-of-life, a trouble signal is sent to the control panel. If unresolved for 30 days, the detector will chirp every 45 seconds. The typical life of the CO sensor is ten years from the date of manufacture.
Low Battery: When the battery is low, the top LED blinks amber every 10 seconds, side LEDs are dark, and the device chirps every 45 seconds after 7 days. Voice instructions are provided when the chirp is silenced by pressing either test button.
Smoke Maintenance: For smoke maintenance issues, the top LED blinks amber every 5 seconds, side LEDs are dark, and the device is silent. Voice smoke maintenance instructions are provided if either test button is pressed.
CO Trouble: For CO trouble, the top LED double blinks amber every 5 seconds, side LEDs are dark, and the device is silent. Voice end-of-life instructions are provided when either test button is pressed.
CO End of Life: For the first 29 days of CO end-of-life, the top LED double blinks amber every 3 seconds, side LEDs are dark, and the device is silent. After 30 days, the top LED double blinks amber every 3 seconds, side LEDs are dark, and the device chirps every 45 seconds. Voice end-of-life instructions are provided when either test button is pressed.
Freeze Warning (Low Temp): For a low-temperature freeze warning, the top LED blinks red every 10 seconds, side LEDs are dark, and the device is silent.
LED Indicators: The multi-color top LED indicates:
Cleaning: The detector should be cleaned at least once a year.
Replacing the Batteries: The device uses four Panasonic CR123A Lithium batteries.
CO Sensor End-of-Life: The CO sensor has a typical life of ten years from the date of manufacture. It is recommended to periodically check the "Replace by" sticker located on the back of the detector head for the replacement date. The device will signal the panel when the CO sensor has passed its end-of-life.
General Maintenance: Do not paint, and do not use cleaning agents, bleach, or polish the detector. Before performing any maintenance, notify the proper authorities and Central Station that maintenance is being performed. Disable the zone or system undergoing maintenance to prevent unwanted alarms. Power must be removed from the detector before performing maintenance.
The SiXCOMBO detector reports maintenance issues to the control panel and communicates them visually and audibly. A "Trouble" feature indicates when the sensor is in a trouble condition (e.g., dirty detector or non-functioning CO sensor), sending a trouble signal to the control panel.
| Battery Life | Up to 5 years |
|---|---|
| Operating Temperature | 0°C to 38°C |
| Mounting | Ceiling or Wall |
| Compliance | FCC |
| Battery Type | 3V Lithium (CR123A) |
| Compatibility | Honeywell |