2
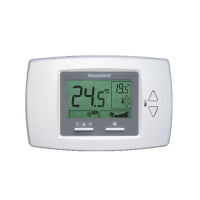
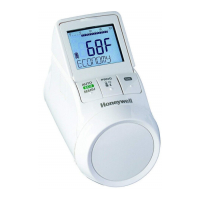
3. Device overview
Operating elements and display
8
5
7
3
2
1
4
11
10
9
6
PROG
AUTO
MANU
OK
ECO
1 Heating period/setback period in hours
2 Day of the week 1 ... 7 (Monday ... Sunday).
Displayed only while the time program is being
programmed
3 Temperature display: e.g. set point temperature
(factory setting) or measured temperature, if
configured in Parameter 9
4 Text display with 9 characters
5 Button OK: Confirm settings
6 Button PROG: Select the operating modes, set the
time program;
Press button >10 seconds): access to the
parameter menu;
Programming: Back to next level up
7 Adjustment dial: Change the set point, navigate
menu
8 Button AUTO/ECO/MANU: Change between
automatic, ECO and manual mode
In programming mode: Exit (without storing)
9 Battery status
10 Operation lock
11 Symbol for Comfort temperature 1 ,
Comfort temperature 2 , Setback temperature
Battery display
Battery status Meaning
Batteries fully charged
Batteries half charged
Batteries have to be replaced soon
Flashing display: Batteries are dead and
have to be replaced
4. Installation
Ready to operate in three steps:
• Insert batteries
• Set the language, time and date
• Mount on radiator – FINISHED
Inserting/changing batteries
The radiator controller is set for the following battery
type:
• 2 alkaline cells 1.5 V; type LR6, AA, AM3
You can instead use the following batteries or
accumulator cells:
• Lithium 1.5 V; type LR6, AA, AM3
• NiMH 1.2 V; type LR6, AA, AM3
i
• If lithium or NiMH batteries are used, Parameter 14
has to be adapted, see Section 9.
• Always change batteries in pairs.
5.
4.
–
+
7.
6.
1.
3.
2.
 Loading...