3
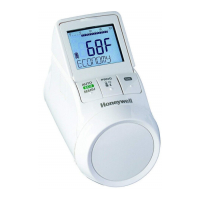
1. Pull off the adjustment dial. To do so, start at the notch
on the bottom of the device.
2. If used, unscrew any fastening screws from the
battery compartment.
3. Release the lock and fold out battery spring.
The battery compartment is now accessible.
4. Insert the batteries.
Ensure that the polarity “+” and “–” is correct.
5. Fold down the battery spring and latch it in.
6. Option: Screw the battery spring to secure the
batteries against removal.
7. Place the adjustment dial back on.
First the software version number and then the
language
deutsch
(German) is displayed.
8. If desired, use the adjustment dial to select a different
language.
9. Confirm the selected language with the OK button.
hour
is displayed.
i
The language selection is only displayed during initial
commissioning. During future battery changes, setting
of time and date is prompted directly.
i
The battery life of new alkaline cells amounts to
approx. 2 years. The batteries need changing when
the symbol flashes. All settings are retained
when the batteries are changed.
WARNING
Explosion hazard!
f Never charge non rechargeable batteries.
f Never short-circuit batteries or throw them
into fire.
f Dispose of used batteries ecologically.
Setting the time and date
1. When
hour
is displayed, use the adjustment dial to
set the current hour and confirm with OK.
minute
is displayed.
2. Use the adjustment dial to set the current minute and
confirm with OK.
year
is displayed.
3. Use the adjustment dial to set the current year and
confirm with OK.
month
is displayed.
4. Use the adjustment dial to set the current month and
confirm with OK.
day
is displayed.
5. Use the adjustment dial to set the current day and
confirm with OK.
The normal display with set temperature and selected
operating mode is displayed.
Checking/changing the time and date
Proceed as follows to check or to change the date and time
later on:
1. Press the PROG button.
2. Select
time date
and confirm with OK.
hour
is displayed.
3. Further checking/changing is carried out as described
above.
Mounting the radiator controller
The radiator controller can be mounted on all common
thermostatic valves with an M30 x 1.5 connection
without draining system.
WARNING
Prevent damage to the radiator controller
through humidity and moisture!
f Mount the radiator controller in dry, closed
rooms only.
f Protect the radiator controller against
humidity, moisture, dust, direct sunlight or
exposure to excessive heat.
Removing the old thermostat head
1.
2.
1. Turn the old thermostat head counter-clockwise until
it stops and loosen the mounting ring.
2. Remove the old thermostat head from the radiator
valve.
 Loading...