Do you have a question about the Honeywell VR8200C and is the answer not in the manual?
Details tables of model settings, ranges, and physical dimensions.
Covers important safety warnings and pre-installation checks.
Safety warnings before startup and explanation of knob settings.
Detailed steps to perform a gas leak test.
Procedure to verify safety shutdown functionality.
Explanation of how the safety shutoff valve functions.
Warnings against disassembly and essential handling precautions.
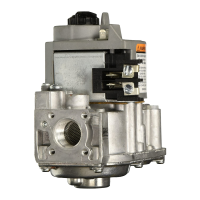
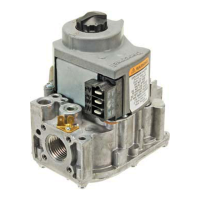
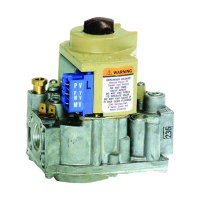
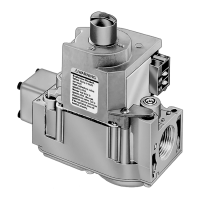
The VR8200 and VR4200 Combination Gas Controls are designed for use in gas-fired, standing pilot appliances. These controls integrate several key functions into a single unit, including safety shutoff, a manual valve, two automatic operators, a pressure regulator, a pilot adjustment, and, for the VR4200, a conduit cover. The VR8200 is intended for 24 Vac heating appliances, while the VR4200 is for 120 Vac heating appliances, both compatible with natural or liquefied petroleum (LP) gas.
The operation of these gas controls is comprehensive, ensuring safe and efficient gas flow. The solenoid-operated first automatic valve opens when the thermostat calls for heat and closes when the call for heat ends. The diaphragm-operated second automatic valve, under the control of the regulator, opens to allow gas flow and closes if the gas or power supply is interrupted. A three-position manual gas control knob offers OFF, PILOT, and ON settings. The OFF position prevents both pilot and main burner gas flow. The PILOT position permits pilot gas flow only, requiring a separate reset button to be held down to allow gas flow for lighting the pilot. The ON position enables both main burner and pilot gas flow, with the thermostat and gas control regulating the main burner.
A key feature is the adjustable servo regulator, which effectively maintains an almost constant gas output pressure despite wide fluctuations in gas supply pressure. Inlet and outlet screens, along with a pilot filter, are included to ensure clean gas flow and prevent contamination. All adjustments, wiring connections, and the pilot outlet are conveniently accessible from the top of the gas control. The compact size and straight-through body pattern facilitate installation, with right-angle adapters available for various inlet and outlet pipe sizes (3/8, 1/2, or 3/4 inch). The standard inlet and outlet are 1/2 inch.
The gas controls can be installed at any angle between 0 and 90 degrees from the upright position, including vertically. Electrical connections are made via 1/4-inch male quick-connect terminals, with combination screw and quick-connect terminals on TRADELINE® models. The wiring terminal block is color-coded beige to identify standing pilot models. Inlet and outlet pressure taps are included and accessible from the top of the gas control, allowing for easy pressure checks.
Various models are available, including standard-, slow-, and step-opening types. Standard and slow-opening TRADELINE models include a natural to LP gas conversion kit, and kits for other conversions are also available. Some models may include an ECO connector, which is also available as an accessory.
For installation, it is crucial to follow instructions carefully to prevent damage or hazardous conditions. This includes disconnecting power, turning off gas supply, and performing a gas leak test after installation. Sediment traps must be installed in the gas supply line to prevent contamination. The gas control knob and reset button should only be operated by hand, never forced with tools.
Converting between natural and LP gas requires specific steps, including changing the regulator spring and adjusting the pressure regulator. Pilot burner orifices must also be changed to match appliance manufacturer specifications. When installing adapters or flanges, proper sealing and tightening procedures must be followed to ensure gas-tight connections. Pipe compound should be applied only to the pipe threads, leaving the end threads bare, and Teflon tape should not be used on LP installations.
Connecting the thermocouple requires a clean and dry electrical connection, tightened just beyond finger-tight for good electrical continuity. Pilot gas tubing must be cut to the desired length, bent smoothly, and connected with a new compression fitting, tightened securely but not overtightened. Wiring connections must comply with local codes and ordinances, and the thermostat heat anticipator should be adjusted as per appliance manual instructions.
Startup and checkout procedures involve performing a gas leak test on all pipe connections, lighting the pilot burner, and adjusting its flame to properly envelop the thermocouple tip. The main burner should then be lit, and the gas input checked and adjusted using either a meter clocking method or a manometer. The pressure regulator must be adjusted to match the appliance's manifold pressure rating. For step-opening models, main burner lightoff should be carefully checked to ensure smooth ignition without flashback.
Safety shutdown performance must be verified by placing the gas control knob in the PILOT position, extinguishing the pilot flame, and ensuring pilot gas flow stops within 2-1/2 minutes. The system should then be relit and operated through a complete cycle to confirm proper control operation.
Regular preventive maintenance is essential, especially for applications with heavy system loads, such as commercial cooking or agricultural and industrial settings. Maintenance frequency depends on factors like cycling frequency, intermittent use, and the consequences of unexpected shutdown. Gas controls exposed to harsh environments, like high ammonia conditions, may require more frequent checks. The gas control should be replaced if it malfunctions during checkout or troubleshooting, if the knob is difficult to operate, or if it has exceeded its operational cycle life (e.g., 200,000 cycles). The gas control itself contains no replaceable components and should not be disassembled or repaired.
Troubleshooting steps are provided for common issues such as the pilot burner not lighting, the pilot flame going out when the knob is released, the main burner not coming on, or the main burner overfiring. These steps involve checking gas supply, pilot adjustment, wiring connections, thermocouple output, and pressure regulator settings.
| Brand | Honeywell |
|---|---|
| Model | VR8200C |
| Category | Control Unit |
| Language | English |