Do you have a question about the Hotpoint CH60GCIK and is the answer not in the manual?
Key safety instructions for using the cooker.
Appliance operation by people with reduced capacities requires supervision.
Appliance must be used by adults for food preparation only; other uses are dangerous.
Essential prohibitions to ensure safe operation and prevent hazards.
Food or grease on surfaces can cause smoke and burns; keep cavities clean.
Ensure an air gap of at least 10mm between the appliance base and the floor.
Do not cover the main oven cavity base with foil or utensils to prevent damage.
Install according to regulations, especially ventilation, and check data badge compatibility.
Lists model numbers and gas types, and conversion kits for LPG.
Gas appliances must be installed by competent persons according to current regulations and BS 6172.
Specify acceptable rooms and minimum volume requirements for bed-sitting rooms.
Detail ventilation requirements based on room volume and presence of other appliances per BS 5440.
Provides key technical specifications like gas connection, electrical connection, and fuse rating.
Details heat input and injector sizes for G20 (Natural Gas) and G30/G31 (LPG) for various burners.
Specifies minimum clearances from surrounding units, walls, and for door opening.
Refer to manufacturer's instructions for fixing height when installing a cooker hood.
Lists all components to be found inside the grill and oven upon unpacking.
Adjust the four skid feet to ensure the cooker is level on the floor.
Detailed steps for converting the appliance from Natural Gas to LPG, including injector and bypass screw adjustments.
A hole in the gas inlet valve bracket is provided to engage a stability chain for safety.
Use an approved flexible connection hose (BS 669) of recommended length and suitable for LPG if converted.
Connect to a 230-240V AC supply via an earthed, accessible wall socket within 1.25m.
Details correct wiring of a 3-pin plug, connecting wires by colour to terminals (Earth, Neutral, Live).
Replace fuse with ASTA approved BS1362; ensure fuse cover is refitted.
Perform checks on gas soundness, burner ignition, flame stability, and timer/light operation.
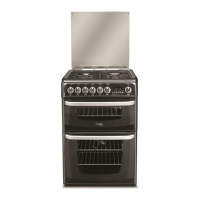
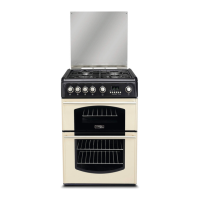
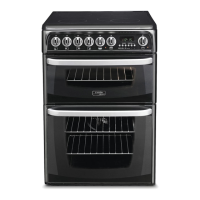
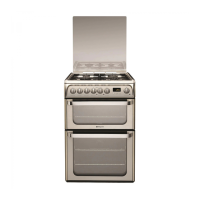
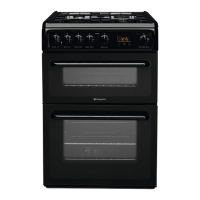
Identifies key components of the cooker, including burners, ovens, control panel, and accessories.
Explains operation of gas hob burner controls and electronic ignition, including safety for extinguished flames.
Details temperature settings for the top oven and how to operate the grill function.
Describes operation of main oven heating elements and temperature settings.
Used for slow cooking, keeping food warm, and warming plates.
The oven timer offers Time of Day, Automatic Cooking, and Minute Minder functions.
Provides essential advice on food selection, preparation, and safety for automatic cooking.
Explains the clockface, symbols (bell, cookpot, AUTO), and their meanings during operation.
Details the function of Minute Minder, Cook Period, End Time buttons, and +/– buttons.
Explains how to set up an Auto Cooking programme using Cook Period and End Time.
Provides a step-by-step guide to set the correct time of day on the cooker's timer.
Explains how to set a countdown timer (Minute Minder) and check remaining time.
Step-by-step instructions for setting the timer to switch the oven on and off automatically at specified times.
Instructions for setting the timer to switch the oven on immediately and off automatically after a set cook period.
Steps to cancel an Auto Cooking programme before completion and return to manual operation.
Important notes on checking cook/end times, power interruptions, and setting functions.
Explains the hotplate lid safety device and lists important "DO NOT" warnings for safe operation.
Step-by-step guide on how to ignite, adjust, and turn off the hotplate burners.
Instructions on keeping burner ignitors clean and dry for reliable lighting.
Crucial safety requirements for deep fat frying, including pan filling and unattended cooking.
Specific steps on how to extinguish a fat fire safely, emphasizing what NOT to use.
Warnings about electrical supply, hot parts, and explanation of the grill's safety device and fan.
Instructions on how to attach the detachable grill pan handle and store the pan.
Detailed steps for operating the grill, including ignition, heat adjustment, and turning off.
Procedure for relighting the grill burner if flames are accidentally extinguished.
Warnings about electrical supply and explanation of the oven's safety devices, heat zones, and shelf stops.
Instructions for setting the timer to manual, placing shelves, igniting, and operating the main oven.
Advice on cold start cooking, roasting large poultry, and storage/re-heating of food.
Guidelines for using aluminium foil in the oven, including increased cooking time and placement.
Provides guidance on cooking times and shelf positions for various foods in the main oven.
Cooking times and settings for starters, fish, meat, and poultry.
Cooking times and settings for various types of puddings.
Cooking times and settings for cakes, pastries, and biscuits.
Cooking times and settings for yeast mixtures and miscellaneous items like Yorkshire pudding.
Describes the use of the 'Slow Cook' setting for slow cooking, keeping food warm, and warming plates.
Detailed instructions and tips for using the 'Slow Cook' setting effectively and safely.
Explains safety devices, fan function, shelf features, and maximum tray size for the top oven.
Step-by-step instructions for operating the top oven, including ignition and temperature control.
Provides guidance on pre-heating and limitations for cooking food in the top oven.
Provides guidance on cooking times and shelf positions for various foods in the top oven.
Cooking times and settings for starters, meat, poultry, and casseroles in the top oven.
Cooking times and settings for vegetables and puddings in the top oven.
Cooking times and settings for cakes, pastries, and biscuits in the top oven.
Cooking times and settings for yeast mixtures and miscellaneous items in the top oven.
General advice on cleaning the appliance, including what not to use and how to move the cooker.
Explains the self-cleaning properties of the oven linings and how to maintain them.
Information on removing inner glass panels for easier cleaning.
Step-by-step guide for safely replacing the oven light bulb, including safety warnings.
Methods for cleaning vitreous enamel and painted surfaces, including specific cleaning agents.
Cleaning instructions for aluminium, glass, and chromium-plated parts.
Methods for cleaning plastic components and stainless steel surfaces.
Instructions for cleaning the main oven burner to resolve ignition or flame issues.
Instructions for cleaning the top oven/grill burner to resolve ignition or flame issues.
Guide to diagnose and resolve issues where burners will not light.
Addresses issues with oven cooking speed and setting Auto Cook programmes.
Troubleshooting timer display errors and oven lamp non-operation.
Instructions for safely disposing of the product and old electrical appliances.
Covers parts and labour for 12 months, subject to installation and usage conditions.
Lists items and damages not covered by the guarantee, such as consumables and accidental damage.
Offers a free 5-year parts guarantee conditional on registration and authorized fitting.
Information on purchasing extended guarantees and using the free helpdesk service.
Provides contact numbers and website for Hotpoint Service and Parts & Accessories.
Details the benefits of registering the appliance, including activating the 5-year parts guarantee.
| Clock type | Electronic |
|---|---|
| Control type | Buttons, Rotary |
| Product type | Freestanding cooker |
| Product color | Black |
| Control position | Front |
| Integrated clock | Yes |
| Oven size | Large |
| Noise level | - dB |
| Cleaning type | Catalytic |
| Number of ovens | 2 |
| Total oven power | - W |
| Oven power source | Natural gas |
| Oven gross capacity | 77 L |
| Total oven(s) interior capacity | 109 L |
| Oven 2 gross capacity | 32 L |
| Hob type | Gas |
| Pan support material | Enameled |
| Number of cooking zones | 4 zone(s) |
| Energy consumption (conventional) | - kWh |
| Width | 600 mm |
|---|---|
| Height | 900 mm |