Do you have a question about the HP BENCH Series and is the answer not in the manual?
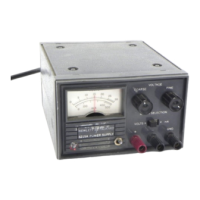
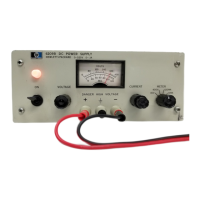
Power supply is transistorized, regulated, constant voltage/current limiting.
Detailed specifications for the power supply are given in Table 1-1.
Factory modifications of a standard instrument requested by the customer.
Accessories that may be ordered with the power supply or separately.
Identification of Hewlett-Packard power supplies by serial number.
Information on purchasing additional manuals for the power supply.
Inspect instrument for damage after unpacking and before returning.
Check for broken knobs, connectors, cabinet, and meter condition.
Check the instrument against electrical specifications and performance.
Instrument is shipped ready for bench operation; connect to power.
Ensure adequate space for air flow and avoid high ambient temperatures.
Figure 2-1 illustrates the outline shape and dimensions.
Instructions for mounting the instrument separately or with other supplies.
Specifies operating voltage range and input power requirements.
Procedures for converting the power supply for 230Vac operation.
Discusses the three-conductor power cable and grounding.
Recommendations for safe instrument shipment and packaging.
Step-by-step procedure to ensure the supply is operational after power-on.
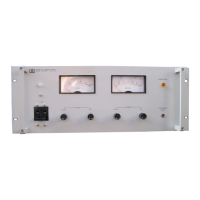
How to operate the supply as a single unit, in parallel, or series.
How to set the output voltage and check current limit.
Procedure to adjust the current limit using resistor R50.
Best practices for connecting loads to the output terminals.
Operation in the shaded area of the meter face.
Discusses series and parallel operation modes.
How to connect two or more supplies in series for higher voltage.
How to connect two or more supplies in parallel for higher current.
Topics like pulse loading and output capacitance.
How the supply handles pulse loading and crossover.
Role of internal and external capacitance in pulse operation.
Avoiding damage from active loads delivering reverse current.
Overview of the power supply's circuit components and function.
Describes the main circuit blocks of the power supply.
Explains the initial power conversion steps from AC to DC.
Protective function of diode CR14 against reverse voltage.
Refer to overall schematic diagram at rear of manual for detailed analysis.
How the feedback loop maintains constant output voltage and current.
Role of the series regulator transistor stage in maintaining voltage and current limits.
Circuit comparing reference voltage with output voltage for regulation.
Amplifies error signal to drive the series regulator transistor.
Circuit that limits output current when a preset level is reached.
Provides stable reference voltages for various parts of the unit.
Circuit that provides output voltage or current indications.
Guide to maintenance checks, troubleshooting, and repair procedures.
Step-by-step instructions for removing and reinstalling covers.
Proper techniques for accurate measurements with test equipment.
Lists the recommended test equipment for maintenance procedures.
Procedures for incoming inspection and periodic maintenance checks.
Checks for output voltage and current accuracy against specifications.
Defines and details how to test load regulation.
Defines and details how to test line regulation.
Test procedure for line regulation.
Definition of ripple and noise and measurement methods.
Discusses incorrect and correct methods for measuring ripple and noise.
Step-by-step guide to checking output ripple and noise.
Measurement of high frequency spikes requires specific equipment.
Definition of output impedance and its measurement.
Detailed procedure for measuring output impedance.
Section on checking current limiting characteristics.
Step-by-step procedure to check current limit.
Definition of transient recovery time and its measurement.
Conditions for measuring transient recovery time.
General approach and systematic method for troubleshooting.
General steps for analyzing faults and identifying problems.
Lists common symptoms and their probable causes.
Step-by-step troubleshooting for low output voltage issues.
Step-by-step troubleshooting for high output voltage issues.
Guidance on replacing components and referring to parts lists.
Instructions for repairing etched circuit boards.
When adjustments and calibration are required after tests or repairs.
Procedure to set the meter's mechanical zero.
Procedure to calibrate the ammeter.
Procedure to calibrate the output voltage to zero.
Procedure to adjust the current limit control R50.
Information on ordering replacement parts.
Lists abbreviations for reference designators used in the manual.
Instructions on how to order replacement parts.
Introduction to circuit diagrams, including location and schematic.
Diagram showing physical location and reference designators of parts.
Schematic illustrating the entire power supply circuitry with test points.
Explains how to adapt the manual for earlier instrument serial numbers.
Specific changes to be made in the Replaceable Parts List.
Instruction to update the component location diagram.
Specific change to be made to the Fuse Cartridge entry.
Updates to current limit values for specific models.
| Brand | HP |
|---|---|
| Model | BENCH Series |
| Category | Power Supply |
| Language | English |