EN
FR
IT
ES
PT
RU
DE
12
You have now nished the hardware assembly
and set-up of your printer. Now you are ready to
start the software set-up. Move on to stage 13.
Vous avez maintenant terminé l’assemblage du
matériel et l’installation de l’imprimante. Vous
êtes maintenant prêt à démarrer l’installation du
logiciel. Passez à l’étape 13 ci-dessous.
Le operazioni di assemblaggio dell’hardware e
di impostazione della stampante sono state com-
pletate. Ora è possibile avviare l’installazione
del software. Andare al passo 13.
Ihr Drucker ist nun einsatzbereit. Sie können jetzt
die Software einrichten. Fahren Sie mit Schritt 13
unten fort.
Ha terminado el montaje del hardware y la
conguración de la impresora. Ahora ya se
puede iniciar la conguración del software. Vaya
al paso 13 siguiente.
Você acaba de nalizar a montagem e a
conguração do hardware da impressora. Agora
você pode iniciar a conguração do software. Vá
para a etapa 13 a seguir.
Сборка и настройка аппаратной части
принтера завершена. Теперь можно
приступить к настройке программного
обеспечения. Переходите к шагу 13,
описанному ниже.
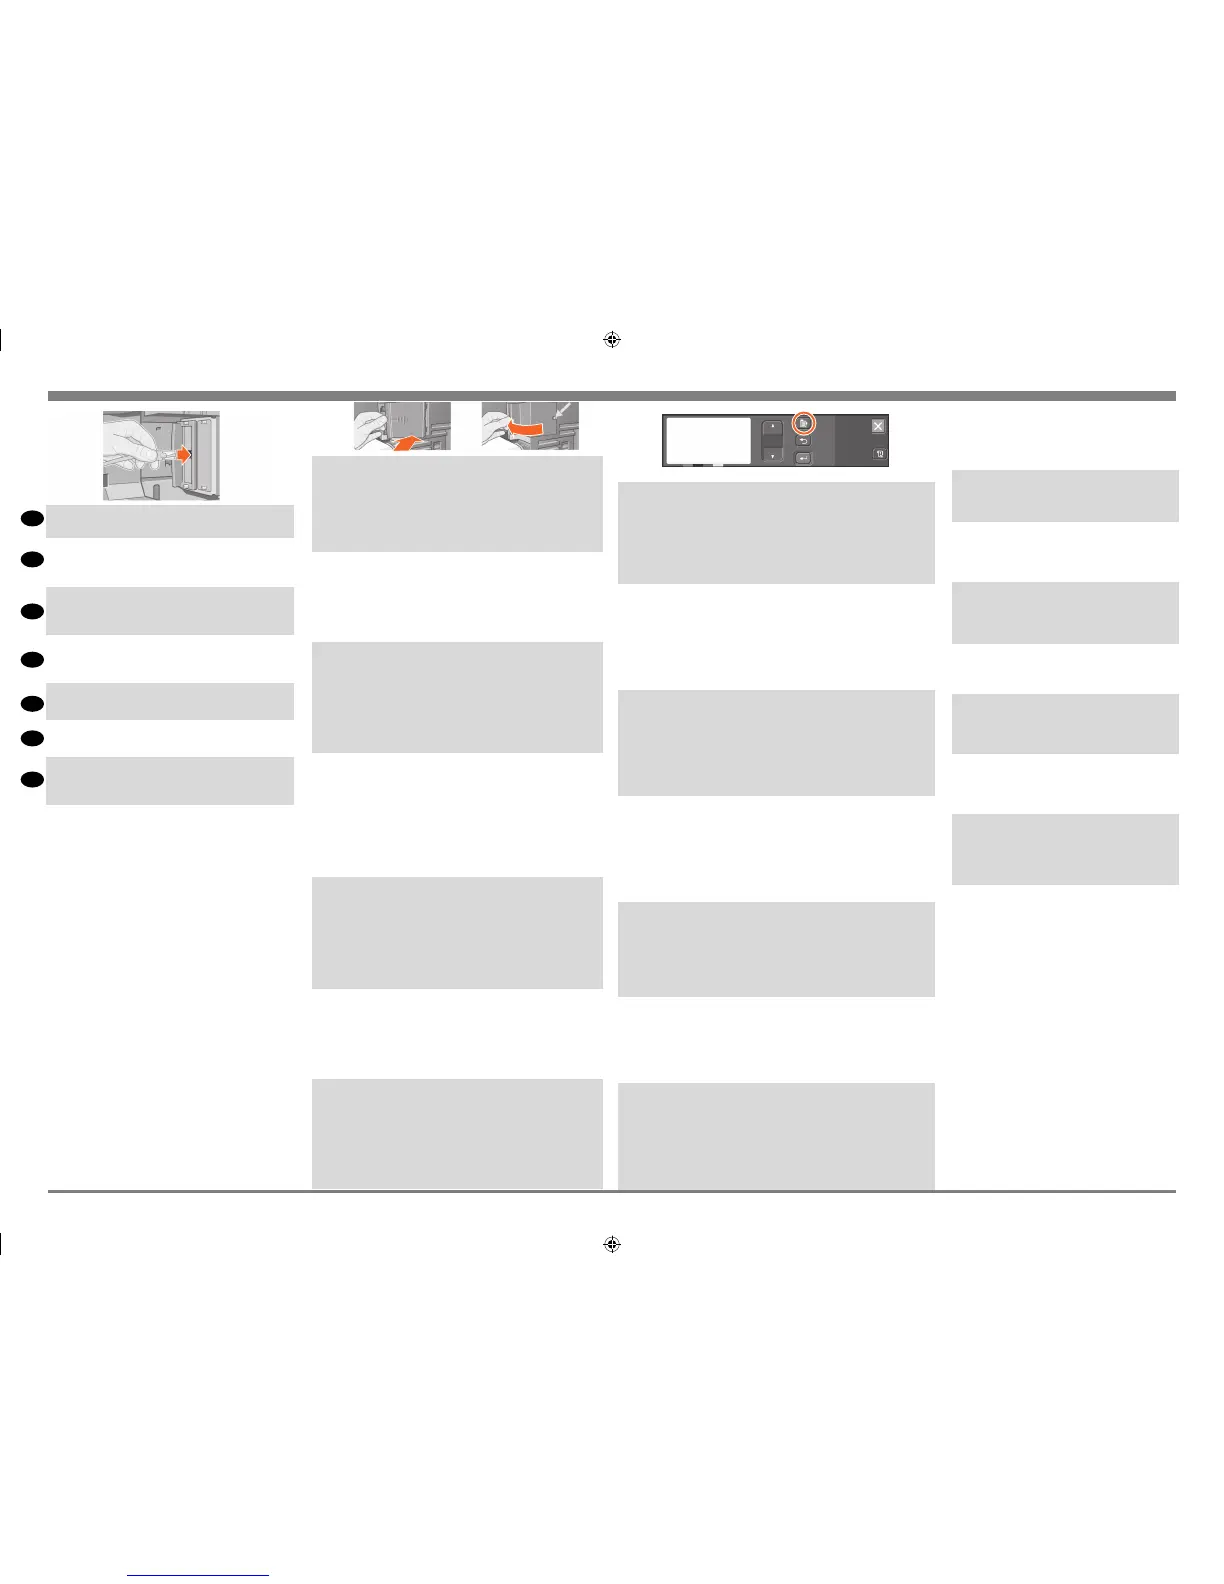
12:8
Network Printer: To obtain the information you’ll need when you install
the software:
• Go to the Set-up menu in the printer’s front panel.
• Select I/O Set-up and press Enter.
• Select Card ID and press Enter.
There you will nd the hardware address of your printer, as
MAC=xxxxxxxx.
You may also require an IP address or an AppleTalk name, for which
the software will prompt you.
Imprimante réseau :pour obtenir les informations nécessaires à
l’installation du logiciel :
• Accédez au menu Conguration du panneau avant de l’imprimante.
• Sélectionnez Conguration E-S et appuyez sur Entrée.
• Sélectionnez ID carte et appuyez sur Entrée.
L’adresse matérielle de l’imprimante s’afche, sous la forme
MAC=xxxxxxxx.
Il est également possible que le logiciel vous demande l’adresse IP ou le
nom AppleTalk de l’imprimante.
Stampante di rete. Per ottenere le informazioni necessarie quando si
installa il software:
• Andare al menu Install./congur. nel pannello frontale della stam-
pante
• Selezionare Congurazione scheda e premere Invio.
• Selezionare Scheda ID e premere Invio Vi è riporta to l’indirizzo
hardware della stampante, come ad esempio MAC=xxxxxxxx. Potrebbe
essere necessario anche un indirizzo IP o un nome AppleTalk, che
verranno chiesti dal software.
Netzwerkdrucker: Gehen Sie wie folgt vor, um Informationen zur Insta-
llation der Software zu erhalten:
• Wechseln Sie in der Bedienfeldanzeige des Druckers in das Setup-
Menü.
• Wählen Sie E/A-Setup, und drücken Sie Eingabe.
• Wählen Sie Karten-ID, und drücken Sie Eingabe. Dort nden Sie die
Hardware-Adresse Ihres Druckers im Format “MAC=xxxxxxxx”.
Sie benötigen ggf. eine IP-Adresse oder einen AppleTalk-Namen, die
Sie in der Software eingeben müssen.
Impresora de red: para obtener la información necesaria para instalar
el software:
• Vaya al menú Set-up (congurar) del panel frontal de la impresora.
• Seleccione I/O Set-up (congurar E/S) y presione Enter (Intro).
• Seleccione Card ID (Id. de tarjeta) y presione Enter (Intro). Aquí en-
contrará la dirección de hardware de la impresora, como por ejemplo,
MAC=xxxxxxxx. Es posible que también necesite una dirección IP o un
nombre AppleTalk, en cuyo caso el software se lo pedirá.
Impressora em rede: Para obter as informações necessárias quando
instalar o software:
• Vá ao menu Congurar, painel frontal da impressora.
• Selecione Congurar E/S e pressione Enter.
• Selecione ID Placa e pressione Enter. Lá você vai encontrar o ende-
reço de hardware da impressora, como MAC=xxxxxxxx.
O software também pode pedir um endereço IP ou um nome AppleTalk.
Сетевой принтер. Для настройки сетевых возможностей принтера
потребуется следующая информация.
• На дисплее панели управления принтера перейдите в меню Set-up
(настройка).
• Выберите I/O Set-up (настройка ввода-вывода) и нажмите Enter.
• Выберите Card ID (идентификатор платы) и нажмите Enter. Будет
показан аппаратный адрес принтера (МАС=хххххххх). При
установке программного обеспечения может также потребоваться
IP-адрес и имя порта AppleTalk.
12:6
Insert the LAN cable into the LAN card–it is simply
pushed into place with a click.
Raccordez le câble réseau à la carte réseau. Pour ce
faire, insérez-la dans la prise jusqu’à ce qu’un déclic
se fasse entendre.
Inserire il cavo di rete nella sche da di rete– basta
semplicemente spingerlo in posizione nché si
avverte un clic.
Schließen Sie das Netzwerkkabel an der
Netzwerkkarte an. Dies müssen Sie einfach in den
Anschluß hineindrücken. Das Kabel rastet hörbar ein.
Introduzca el cable LAN en la tarjeta LAN; no hay
más que introducirlo hasta que quede encajado.
Insira o cabo de LAN na placa de LAN – basta
colocá-lo no lugar com um clique.
Подсоедините кабель ЛВС к сетевой плате. Разъем
кабеля должен со щелчком зафиксироваться в
разъеме платы.
12:7
Carefully replace the plastic cover by clipping it back into place:
a. Put the two hinge clips on the side that has the edge cable-hole
into their slots.
b. Swivel the cover in the direction opposite to the embossed
arrow and clip the other two tabs on the opposite side into their
slots. Ensure that the LAN cable passes correctly through the edge
cable-hole (shown by the yellow arrow) and avoids touching the
roll of paper on the spindle.
Remettez délicatement en place le capot en plastique :
a. Insérez les deux tenons dans leur rainure respective, du côté de
l’orice de sortie du câble.
b. Faites glisser le capot dans la direction inverse de la èche
en relief et enclenchez les deux autres languettes situées du côté
opposé. Vériez que le câble de connexion passe par l’orice
prévu (signalé par la èche jaune). Evitez de toucher au.
Riposizionare con cura il coperchio di plastica ssandolo in
posizione:
a. Mettere i due fermi a cerniera sul lato che ha il foro per il cavo
nei relativi alloggiamenti.
b. Far ruotare il coperchio nella direzione opposta alla freccia in
rilievo e ssare le altre due linguette sul lato opposto, nei relativi
vani. Controllare che il cavo di rete passi attraverso il foro per i
cavo (indicato dalla freccia gialla) ed evitare che tocchi il rotolo
di carta sull’alberino.
Bringen Sie die Kunststoffabdeckung vorsichtig an. Sie muß
wieder einrasten:
a. Setzen Sie die beiden Scharnierklammern an der Seite mit der
Kabelöffnung in ihren Vertiefungen ein.
b. Klappen Sie die Abdeckung in die entgegengesetzte Richtung
des eingeprägten Pfeils, und setzen Sie die beiden Stifte auf der
gegenüberliegenden Seite in ihre Vertiefungen ein. Vergewissern
Sie sich, daß das Netzwerkkabel korrekt durch die Kabelöffnung
verlegt ist (durch den gelben Pfeil markiert) und nicht mit der
Spindel kollidiert.
Vuelva a colocar cuidadosamente la cubierta de plástico enca-
jándola en su lugar:
a. Coloque las dos bisagras de sujeción del lado que tiene el ori-
cio para el cable en el borde en las ranuras correspondientes.
b. Gire la cubierta en el sentido opuesto a la echa grabada y
encaje las otras dos pestañas del lado opuesto en sus ranuras.
Compruebe que el cable LAN pase correctamente por el oricio
para el cable en el borde (mostrado con la echa amarilla) y que
no entre en contacto con elrollo de papel del eje.
Com cuidado, encaixe de novo a tampa de plástico no lugar:
a. Coloque nos slots os dois encaixes da dobradiça do lado que
tem a borda com orifício para o cabo.
b. Gire a tampa na direção oposta à seta e prenda as outras
duas lingüetas nos slots, no lado oposto. Veja se o cabo de LAN
está passando direito pelo orifício para o cabo na borda (seta
amarela) e se não está tocando o rolo de papel no cilindro.
Аккуратно установите на место пластмассовую крышку.
a. Вставьте два выступа, расположенные возле отверстиядля
кабеля, в соответствующие пазы.
b. Поверните крышку в направлении, противоположном
указанному стрелкой на
крышке, и вставьте два выступа с другой стороны крышки в
соответствующие пазы. Убедитесь, что кабель ЛВС свободно
проходит через отверстие, показанное желтой стрелкой, и не
касается рулона бумаги.
emea1.indd 21 9/30/2010 4:05:55 PM

 Loading...


