X4
180°
EN
FR
IT
ES
PT
RU
DE
3:4
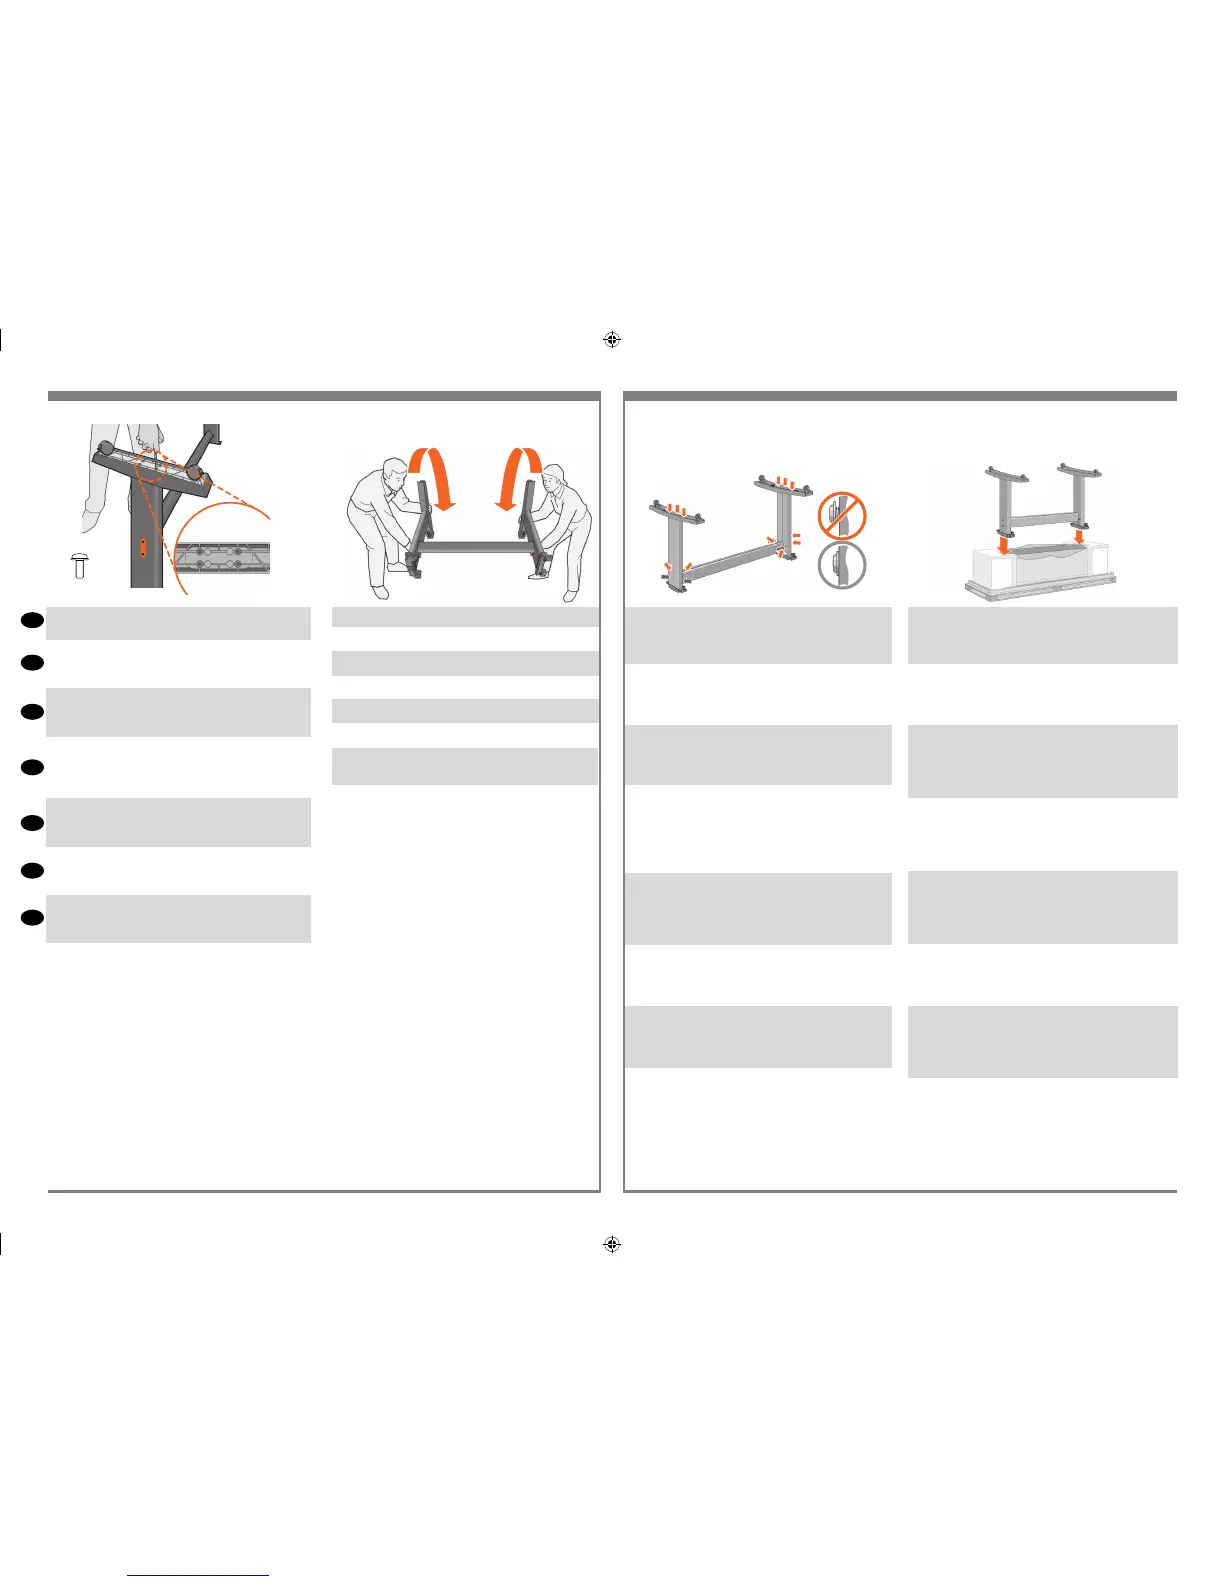
Attach a foot to each leg, using four screws in each foot.
First t all four screws loosely, then tighten them up.
Fixez un pied à chaque montant, en utilisant quatre vis pour
chaque pied. Fixez d’abord les quatre vis de manière lâche,
puis serrez-les.
Fissare un piedino a ciascun piede utilizzando quattro viti
per ciascuno. Avvitare dapprima tutte e quattro le viti non
completamente, quindi stringerle.
Befestigen Sie an jedem Standbein einen Fuß. Sie benötigen
dabei für jeden Fuß vier Schrauben. Drehen Sie alle vier
Schrauben zunächst nur locker ein, und ziehen Sie sie dann
der Reihe nach fest.
Fije los pies a las patas utilizando cuatro tornillos en cada
pie. Primero, ajuste los cuatro tornillos sin apretar y después,
apriételos.
Fixe o pé em cada uma das pernas usando quatro parafusos
para cada pé. Primeiro, posicione os quatro parafusos
deixando-os soltos e depois aperte-os.
Прикрепите к каждой стойке ножку четырьмя винтами.
Сначала неплотно вверните все четыре винта, а затем
затяните их накрепко.
3:5
Turn the stand upright.
Placez le support en position verticale.
Girate il piedistallo in posizione verticale.
Stellen Sie den Ständer aufrecht.
Ponga de pie el soporte.
Vire o suporte para cima.
Переверните основание, установив его в вертикальное
положение.
4:1
Check that all the stand screws are tight. If you can’t
tighten all the screws properly, try unscrewing one or
two so that the legs, feet and cross braces are properly
aligned, and then retighten them.
Vériez que les vis du socle sont serrées. Si vous ne par-
venez à serrer toutes les vis, dévissez-en une ou deux pour
que les montants, les pieds et les traverses soient alignés,
puis resserrez les vis.
Controllare che tutte le viti siano ssate. Se non si riesce
a stringere tutte le viti, provare a svitarne una o due in
modo che le gambe, i piedi e i braccetti trasversali siano
allineati, quindi stringerle di nuovo.
Vergewissern Sie sich, daß alle Schrauben an der
Aufstellvorrichtung fest angezogen sind. Wenn nicht alleS-
chrauben korrekt angezogen werden können, lösen Sie
eineoder zwei Schrauben, so daß Standbeine, Füße und
Querverstrebungen korrekt ausgerichtet werden können.
Ziehen Sie dann die Schrauben wieder fest.
Compruebe que todos los tornillos están apretados. Si no
puede apretar todos los tornillos adecuadamente, intente
desatornillar uno o dos, de forma que las patas, las bases
y las abrazaderas cruzadas estén correctamente alinea-
das; a continuación, vuelva a apretarlos.
Veja se todos os parafusos estão apertados. Se não puder
apertar os parafusos totalmente, tente soltar um ou os dois
para que os pedestais, pés e suportes em cruz quem
alinhados e aperte-os de novo.
Убедитесь, что все винты закручены полностью. Если все
винты закрутить не удается, открутите несколько винтов
и выровняйте ножки, боковые стойки и перекладины.
Затем закрутите все винты на место.
4:2
Put the stand assembly onto the printer. Peel open the
protective cover and then place the stand onto the printer.
Looking at the front of the printer, rst place the leg marked
in green on the right-hand side.
Placez le socle sur l’imprimante. Retirez le lm protecteur
et placez le socle sur l’imprimante. En regardant l’avant de
l’imprimante, placez d’abord le support marqué en vert du
côté droit.
Collocare il gruppo del supporto sulla stampante. Staccare
la copertura di protezione e collocare il supporto sulla
stampante. Ponendovi davanti alla parte frontale della
stampante, per prima cosa posizionare il piede stabilizza-
tore contrassegnato in verde sul lato destro.
Setzen Sie die Aufstellvorrichtung auf dem Drucker auf.
Ziehen Sie die Schutzabdeckung ab, und setzen Sie die
Aufstellvorrichtung auf dem Drucker auf. Platzieren Sie
zunächst das grün markierte Bein auf der rechten Seite (von
vorne gesehen).
Coloque el soporte sobre la impresora. Despegue la
cubierta protectora y, a continuación, coloque el soporte
sobre la impresora. Desde la parte frontal de la impresora,
coloque primero la pata marcada en verde en la parte
derecha.
Coloque o suporte na impressora. Abra a tampa protetora
e, em seguida, coloque o suporte na impressora. Desde
la parte frontal de la impresora, coloque primero la pata
marcada en verde en la parte derecha.
Установите на принтер собранные ножки. Снимите
защитное покрытие и установите на принтер собранные
ножки. Повернувшись лицом к передней панели
принтера, сначала разместите ножку, отмеченную
зеленым, на правой стороне.
3 4 Attach the Stand to the printer / Installation du socle sur l’imprimante / Installation du socle sur
l’imprimante / Montare il supporto sulla stampante / Anbringen der Aufstellvorrichtung am Drucker /
Conectar el soporte a la impresora / Prender o suporte à impressora / Монтаж ножек принтера
emea1.indd 5 9/30/2010 4:05:48 PM

 Loading...


