GETTING STARTED
2
Setting Up the HP34401A
1. Get all lab supplies ready for use.
q HP34401A Digital Multimeter
q Probes Leads (found hanging in wall racks)
q Alligator Clips for Lead ends
q Breadboard and circuit components (if needed)
2. Turn on the Multimeter.
The front panel display will light up while the meter performs the power-on self –test. After
this is complete, the HP34401A is ready to perform measurements.
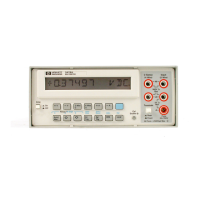
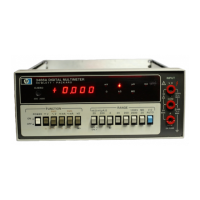
Overview of Controls
The front panel has two rows of keys for selecting the functions. The right side of the panel
contains various probe input locations of which the selection is dependent upon the
characteristic being measure (Figure 1). The selection keys are annotated in black and blue. To
select a function in blue, first select the blue SHIFT key.
Section
Function Button Panel: DC V or I
I, Resistance (ohm’s) and Freq
Probe Input Panel
Figure 1. Overview of front panel [1]