Do you have a question about the HP 3457A and is the answer not in the manual?
Describes symbols used on products and in manuals, including their meanings and applications.
Provides an overview of the manual's content, covering installation, operation, performance testing, calibration, and service.
Details the manual's layout and content, outlining the structure of its various sections.
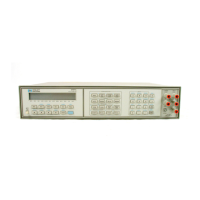
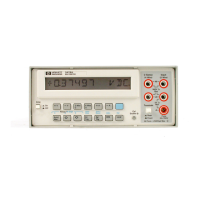
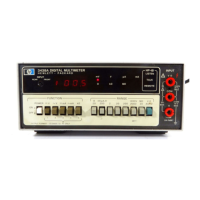
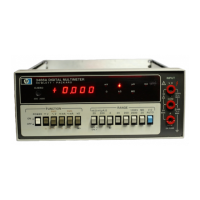
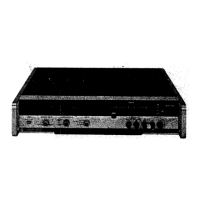
Describes the HP 3457A multimeter's capabilities, including measurement functions and features like high-speed applications.
Highlights critical safety precautions and warnings for operating and servicing the instrument.
Lists the performance standards and specifications that the instrument is guaranteed to meet.
Details the available options and accessories that can be used with the HP 3457A multimeter.
Lists the necessary test equipment required for calibrating and repairing the HP 3457A multimeter.
Introduces installation procedures, including initial inspection, power requirements, and repackaging instructions.
Provides guidelines for inspecting the instrument for mechanical and electrical condition upon receipt.
Covers essential preparation steps before using the instrument, including power and fuse selection.
Explains how to select the appropriate line voltage switches and fuse requirements for different power line voltages.
Details the grounding requirements to protect personnel from shock hazards by grounding the instrument cabinet.
Describes interface connections, focusing on the HP-IB interface for system integration.
Explains the control interface, specifically the HP-IB compatibility and system connection methods.
Details how to set the HP-IB address, both from the front panel and via the interface bus.
Provides step-by-step instructions for changing the HP-IB address using the front panel controls.
Explains how to change the HP-IB address of the instrument using an external controller.
Covers the installation of optional plug-in assemblies, including configuration and wiring.
Provides instructions for removing the rear terminal assembly prior to installing plug-in assemblies.
Details the procedure for installing plug-in assemblies, including connecting the wiring harness.
Explains how to configure plug-in assemblies, dependent on the specific assembly and user application.
Describes the configuration options for the HP 44491A Armature Relay Assembly.
Details the configuration options for the HP 44492A Reed Relay Multiplexer Assembly.
Outlines the procedures for preparing the wiring block for plug-in assembly installation.
Introduces the manual operation section, focusing on front panel operations for service personnel.
Provides general information on operating the HP 3457A multimeter.
Explains how to perform manual voltage measurements, including function and range selection.
Details how to select measurement functions like DC Volts, AC Volts, and DC Coupled AC Volts.
Describes how to select measurement ranges, including Auto-Range and Manual Ranging features.
Explains how to change the measurement resolution by selecting the number of digits displayed.
Details how to change the integration time to reduce noise or permit faster readings.
Covers manual resistance measurements, including function and range selection.
Explains how to select measurement functions for resistance, including 2-Wire and 4-Wire Ohms.
Describes how to select resistance measurement ranges, including Auto-Range and Manual Ranging.
Explains how to change measurement resolution by selecting the number of digits displayed.
Covers manual current measurements, including function and range selection.
Details how to select measurement functions for current: DC Current, AC Current, and DC Coupled AC Current.
Explains manual measurements for frequency and period, including function and range selection.
Details how to select measurement functions for frequency and period.
Describes how to set up automatic scanning to take and store measurements from multiple channels.
Details the process for setting up automatic scanning to measure inputs and store results.
Explains the function keys used to select the type of measurement for the instrument.
Describes the annunciators across the display that indicate the instrument's operating conditions.
Details the 12-character alphanumeric LCD display used for readings and messages.
Explains how to set instrument parameters and configure operating settings using configuration keys.
Describes the input terminals for voltage, resistance, and current measurements.
Introduces performance tests designed to verify the accuracy of the HP 3457A multimeter.
Lists the equipment required for performing performance and operational verification tests.
Details the procedures for testing the DC voltage measurement capabilities of the instrument.
Describes the procedure for testing the DC voltage function's offset, requiring a low thermal short.
Explains the procedure for testing the DC voltage function's gain, requiring a DC voltage standard.
Outlines the procedures for testing the AC voltage measurement capabilities of the instrument.
Details the procedure for testing the AC voltage function's gain, requiring an AC signal source.
Explains the procedure for testing the AC voltage function's frequency response using an AC signal source.
Details the procedures for testing the DC current measurement capabilities of the instrument.
Describes the procedure for testing the DC current function's offset, requiring no specific test equipment.
Explains the procedure for testing the DC current function's gain, requiring a DC current source.
Outlines the procedures for testing the AC current measurement capabilities of the instrument.
Details the procedure for testing the AC current function's gain, requiring an AC current source.
Covers the procedures for testing the 2-Wire Ohms measurement capabilities.
Describes the procedure for testing the 2-Wire Ohms function's offset, requiring a low thermal short.
Explains the procedure for testing the 2-Wire Ohms function's gain, requiring resistance standards.
Details the procedures for testing the 4-Wire Ohms measurement capabilities.
Describes the procedure for testing the 4-Wire Ohms function's offset, requiring a low thermal short.
Explains the procedure for testing the 4-Wire Ohms function's gain, requiring resistance standards.
Covers the procedures for testing the frequency counter measurement capabilities.
Details the procedure for testing the frequency counter's accuracy using a frequency source.
Outlines performance tests for the instrument's rear input terminals.
Describes testing the DC voltage function's rear terminal offset, requiring a low thermal short.
Details testing the DC current function's rear terminal offset, requiring no specific test equipment.
Describes testing the 2-Wire Ohms function's rear terminal offset, requiring a low thermal short.
Explains testing the 4-Wire Ohms function's offset, requiring a low thermal short.
Outlines performance tests for the 44491A General Purpose Relay Assembly rear inputs.
Details testing the DC voltage function's offset for the 44491A assembly, requiring shorting wires.
Provides limits for testing the 2-Wire Ohms function's offset on the 44491A assembly.
Lists limits for testing the 4-Wire Ohms function's offset on the 44491A assembly.
Provides limits for testing the DC current function's offset on the 44491A assembly.
Outlines performance tests for the 44492A 10 Channel Multiplexer Assembly rear inputs.
Details testing the DC voltage function's offset for the 44492A assembly, requiring shorting wires.
Lists limits for testing the 2-Wire Ohms function's offset on the 44492A assembly.
Covers verification tests for DC voltage measurements, including offset and gain.
Details the procedure for testing the DC voltage function's offset during operational verification.
Explains the procedure for testing the DC voltage function's gain during operational verification.
Outlines verification tests for AC voltage measurements, including gain and frequency response.
Details the procedure for testing the AC voltage function's gain during operational verification.
Explains the procedure for testing the AC voltage function's frequency response during verification.
Covers verification tests for DC current measurements, including offset and gain.
Describes the procedure for testing the DC current function's offset during operational verification.
Explains the procedure for testing the DC current function's gain during operational verification.
Outlines verification tests for AC current measurements, focusing on gain.
Details the procedure for testing the AC current function's gain during operational verification.
Covers verification tests for 2-Wire Ohms measurements, including offset and gain.
Describes the procedure for testing the 2-Wire Ohms function's offset during verification.
Explains the procedure for testing the 2-Wire Ohms function's gain during verification.
Outlines verification tests for 4-Wire Ohms measurements, including offset and gain.
Details the procedure for testing the 4-Wire Ohms function's offset during verification.
Explains the procedure for testing the 4-Wire Ohms function's gain during verification.
Covers verification tests for the frequency counter measurement capabilities.
Details the procedure for testing the frequency counter's accuracy during verification.
Outlines performance tests for the standard instrument's rear input terminals.
Describes testing the DC voltage function's rear terminal offset during verification.
Details testing the DC current function's rear terminal offset during verification.
Describes testing the 2-Wire Ohms function's rear terminal offset during verification.
Explains testing the 4-Wire Ohms function's offset during verification.
Introduces the manual calibration procedures for the HP 3457A multimeter.
Explains the calibration security feature that prevents unauthorized calibration.
Provides the procedure for changing the security code to prevent accidental calibration.
Outlines essential steps to perform before calibrating the HP 3457A multimeter.
Details the adjustment procedure for the input amplifier offset, required for specific self-test errors.
Explains the adjustment for AC convertor frequency response, needed for specific self-test errors.
Covers calibration procedures for offset and gain using front panel inputs.
Details the procedure for calibrating the DC volts offset using front panel terminals.
Explains the procedure for calibrating the DC volts gain using front panel terminals.
Details the procedure for calibrating the 2-Wire Ohms offset using front panel terminals.
Explains the procedure for calibrating the 2-Wire Ohms gain using front panel terminals.
Details the procedure for calibrating the 4-Wire Ohms offset using front panel terminals.
Explains the procedure for calibrating the 4-Wire Ohms gain using front panel terminals.
Details the procedure for calibrating the DC current offset using front panel terminals.
Explains the procedure for calibrating the DC current gain using front panel terminals.
Details calibrating AC volts offset and gain using front panel terminals.
Explains calibrating AC current offset and gain using front panel terminals.
Details calibrating the frequency function using front panel terminals.
Covers calibration procedures for the instrument's rear panel inputs.
Details calibrating DC volts offset for rear terminals on the standard instrument.
Explains calibrating 2-Wire Ohms offset for rear terminals on the standard instrument.
Details calibrating 4-Wire Ohms offset for rear terminals on the standard instrument.
Explains calibrating DC current offset for rear terminals on the standard instrument.
Covers calibration procedures specific to the HP 44491A General Purpose Relay Assembly.
Outlines the procedures for preparing the wiring block before calibration for the 44491A assembly.
Details calibrating DC volts offset for the HP 44491A assembly.
Explains calibrating 2-Wire Ohms offset for the HP 44491A assembly.
Details calibrating 4-Wire Ohms offset for the HP 44491A assembly.
Explains calibrating DC current offset for the HP 44491A assembly.
Covers calibration procedures for the HP 44492A 10 Channel Multiplexer Assembly.
Outlines procedures for preparing the wiring block before calibration for the 44492A assembly.
Details calibrating DC volts offset for the HP 44492A assembly.
Explains calibrating 2-Wire Ohms offset for the HP 44492A assembly.
Introduces the section on ordering replacement parts for the instrument.
Provides information on how to order listed and non-listed parts, including direct mail order system.
Explains procedures for removing and replacing cabinet parts and circuit assemblies.
Details the steps for removing the rear terminal assembly from the instrument.
Provides instructions for removing optional plug-in assemblies from the instrument.
Explains the procedure for removing the top cover of the instrument.
Details the steps for removing the display assembly from the instrument.
Provides instructions for removing the digital assembly (A1 or A11) from the instrument.
Explains how to remove the plug-in support assembly from the instrument.
Details the procedure for removing the AC convertor (A3) assembly.
Provides instructions for removing the analog assembly (A2) from the instrument.
Explains the procedure for removing the front panel assembly from the instrument.
Introduces the section on manual changes, noting its purpose for adapting the manual to older instruments.
Introduces the service section, covering troubleshooting, repair, safety, and theory of operation.
Highlights safety considerations for servicing the instrument, emphasizing adherence to manual warnings.
Provides essential guidelines for handling components safely to prevent electrostatic discharge (ESD) damage.
Lists the recommended test equipment required for testing and repairing the HP 3457A.
Provides a simplified explanation of the HP 3457A's circuit operation, divided into sections.
Offers a detailed description of the HP 3457A's operating circuitry, explaining each section.
Explains the purpose and operation of the input circuitry in conditioning input signals for the A/D converter.
Details the circuitry that protects the instrument from over voltage and over current conditions.
Describes the input switching circuitry, consisting of relays and MOSFET switches for signal routing.
Explains the offset DAC section responsible for providing bipolar voltage output for calibration.
Details the pre-charge stage for input capacitance and the offset adjustment procedure.
Describes the input amplifier's purpose in conditioning input signals and its block structure.
Explains the purpose of the Ohms Current Source in providing stable current for resistance measurements.
Details the Ohms Voltage Reference circuit used for precise and stable ohms function measurements.
Describes the switch amplifier used to enable range resistors for output current value selection.
Explains the output FET Gate Bias Amplifier's role in the voltage-to-current converter.
Details the offset compensation technique used to remove errors in ohms measurements.
Describes the A/D Analog section, including the Integrator, Slope Amplifier, and Auto-Zero Loop.
Explains the function of the integrator in accumulating charge for measurement and nulling.
Describes the slope amplifier's role in amplifying smaller slopes for improved resolution.
Details the DA compensation circuit used to minimize linearity errors from integrator capacitor DA.
Explains the function of the analog auto-zero loop in achieving precision A/D performance.
Describes the precision voltage reference assembly used for maintaining long-term accuracy.
Discusses the A/D Controller circuitry, its functions, and divisions.
Explains how the A/D input signal is integrated and controlled during conversion cycles.
Describes the AC assembly's front end for frequency measurements and its ranging capability.
Explains the role of the floating common MPU in controlling the Analog Section's measurement dynamics.
Details the cross-isolation link for precision floating measurements, achieved via opto-isolators.
Discusses the main controller assembly's functions in managing measurements and communication.
Explains the procedure for reading instructions from ROM U503 via the microprocessor.
Details the procedure for reading information from RAM U506 via the microprocessor.
Explains how to read information from RAM U511 via the microprocessor.
Details the procedure for storing information into RAM U506 via the microprocessor.
Explains writing to the unprotected section of RAM U511 via the microprocessor.
Details writing to the protected section of RAM U603, including CAL-RAM lock operation.
Explains the purpose and conditions for the microprocessor reset circuit operation.
Describes the AC to DC converter's function in converting AC signals to DC voltage for measurement.
Explains how the AC input signal is routed to the AC to DC Converter assembly.
Details the two input attenuators used to condition the AC input signal for measurement.
Describes the AC converter amplifier's two-stage design for providing input voltage to the RMS converter.
Explains the RMS converter's function in converting AC signals to DC voltage with high performance.
Details DC offset correction for ACV function measurements to reduce measurement errors.
Describes the comparator selected for frequency or period functions to direct the AC signal.
Explains the automatic calibration function (ACAL) for compensating DC offsets and frequency response.
Describes the auto-zero process performed at the beginning of each automatic calibration routine.
Details frequency response compensation for AC measurements using RC attenuators.
Explains the auto-calibration procedure for the Ohms Precharge Amplifier, similar to Self Test 9.
Describes the auto-calibration for extended ohms ranges, focusing on measurement and checking values.
Provides discussion on the 44491A General Purpose Relay Card's functions and circuitry.
Explains the control circuitry for the relays, driven by shift registers and logic gates.
Details the matrix scheme of row and column drivers used to control the card's relays.
Describes the two types of relays used in the 44491A and their contact configurations.
Explains the operation of channel 0, including relay configuration and signal paths.
Describes how users can configure different channels and components on the circuit board.
Provides discussion on the 44492A 10 Channel Reed Multiplexer's capabilities and ID line.
Details the procedure for closing a channel on the instrument's inguard controller.
Provides information to assist in isolating failures to the component level on the multimeter module.
Discusses special configurations like Self Test, Diagnostic, and Autocal modes.
Describes how to interpret front panel display messages indicating Al assembly faults.
Explains how failures in A2/A3 assemblies are detected via TEST FAILED and error annunciator.
Details the two categories of self tests: power-on and keyboard executable.
Describes the abbreviated self test executed at instrument power-on for fundamental hardware checks.
Explains the execution of 7 additional self tests using the TEST command.
Details updated self tests for the Main Controller assembly, including ROM and RAM checks.
Explains the Autocal routine for calibrating AC amplifier DC offset and Attenuator Flatness.
Details the auto-calibration procedure for the AC amplifier's DC offset.
Explains the auto-calibration for AC amplifier's attenuator flatness.
Describes the auto-calibration for the Ohms Precharge Amplifier, similar to Self Test 9.
Explains the auto-calibration for extended ohms ranges, focusing on measurement and checking values.
Provides procedures for verifying faulty operation or finding failed components on plug-in cards.
Troubleshooting steps for when the instrument does not work with the 44491A card installed.
Troubleshooting steps for when the instrument does not work with the 44492A card installed.
References Section VI for procedures on removing and replacing PC assemblies.
Notes references to HP, now Agilent Technologies, and potential manual copy inconsistencies.
Provides information about the manual's availability on the Agilent website and potential quality issues.
Informs users that Agilent no longer sells or supports the product, directing them to the website for information.
| Model | 3457A |
|---|---|
| Category | Multimeter |
| Type | Digital Multimeter |
| DC Voltage Range | 100 mV to 1000 V |
| AC Voltage Frequency Range | 10 Hz to 1 MHz |
| Manufacturer | Hewlett-Packard |
| Interface | IEEE-488 |