2-7
Installing the Switch
Installation Procedures
2. Check the LEDs on the switch as described below.
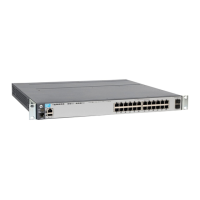
Figure 2-3. Example of an HP E3800 24-port non-PoE switch
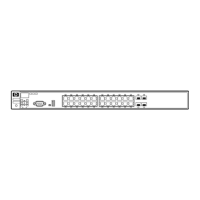
Figure 2-4.Example of an HP E3800-48-port PoE+ switch
When the switch is powered on, it performs its diagnostic self test and
initialization. This boot process takes approximately 50 seconds to
complete.
LED Behavior:
During the switch boot:
• The Power, Fault, Test, and Locator LEDs, other Staus LEDs, Mode
indicator LEDs, and port LEDs are on for most of the duration of the
test.
• Most of the LEDs go off and may turn on again during phases of the
boot.
When the switch boots successfully, Staus LEDs display:
• Power and Tmp LEDs (and the PoE LED for PoE+ switches) remain on.
• Fault, Test, and Locator LEDs are off.
• Other status LEDs may be on or off depending on the switch
configuration and the hardware installed.
Switch port LEDs
Power and
Fault LEDs
Test LED
Switch port LEDs
Power and
Fault LEDs
Test LED
 Loading...