Do you have a question about the HP ProBook 440 G0 and is the answer not in the manual?
Identifies and describes external display components and their functions.
Details components on the top surface, including the touchpad and its buttons.
Explains the meaning of various indicator lights like power, wireless, and caps lock.
Identifies the power button, wireless button, speaker mute, and fingerprint reader.
Describes the function of specific keys: Fn, Windows, Num Lock, Esc, and function keys.
Identifies components on the front: hard drive light and media card reader.
Details ports and vents on the left side: power connector, vents, monitor port, RJ-45, HDMI, USB.
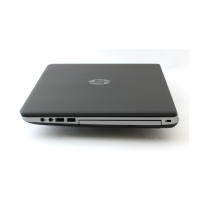
Identifies components on the right side: audio jacks, USB ports, optical drive, and security cable slot.
Explains the importance of service tag and PCID label for system identification and support.
Lists and illustrates main internal components with their spare part numbers.
Details individual parts of the display assembly, including bezels and panels.
Lists parts included in the plastics kit, such as protective inserts.
Illustrates and lists the various cables included in the cable kit.
Details specifications and part numbers for hard drives and optical drives.
Lists other parts like AC adapters, power cords, and screw kits.
Provides a detailed list of parts with part numbers and CSR flags.
Lists the necessary tools for performing component removal and replacement.
Provides important guidelines and precautions for disassembly and assembly.
Cautionary advice on handling plastic parts to avoid damage during disassembly.
Guidelines for safely handling and routing cables and connectors during service.
Precautions for handling fragile storage drives to prevent damage or data loss.
Information on preventing electrostatic discharge (ESD) damage to components.
Guidelines for safely packaging and transporting electronic components.
Recommendations for setting up a proper workstation to prevent static discharge.
Details on grounding equipment like wrist straps and floor mats for ESD prevention.
General instructions for successfully accessing and replacing customer self-repairable parts.
Step-by-step guide for removing and installing the laptop battery.
Procedure for removing the service door to access internal components.
Instructions on how to use the optional security screw for the service door.
Detailed steps for removing and replacing the computer's hard drive.
Procedure for removing and replacing the optical drive.
Instructions for updating or replacing memory modules, including BIOS update advice.
Steps for removing and replacing the wireless communication card.
Guide for removing and replacing the wireless wide area network module.
Detailed procedure for removing and replacing the computer keyboard.
Note that components in this chapter are for authorized service providers only.
Procedure for replacing the RTC battery in models without WWAN.
Steps for removing the top cover, including dealing with rubber screw covers.
Procedure for replacing the RTC battery in WWAN models, requiring system board removal.
Guide for removing and replacing the fan and heat sink assembly.
Detailed instructions for removing and installing the CPU, including thermal material.
Steps to remove the entire display assembly, including antennas and hinges.
Procedure for removing and replacing the internal speaker components.
Guide for removing and replacing the fingerprint reader assembly.
Steps for removing and replacing the power button board.
Procedure for removing and replacing the function board.
Steps for removing and replacing the memory card reader board.
Guide for removing and replacing the USB and audio input/output board.
Detailed instructions for removing and replacing the main system board.
Procedure for removing and replacing the internal power cable.
Steps for removing and replacing the battery cable.
Guide to accessing and navigating BIOS settings for system configuration.
Instructions to reset BIOS settings to their original factory defaults.
Information on how to check for and install BIOS updates from HP's website.
How to check the current BIOS version for update compatibility.
Steps for downloading the latest BIOS update package from HP's website.
Explains options for managing boot order and selecting boot devices.
Guide to running diagnostic tests for hardware functionality.
Guide to accessing and navigating BIOS settings for system configuration.
Instructions on how to change the display language within the Setup Utility.
Methods for navigating menus and making selections within the Setup Utility.
How to view system time, date, and other identification information in Setup Utility.
Steps to reset all Setup Utility settings to their original factory defaults.
Methods for exiting the Setup Utility, with or without saving changes.
Information on obtaining and installing BIOS updates.
How to check the current BIOS version for update compatibility.
Step-by-step instructions for downloading BIOS updates from HP's website.
Guide to running diagnostic tests for hardware functionality.
Guide to BIOS settings and navigation for SUSE Linux.
Instructions for resetting BIOS settings to factory defaults on SUSE Linux.
Information on obtaining and installing BIOS updates for SUSE Linux.
How to check the current BIOS version on SUSE Linux.
Guide to running hardware diagnostics on SUSE Linux.
Steps for backing up files and creating system repair media for Windows 8.
Methods for recovering the system using Windows tools or f11 recovery.
Instructions for recovery using purchased Windows 8 OS and driver media.
Guide to using Windows Refresh to restore the PC without affecting files.
Procedure to reset the PC to original state by removing all data and reinstalling Windows.
How to use HP Software Setup to reinstall drivers or corrupted software.
Guide to creating recovery DVDs using HP Recovery Disc Creator software.
Steps for creating Windows or Driver recovery media using the optical drive.
Instructions for backing up data and creating system repair discs.
Methods for recovering the system using Windows recovery tools or Startup Repair.
Steps to recover system settings or files using built-in Windows tools.
Procedure to recover the original hard drive image using the f11 recovery option.
Instructions for recovery using purchased Windows 7 OS and driver media.
Guide to backing up computer files and system information in SUSE Linux.
Instructions for repairing or restoring the computer to factory state using recovery media.
Provides detailed technical specifications for the computer's hardware and performance.
Details specifications for the 14.0-inch HD+ display, including resolution and brightness.
Lists specifications for various hard drive capacities, including dimensions and speed.
Details the read and write capabilities of the DVD±RW SuperMulti DL Drive.
Specifications for the Blu-ray ROM DVD±RW SuperMulti DL Drive.
Details the specifications for the DVD-ROM drive.
How to access and view hardware specifications using Windows Device Manager.
Details non-volatile memory types, their purpose, and data write/protection methods.
Answers common questions regarding BIOS settings, memory, and CMOS configuration.
General requirements for power cord sets applicable to all countries and regions.
Lists specific requirements and agency approvals for power cords in different countries.
Guidance on proper disposal and recycling of batteries.
Instructions for disassembling the display assembly for recycling purposes.
| Display Size | 14 inches |
|---|---|
| Storage | 500GB HDD |
| Display Resolution | 1366 x 768 |
| Graphics | Intel HD Graphics |
| Operating System | Windows 7 Pro |
| Ports | USB 3.0, HDMI, VGA, Ethernet, Headphone/Microphone combo jack |
| Wireless | 802.11b/g/n |
| Processor | Intel Core i3, i5, or i7 (4th Gen) |
