10
41524-01 9-5-2001
®
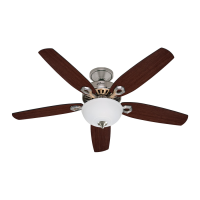
As discussed in STEP 1 - GETTING
READY, your Hunter fan can be in-
stalled in a standard mounting posi-
tion.
Included with the fan are two pipes:
one 3" long pipe/ball assembly for
standard mounting on 8' ceilings and
one 12" long pipe for 9' ceilings and
higher. See Figure 3a.
If you are going to install the fan us-
ing the standard mounting, go to
STEP 4 - ASSEMBLING THE FAN.
If you are going to install the fan us-
ing the 12" long pipe for 9' ceilings
or higher, complete the steps below.
STEP 3 - ASSEMBLING PIPE/BALL ASSEMBLY
3. Remove the ball from the pipe.
4. Remove the pin from the pipe.
Figure 3a - Pipes
Figure 3b - Removing ball assem-
bly
REMOVING BALL ASSEMBLY
For the following steps refer to
Figures 3b and 3c.
1. Locate the 3" pipe/ball assembly.
2. Remove the positioning screw
from the top of the ball.
NOTE: The ball will become
loose and should slide down the
pipe.
3" Pipe/Ball
Assembly
12" Pipe
Pin
Positioning Screw
Leadwire
Assembly
Ball
Ground
Screw