LIT-054.REVJ 5/6/03 9:24 AM Page 1
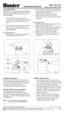
Steel Hex End
Plastic Key End
Fig. 4
RADIUS / DISTANCE OF THROW
Insert the steel hex end of the Hunter wrench into the radius adjustment screw
(Fig. 6). Turn the screw clockwise (into the stream of water) to decrease the
radius, or counterclockwise to increase the radius. Radius can be reduced up
to 25%.
Caution: Tu r ning the adjustment screw clockwise more than five full turns
may result in a lost radius adjustment screw.
Note: It is not necessary to disassemble the sprinkler to make adjustments.
®
Professional Series™
PGP
®
, PGS, PGH
Gear-Driven Sprinklers
PGP
®
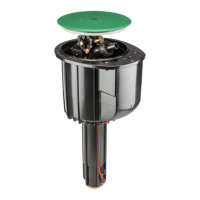
Installation:
The PGP
®
pop-up sprinkler should be installed at finished
grade as shown in the illustration (Fig. 1).
To Increase the Arc:
1. Insert the plastic key end of the Hunter wrench into the adjustment
socket (Fig. 3 & 4).
2. While holding the nozzle turret at the right stop, turn the wrench
clockwise. Each full 360° turn of the wrench will increase the arc 90°.
3. Adjust to any arc between 40° and 360° (Fig. 5).
4. The wrench will stop turning, or there will be a ratcheting noise,
when the maximum arc of 360° (full circle) has been reached.
Arc Adjustments:
Adjustable heads are preset to approximately 180°.
Sprinklers may be adjusted with water on or off. It is
recommended that initial adjustments be made
before installation.
1. Using the palm of your hand, rotate the nozzle
turret counterclockwise to the left stop to complete
any interrupted rotation cycle (Fig. 2).
2. Rotate the nozzle turret clockwise to the right
stop. This is the fixed side of the arc. The nozzle
turret must be held in this position for arc
adjustments. The right stop does not change.
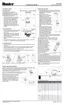
PRECIPITATION RATE ADJUSTMENT
If you have excessively wet or dry areas,
you can change the nozzle in the sprinkler
to increase or decrease the precipitation
rate. For dry areas, install a larger nozzle.
For wet areas, install a smaller nozzle.
Fig. 6
To Decrease the Arc:
1. Insert the plastic key end of the Hunter wrench into the adjustment socket (Fig. 3 & 4).
2. While holding the nozzle turret at the right stop, turn the wrench counterclockwise. Each full 360° turn of the
wrench will decrease the arc 90°.
3. Adjust to any arc between 40° and 360° (Fig. 5).
4. The wrench will stop turning, or there will be a ratcheting noise, when the minimum arc of 40° has been reached.
Fig. 3
P
G
P
®
Fig. 2
Fig. 1
Decrease ArcIncrease Arc
Minimum
Arc
Maximum
Arc
40°
360°
Fig. 5
Nozzle/Range
Adjustment
Screw
Lifting
Socket
Adjustment
Socket
Model
Identification
®