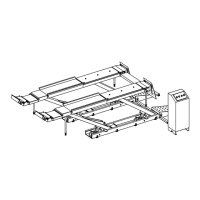
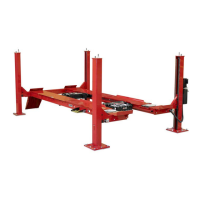
RL, RLHD OPERATION MANUAL 4. Detailed Operation Instructions 15
Turn “POWER” switch to the “ON” position.
The “POWER RUN” light will illuminate. The switch is spring-loaded to turn to “RUN”
position when released.
Depress and hold “RAISE” button.
The pump will begin to operate, raising the lift.
CAUTION: Listen for the sound of the mechanical locks passing over
their detents. If the sound is not heard, release the “RAISE”
button and refer to the troubleshooting section of this
manual.
Release “RAISE” button when lift reaches desired height.
The pump will shut off and the lift will stop.
Press and hold “LOCK/LEVEL” button until lift lowers and the mechanical locks
engage.
Turn OFF “POWER” switch.
Lowering the Lift
Remove all obstacles from under rack and runways.
Be certain vehicle is resting firmly on runways with chocks in front of and behind left
rear wheel.
Check that the turning angle gauge and runway slip plate lock pins are installed.
Turn “POWER” switch to the “ON” position.
CAUTION: To avoid damage to the lift, ensure that all four leveling legs
and swing air jacks are pivoted and locked to the horizontal
position before lowering.
Depress and hold “LOWER” button.
The pump will operate, raising the runways a few inches. Lifting the runways
removes the load from the mechanical locks, allowing them to disengage. The pump
will then shut off and the lift will descend as long as the button is held.
If the lift is being lowered to a different working height, depress and hold
“LOCK/LEVEL” button several times until lift lowers and the mechanical locks engage
before working on vehicle.
If lift is being lowered completely, depress “LOCK/LEVEL” button several times until
lift rack is resting on all floor stops before removing the wheel chocks.
Turn OFF “POWER” switch.
Remove all chocks.
Carefully drive the vehicle off the runways.