EasyManua.ls Logo

Husky H3DTWDIG - User Manual

Husky H3DTWDIG
2 pages
Print Icon
To Next Page IconTo Next Page
Loading...
3/8 in. Drive
Digital Display Click Style
Torque Wrench
Owner’s Manual Model No: H3DTWDIG
SAFETY RULES
1. STUDY THIS BOOKLET CAREFULLY BEFORE ATTEMPTING
TO OPERATE THIS WRENCH.
2. Never apply more torque than the maximum scale
reading.
3. This torque wrench is designed for manual tightening of
threaded fasteners only. DO NOT USE IT AS A NUTBREAKER
OR FOR ANY OTHER PURPOSE.
4. Over-torqued or defective fasteners and sockets may
suddenly break. Ratchets that are improperly engaged,
worn out, damaged, or over-torqued may slip or break.
TO PREVENT INJURY, KEEP PROPER FOOTING AND
BALANCE AT ALL TIMES. DO NOT USE THE WRENCH IN
PLACES FROM WHICH YOU MAY FALL OR SLIP, OR
AROUND OPERATING MACHINERY.
5. This wrench will not prevent you from applying more
torque than set, it is not a torque limiting tool. The LCD
display will flash “STOP” if you exceed either the lower or
upper limit of intended use. At low settings the release is
gentle and there usually is no audible ‘click’ signal. Learn
how different amounts of torque ‘feel’, so you will reduce
the possibility of damage and/or injury due to accidental
over-torquing.
6. APPLY FORCE TO THE GRIP ONLY. DO NOT USE ‘CHEATER
BARS’ (a piece of pipe placed over the hand grip).
7. There are no user-serviceable components inside the
wrench. Disassembling the wrench or making any
adjustments will result in the loss of accuracy, and will
void the warranty.
OPERATING INSTRUCTIONS
Before adjusting the wrench to the desired torque setting,
make sure that you are using the correct torque units.
Torque values may be displayed in units of Inch Pounds, Foot
Pounds, Newton Meters, or Centimeter Kilograms.
Your Husky Digital Style Click Torque Wrench is calibrated
in Foot-Pounds (default on the LCD display) and can be
changed to other units as desired.
WARNING: DO NOT turn the adjusting knob either below the
lowest scale reading or above the highest scale reading. The
LCD display will show torque settings beyond the calibrated
upper and lower limits of your torque wrench,these are
intended for adjusting purposes only and are not within the
calibrated range.
WARNING: DO NOT use the wrench when batteries are not
installed or when batteries do not have sufficient power to
operate the wrench
TO SET TORQUE
1. Press the red PWR button to turn the wrench on.
2. At initial power up, the LCD display will flash all icons
twice and then show the current torque setting. When
stored or not in use, the wrench should be set to less
than 25% of the maximum capacity.
NOTE: The battery level indicator on the LCD display will
indicate the remaining battery life.
3. Press the green UNIT button to toggle through desired
units (ft-lb, in-lb, N-m, kg-cm)
4. Pull the adjusting knob out to unlock the adjusting
mechanism.
5. While holding the adjusting knob unlocked, turn it
clockwise to increase the torque, and counterclockwise
to decrease torque. Keep turning until the desired
TARGET torque reading is displayed on the LCD screen.
6. If during a torque setting adjustment the intended
TARGET value is exceeded on the LCD display, the
torque wrench should be first adjusted back to below
the TARGET value, and then back up to the intended
TARGET value.
7. Lock the setting by releasing and, if necessary, pushing
the adjusting knob in. The knob can be turned slightly
back and forth without changing the torque setting to
assure proper engagement of teeth in the locking
mechanism.
8. Press and hold the red PWR button for 2 seconds to turn
the wrench off. This torque wrench has an automatic
shut off feature and will power down after 10 minutes
of non-use.
9. To turn the LED back light on or off, press and hold the green
button for 2 seconds.
NOTE: The TARGET torque setting and units will be saved
after shut off. If the torque is adjusted while the power is
off, the correct torque target will be displayed at the power
on screen .
TO APPLY TORQUE
1. Attach the proper socket or other attachment to the
drive. Set the reversing lever of the proper direction of
the operation.
NOTE: If special attachments are used, torque setting must
be corrected in accordance with the directions given below
in the extensions section.
2. Place the socket or attachment onto the fastener to be
torqued.
3. Utilizing the ratcheting head, you may ‘spindown’ the
fastener until resistance is felt.
4. Holding the wrench BY THE GRIP ONLY*, apply SLOW
AND STEADY pull until a momentary release impulse or
‘click’ is felt. Release tightening pressure immediately
when the release is felt.
WARNING: At low torque settings the release is gentle and
there usually is no audible ‘click’ signal. Learn how the
release feels BEFORE you torque to avoid accidental
overtightening or damage.
*When using long sockets or extensions, the wrench may be
supported at the head (only at the head) with only negligible
effects on accuracy.
5. The wrench resets automatically and is ready for the next
operation.
Adjusting
Knob
Plastic Handle
Battery Cover
Chrome Plated
Hardened steel housing
LCD Display
Dust Seal
Drive
Ratchet Reversing Lever
Fine-Tooth Ratchet Drive Head
Power ON/OFF
Button (Red)
Unit Change
Button (Green)
Question and Answer IconNeed help?

Do you have a question about the Husky H3DTWDIG and is the answer not in the manual?

Summary

Safety Rules

General Safety Precautions

Covers studying the manual, max scale, not using as nutbreaker, proper footing, and avoiding operating machinery.

Usage Restrictions and Warnings

Covers over-torquing, using grip only, no cheater bars, and no user-serviceable components.

Operating Instructions

To Set Torque

Step-by-step guide on how to set the desired torque value using the adjusting knob and buttons.

To Apply Torque

Instructions for applying torque to a fastener, including grip and release feel guidance.

Extensions and Calibration

Extension Calibration Formulas

Formulas to calculate correct torque settings when using attachments or extensions.

Care and Maintenance

General Care and Storage

Guidance on handling, storage, cleaning, and battery replacement for the torque wrench.

Accuracy Checks and Serviceability

Information on periodic accuracy checks and the non-serviceable nature of the wrench.

Specifications and Certification

Technical Specifications

Details on operating temperature, model, drive, capacity, dimensions, weight, and lever length.

Factory Calibration and Warranty

Information on factory calibration accuracy and the lifetime warranty policy.

Overview

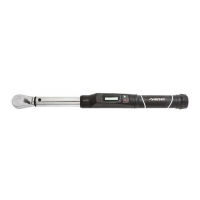
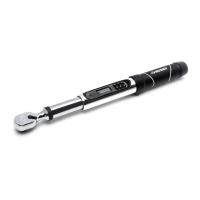
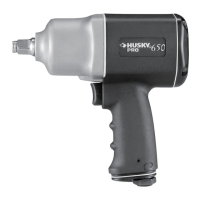
The Husky 3/8 in. Drive Digital Display Click Style Torque Wrench (Model No: H3DTWDIG) is a precision instrument designed for the manual tightening of threaded fasteners. It features a fine-tooth ratchet drive head with a reversing lever, a chrome-plated hardened steel housing, and a plastic handle. The wrench incorporates a digital LCD display for showing torque settings and units, a red Power ON/OFF button, a green Unit Change button, and an adjusting knob for setting torque values.

Function Description:

This torque wrench allows users to set a specific target torque value digitally. When applying torque, the wrench provides a momentary release impulse or an audible "click" signal once the target torque is reached. This helps prevent over-tightening and ensures fasteners are tightened to the correct specification. The LCD display shows the current torque setting and units, and a battery level indicator shows remaining battery life. The wrench is designed for clockwise (right-hand) operation to actuate the click mechanism; it will not actuate or 'click' when used in the counter-clockwise or left-hand direction. It has an automatic shut-off feature that powers down after 10 minutes of non-use to conserve battery life. The target torque setting and units are saved after shut-off.

Important Technical Specifications:

  • Drive: 3/8" Ratchet
  • Calibrated Capacity:
    • 5-80 ft-lbs
    • 60-960 in-lbs
    • 6.78-108.48 N-m
    • 69.1-1106.0 kg-cm
  • Increments & Display Resolution:
    • 0.1 ft-lbs
    • 1.2 in-lbs
    • 0.135 N-m
    • 1.4 kg-cm
  • Operating Temperature Range: 40°F - 110°F (5°C - 42°C)
  • Dimensions: 18" x 1.57" x 2.16"
  • Weight: 3.2 lbs.
  • Lever Length (Center of drive to center of handle): 18.0"
  • Accuracy: ±4% on clockwise or right-hand readings greater than or equal to 20% of capacity. Complies with ASME standard B107.300-2010(B107.14) and International Standard ISO 6789.
  • Batteries: Two (2) 1.5V (LR44 or equivalent) batteries.
  • Warranty: Lifetime Warranty.

Usage Features:

  • Power On/Off: Press the red PWR button to turn the wrench on. Press and hold the red PWR button for 2 seconds to turn it off.
  • Unit Change: Press the green UNIT button to toggle through desired units (ft-lb, in-lb, N-m, kg-cm).
  • Backlight: To turn the LED backlight on or off, press and hold the green button for 2 seconds.
  • Torque Setting: Pull the adjusting knob out to unlock the mechanism. Turn it clockwise to increase torque and counter-clockwise to decrease torque. The LCD display shows the target torque reading. After setting, release and push the knob in to lock the setting.
  • Adjustment Precaution: If the target value is exceeded during adjustment, first adjust back below the target, then back up to the intended value. Avoid turning the adjusting knob beyond the lowest or highest calibrated scale readings, as these values are for adjustment purposes only and not within the calibrated range.
  • Applying Torque: Attach the proper socket, set the reversing lever, and place the socket onto the fastener. Apply a slow and steady pull to the grip until a release impulse or 'click' is felt, then immediately release pressure.
  • Extensions: When using special attachments that change the effective length of the wrench, the torque setting must be corrected using specific formulas:
    • T(W) = T(E) * (L / (L + E))
    • T(E) = T(W) * ((L + E) / L)
    • Where E is the effective length of the extension, L is the lever length of the wrench, T(W) is the torque setting on the wrench, and T(E) is the effective torque applied. Regular socket extensions that extend directly under the drive head along the axis of rotation do not affect calibration.
  • Safety: Never apply more torque than the maximum scale reading. Do not use as a nut-breaker or pry bar. Be aware that at low torque settings, the release may be gentle with no audible 'click'.

Maintenance Features:

  • Storage: Store the wrench in its protective case when not in use. Keep it set below 25% of its maximum capacity. If left set to over 50% capacity for more than 1-2 hours, set it to the lowest setting for 3-5 minutes before using again.
  • Lubrication: The wrench is lubricated for life with a special lubricant and should not be oiled. The ratchet head can be lubricated as needed.
  • Cleaning: The rubberized grip is not affected by petroleum products but can be damaged by Acetone or certain industrial solvents. Clean with a cloth wetted in mineral spirits or denatured alcohol. Never immerse the wrench or any portion of it in any liquid.
  • Battery Replacement: Remove the screw on the battery cover (located to the left of the LCD), then place two 1.5V (LR44 or equivalent) batteries with the positive (flat) side facing the user. Replace the cover and tighten the screw. Remove batteries when storing for extended periods.
  • Accuracy Check: Periodically check the wrench for accuracy, especially if used frequently, subjected to abnormal handling, or stored improperly. For assembly line usage, it should be checked every 5,000 torque applications.
  • Serviceability: With the exception of the ratchet mechanism, the wrench is not user-serviceable. Disassembling the wrench or making adjustments will void the warranty.

Husky H3DTWDIG Specifications

General IconGeneral
BrandHusky
ModelH3DTWDIG
CategoryPower Tool
LanguageEnglish

Related product manuals