EasyManua.ls Logo

Husqvarna DMS 240 - User Manual

Husqvarna DMS 240
20 pages
Print Icon
To Next Page IconTo Next Page
Loading...
DMS 240
EN Operator's manual 2-20
DE Bedienungsanweisung 21-40
FR Manuel d'utilisation 41-60
NL Gebruiksaanwijzing 61-80

Table of Contents

Other manuals for Husqvarna DMS 240

Questions and Answers

  • M
    Maria Byrd DVMAug 12, 2025
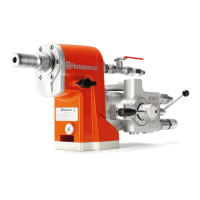
    How to prevent the tube from being abraded on my Husqvarna Drill?
    • K
      Kevin AndersonAug 13, 2025
      Abrasion of the tube in your Husqvarna Drill can occur for several reasons. The clamp may have too much free play, so adjust the clearance of the clamp properly. Alternatively, the bit, tube, or base might be loose; ensure you tighten them securely. A deformed bit can also cause abrasion, so replace the bit if necessary. Finally, if chips are not discharging well, increase the water pressure and volume to improve chip removal.
  • F
    flowersamberAug 16, 2025
    What to do if the tube is ground down on Husqvarna DMS 240 Drill?
    • T
      Tiffany JonesAug 17, 2025
      If the tube of your Husqvarna Drill is ground down, there are several potential causes. The clamp might have too much free play, requiring you to adjust the clamp clearance correctly. Alternatively, the drill bit, tube, or bottom plate could be loose, so tighten them safely. A damaged drill bit could also be the culprit, so replace it. Finally, if particles are not releasing correctly, increase the water pressure and volume.
  • A
    Anthony AbbottAug 20, 2025
    What to do if the drill bit is blocked on Husqvarna DMS 240?
    • C
      cantrellgeorgeAug 20, 2025
      If the drill bit of your Husqvarna Drill is blocked, it could be due to a stone or steel bar caught between the core and the drill bit. To resolve this, rotate the drill bit clockwise with a wrench while pulling out the feed lever. Be careful not to rotate it counterclockwise, as this could loosen the drill bit from the tube. Another cause could be that the bottom plate moves during operation, so reset the bottom plate and tighten it securely. Also, the clamp might have too much free play, requiring an adjustment of the clamp clearance. Lastly, the outer diameter of the bit might be the same as that of the tube, in which case you should replace the drill bit.
  • M
    Malik RogersAug 25, 2025
    Why is my Husqvarna DMS 240 Drill drilling so slow?
    • L
      Laura HardyAug 25, 2025
      If the drilling with your Husqvarna Drill is unusually slow, several factors could be at play. First, the bit might be worn out and require replacement. Alternatively, the bit may be clogged with chips; in this case, clean it with a wire brush and increase the water pressure. If the diamond is rounded, consider using a softer bond bit and apply more force on the handle. Lastly, if the drill is cutting reinforcing rods, ease up on the handle to prevent tripping the circuit breaker.
  • J
    Jeffrey CoffeyAug 28, 2025
    What to do if the drill bit is stuck in my Husqvarna DMS 240 Drill?
    • D
      Dana SingletonAug 28, 2025
      If the bit of your Husqvarna Drill gets stuck, it could be due to a few reasons. A stone or steel bar might be caught between the core and the bit. To resolve this, use a wrench to rotate the bit clockwise while backing out the handle. Be aware that rotating it counterclockwise may unscrew the bit from the tube. Another possibility is that the base wanders during drilling; if this occurs, reset the base and tighten it securely. Also, check if the clamp has too much free play, and if so, adjust the clamp's clearance properly. Finally, the bit’s outer diameter might be the same as the tube’s, requiring you to replace the bit.
  • D
    daviscraigAug 31, 2025
    Why is my Husqvarna Drill operation unusually slow?
    • N
      Neil ScottAug 31, 2025
      If the operation of your Husqvarna Drill is unusually slow, it could be due to several reasons. The drill bit may be worn out and require replacement. Alternatively, the drill bit might be clogged with particles; in this case, clean it with a wire brush and increase the water pressure. If you're using a diamond drill bit and it's rounded, switch to a softer bond drill bit and increase the force on the feed lever. Also, if the drill motor cuts a rebar, move the feed lever to prevent the residual-current device from releasing. Finally, check for metal powder in the waste water.
  • J
    Julie WilliamsSep 4, 2025
    What to do if the drill bit is blocked in my Husqvarna DMS 240 Drill?
    • A
      Alice JonesSep 4, 2025
      If the drill bit of your Husqvarna Drill is blocked, it could be due to a few reasons. A stone or steel bar might be caught between the core and the drill bit; try rotating the drill bit clockwise with a wrench while pulling out the feed lever to release it. Note that rotating it counterclockwise can loosen the drill bit from the tube. Another cause might be that the bottom plate moves during operation; in that case, reset the bottom plate and tighten it securely. Also, the clamp may have too much free play; adjust the clamp clearance correctly. Finally, the outer diameter of the bit may be the same as that of the tube, requiring a replacement of the drill bit.
  • N
    nealdavidSep 8, 2025
    Why is the tube ground down on my Husqvarna DMS 240?
    • P
      Patrick WaltersSep 8, 2025
      If the tube of your Husqvarna Drill is ground down, it could be due to several reasons. The clamp may have too much free play, so adjust the clamp clearance correctly. Also, the drill bit, tube, or bottom plate might be loose; tighten them safely. Another reason could be that the drill bit is damaged, requiring a replacement. Finally, particles may not be releasing correctly, so increase water pressure and volume.

Summary

Introduction to the DMS 240 Drill

Product Description Overview

Overview of the electrical drill motor and its use with a drill stand.

Drill Motor Features

Details on gears, insulation, overload protection, and water system.

Drill Stand Features

Description of its use, attachment plate, materials, and adjustability.

Intended Use of the Product

Specifies the product's intended application for drilling materials.

Product Overview - Drill Motor

Power Switch Operation

Function and location of the ON/OFF power switch.

Carbon Brush Cover Access

Location of the cover for carbon brush maintenance.

Drill Stand Attachment Point

Designated point for connecting the drill motor to the stand.

Drill Spindle Details

The rotating shaft for attaching drill bits.

Gear Selection Control

Mechanism for changing motor speed gears.

Water Supply Connector

Port for connecting the water system.

Residual Current Device (RCD)

Safety device for protection against electric shock.

Operators Manual Reference

Indication to consult the user manual.

Product Overview - Drill Stand

Jack Screw Function

Adjustable screw for leveling the drill stand base.

Drill Column Structure

The vertical support rod for the drill motor carriage.

Depth and Angle Scale

Markings for precise setting of drilling depth and angle.

Angle Indicator Gauge

Visual display of the current drill column angle.

Drill Motor Carriage Mechanism

Component that holds and guides the motor along the column.

Drill Column Angle Lock

Fastener to secure the set angle of the drill column.

Feed Lever Operation

Lever used for moving the carriage and applying drilling pressure.

Rear Support Component

Stabilizing element located at the rear of the stand.

Motor Installation Plate

Plate for mounting the drill motor onto the carriage.

Carriage Locking Mechanism

Device to fix the drill motor carriage in position.

Gearbox Component

Internal gearing mechanism within the stand.

Gear Rack System

Toothed rack for precise carriage movement.

Removable Wheel Set

Detachable wheels for portability of the drill stand.

Level Adjustment Screws

Screws used to ensure the drill stand base is level.

Bottom Plate Base

The main base structure of the drill stand.

Included Hex Keys

Tools provided for assembly and adjustments (3mm & 4mm).

Operators Manual Reference

Pointer to the user manual for further information.

Product Symbols and Warnings

Critical Warning Symbol

Indicates potential for serious injury or death if warnings are ignored.

General Safety Guidelines

Read Manual Before Use

Ensure understanding of instructions before operating the product.

Personal Protective Equipment

Mandatory use of hearing, eye, and breathing protection.

Product Liability Limitations

Conditions under which the manufacturer is not liable for damages.

Safety Definitions Explained

Explanation of terms like WARNING, CAUTION, and NOTE.

Exercise Common Sense

Advice on exercising care and using judgment during operation.

Operation Safety Instructions

General warnings and recommendations for safe product operation.

Operational Safety Procedures

General Power Tool Safety

Instructions for safe handling and use of power tools.

Work Area Safety

Guidelines for maintaining a clean, well-lit, and hazard-free work environment.

Electrical Safety Precautions

Measures to prevent electric shock during operation.

Personal Safety During Use

Advice on operator's physical and mental state for safe operation.

Electrical Safety Details

Plug and Outlet Compatibility

Ensuring correct plug type and matching outlets to prevent shock.

Avoid Grounded Surfaces

Preventing contact with earthed objects to reduce shock risk.

Damp Location Precautions

Using RCD protection when operating in wet environments.

Cord and Voltage Checks

Verifying mains voltage, fusing, and cord condition.

Personal Protective Equipment (PPE)

Eye Protection Requirements

Importance of wearing approved eye protection during operation.

Footwear and Clothing Guidelines

Requirements for safety shoes and fit of operational clothing.

Protective Glove Usage

Use of heavy-duty and rubber protective gloves.

Protective Helmet Recommendation

Recommendation for wearing a protective helmet.

Hearing Protection Necessity

Importance of hearing protection to prevent noise-induced hearing loss.

Further Electrical and Personal Safety

Damaged Cord Handling

Risks associated with damaged power cords and proper repair.

Outdoor Extension Cord Use

Using suitable extension cords for outdoor operation.

Cord Care and Handling

Proper procedures for handling and protecting power cords.

Wet Condition Warnings

Warning against using power tools in rain or wet conditions.

Cord Positioning During Use

Ensuring the power cord is positioned safely behind the user.

Prevent Unintentional Starting

Ensuring the switch is off before connecting or handling the tool.

Remove Tools Before Starting

Importance of removing adjustment keys or wrenches before operation.

Maintain Balance and Footing

Maintaining proper footing and balance for optimal control.

Dress Code for Operation

Avoiding loose clothing and jewelry; securing hair.

Dust Extraction Usage

Using dust collection facilities to reduce hazardous dust.

Avoid Complacency

Warning against becoming complacent due to frequent tool use.

Power Tool Use and Care

Correct Tool Application

Using the correct power tool for the specific application.

Switch Functionality Check

Ensuring the ON/OFF switch operates correctly.

Disconnect Power for Adjustments

Disconnecting power before making adjustments or changing accessories.

Proper Tool Storage

Storing tools out of reach of children and untrained users.

Tool Maintenance Importance

Importance of maintaining tools and accessories for safe operation.

Sharp Cutting Tool Care

Keeping cutting tools sharp for safety and control.

Product Safety Features and Maintenance

Safety Device Integrity

Ensuring safety devices are functional and not modified.

ON;OFF Switch Operation Check

Procedure to verify the correct operation of the ON/OFF switch.

Authorized Service Centers

Information on finding authorized Husqvarna service locations.

Battery Pack Servicing

Guidelines for handling and servicing damaged battery packs.

Water Management During Drilling

Managing water flow to reduce electrical shock risk during drilling.

Use Insulated Surfaces Near Wiring

Using insulated grasping surfaces when operating near electrical wiring.

Hearing Protection for Diamond Drilling

Importance of hearing protection during diamond drilling operations.

Jammed Drill Bit Procedure

Steps to take if the drill bit becomes jammed.

Restarting Drill Bit Safely

Checking drill bit rotation before restarting to avoid issues.

Secure Drill Stand Anchoring

Ensuring secure anchoring of the drill stand to the workpiece.

Wall;Ceiling Drilling Safety

Protecting persons and work areas when drilling through walls or ceilings.

Overhead Drilling with Water

Precautions for overhead drilling involving water supply.

Defective Safety Devices Warning

Warning against using products with non-functional safety devices.

RCD Functionality Check

Understanding the function of residual-current devices for protection.

Detailed Safety Instructions

Examining the Residual-Current Device

Procedure for testing the functionality of the residual-current device.

Water Management Safety

Managing water to prevent electrical shock during drilling operations.

Insulated Surfaces and Wiring

Using insulated surfaces when operating near electrical wiring.

Hearing Protection Importance

Necessity of hearing protection during diamond drilling tasks.

Jammed Bit Handling

Correct procedures for handling a jammed drill bit to avoid damage.

Restarting Procedures

Checking drill bit rotation before restarting the operation.

Drill Stand Securing

Ensuring the drill stand is securely anchored to the workpiece.

Wall Drilling Safety

Safety measures when drilling through walls or ceilings.

Overhead Drilling Precautions

Precautions for performing overhead drilling with water supply.

Maintenance Safety Precautions

Ensuring motor is off and plug disconnected before maintenance.

Tool and Accessory Maintenance

Importance of regular maintenance for tools and accessories.

Cutting Tool Sharpness

Keeping cutting tools sharp for improved safety and control.

Servicing by Qualified Personnel

Requirement for servicing to be performed by qualified personnel.

Assembly Procedures

Safety Warning: Read Manual

Read and understand the safety chapter before assembling the product.

Safety Warning: Disconnect Power

Disconnect power cord and remove drill bit before assembly.

Attaching the Wheel Kit

Instructions for mounting the wheel kit onto the drill stand.

Securing Wheel Kit Screws

Tightening screws to properly secure the attached wheel kit.

Locking the Drill Motor Carriage

Securing the drill motor carriage before attaching the motor.

Mounting Motor to Installation Plate

Attaching the drill motor onto the designated installation plate.

Connecting Plate and Motor to Carriage

Attaching the motor and plate assembly to the drill motor carriage.

Securing Motor in Carriage

Locking the drill motor into its final position using a screw.

Drill Stand Installation Methods

Overview of two methods for attaching the drill stand during operation.

Installation with Expander Bolt

Method of attaching the drill stand using an expander bolt.

Installation with Threaded Rod

Method of attaching the drill stand using a threaded rod.

Drill Stand Installation Steps

Prepare Expander Bolt Hole

Procedure for creating the necessary hole for the expander bolt.

Attach Bottom Plate with Bolt

Connecting the bottom plate securely using the expander bolt.

Tighten Expander Bolt

Fully tightening the expander bolt for secure attachment.

Adjust Bottom Plate Level

Using level adjustment screws to ensure the bottom plate is level.

Assess Surface Quality

Examining the surface quality before attaching with a threaded rod.

Attach Bottom Plate with Rod

Securing the bottom plate using a threaded rod and washer.

Install Drill Stand with Washer

Finalizing the installation with a washer and locknut.

Operation and Pre-Use Checks

Pre-Operation Checks

Key checks and preparations required before operating the product.

Daily Start;Stop Switch Check

Performing daily checks on the ON/OFF switch functionality.

Daily Maintenance Reference

Reference to daily maintenance procedures for optimal performance.

Correct Product Installation

Ensuring correct installation of the drill bit and drill stand.

Personal Protective Equipment Usage

Reference to personal protective equipment requirements.

Water System Integrity Check

Verifying the water system is undamaged and properly connected.

Residual-Current Device Status

Ensuring the residual-current device is active and functional.

Adjusting and Operating the Drill

Loosening Column Lock Screws

Loosening screws to allow adjustment of the drill column angle.

Use Angle Indicator for Adjustment

Utilizing the angle indicator for precise angle setting.

Tightening Column Lock Screws

Securing the drill column angle by tightening the lock screws.

Attaching Water Connector

Connecting the water connector to the water supply.

Activating Water System

Opening the water system to provide water during drilling.

Caution: Avoid Excessive Force

Warning against applying excessive force to prevent motor overload.

Caution: Low Pressure for Rebars

Warning about using low pressure with rebars to prevent RCD trip.

Start Water System

Initiating the water supply before starting the drill motor.

Engage Power Switch

Pushing the power switch to start the drill motor.

Allow Motor Speed to Increase

Letting the motor reach maximum speed before contacting workpiece.

Apply Drill Bit to Workpiece

Using the feed lever to apply the drill bit to the workpiece.

Initial Positioning Pressure

Using minimal pressure initially to maintain drill bit position.

Reset After RCD Trip

Procedure to reset the residual-current device if it trips.

Warning: Continued Rotation

Warning that drill bit continues to rotate after motor stops.

Use ON;OFF Switch to Stop

Stopping the product by pushing the ON/OFF switch.

Wait for Drill Bit to Stop

Waiting for the drill bit to stop rotating completely.

Operate Without Load

Running the motor without load for 2 minutes to decrease temperature.

Maintenance Procedures

Safety Warning: Read Manual

Read and understand the safety chapter before performing maintenance.

Safety Warning: Disconnect Power

Disconnect the power cord before performing any maintenance.

Daily Maintenance of Drill Motor

Routine checks for nuts, screws, switch, and cleaning of motor.

Daily Maintenance of Drill Stand

Routine checks for stand fasteners, cleaning, and movement.

Warning: Avoid Water Cleaning

Warning against cleaning the drill motor with water due to short-circuit risk.

Use Compressed Air for Cleaning

Cleaning the drill motor and bit using compressed air.

Ensure Air Openings are Clear

Making sure cold air openings are free from dirt or blockage.

Warning: Disconnect Before Replacement

Warning to disconnect the plug before replacing the drill bit.

Prepare for Drill Bit Change

Gathering necessary tools and parts for drill bit replacement.

Apply Grease to New Bit Thread

Lubricating the thread of the new drill bit with water-resistant grease.

Attach New Drill Bit

Using wrenches to securely attach the new drill bit.

Clutch Torque Adjustment

Procedure for adjusting the clutch if transmitted torque is lowered.

Carbon Brush Inspection Frequency

Instructions for examining carbon brushes based on usage frequency.

Caution: Replace Both Brushes

Caution to replace both carbon brushes simultaneously.

Remove Brush Cover

Opening the carbon brush cover using a flat screwdriver.

Remove Old Brushes

Carefully removing the old carbon brushes from their housing.

Install New Brushes

Inserting the new carbon brushes into the motor.

Reattach Brush Cover

Securing the carbon brush cover after brush replacement.

Run-In New Carbon Brushes

Running the motor at idle speed for break-in of new brushes.

Drill Stand Care and Adjustment

Caution: Prevent Damage

Caution regarding potential damage if the drill stand is not cleaned properly.

Remove Drill Motor First

Detaching the drill motor from the stand before cleaning.

Clean Stand with Washer and Cloth

Cleaning the drill stand with a pressure washer and drying with a cloth.

Lubricate Moving Parts

Applying grease to moving parts for corrosion prevention.

Remove Carriage Covers

Detaching plastic covers from the drill motor carriage.

Loosen Roller Shaft Set Screws

Loosening the set screws that hold the roller shafts.

Adjust Top Roller Shaft

Moving the top roller shaft closer to the drill column.

Secure Top Roller Shaft

Tightening the set screw to lock the adjusted top roller shaft.

Adjust Lower Roller Shaft

Moving the lower roller shaft closer to the drill column.

Secure Lower Roller Shaft

Tightening the set screw to lock the adjusted lower roller shaft.

Test Carriage Smoothness

Testing the smooth movement of the carriage on the drill column.

Reinstall Carriage Covers

Re-attaching the plastic covers to the drill motor carriage.

Troubleshooting and Storage

Troubleshooting Schedule Overview

Table listing common problems, their possible causes, and solutions.

Slow Operation Diagnosis

Steps to diagnose and resolve issues causing slow operation.

Blocked Drill Bit Troubleshooting

Procedures for troubleshooting and clearing a jammed drill bit.

Grounded Tube Issues

Addressing problems related to the tube being ground down.

Secure Storage Requirements

Keeping the product in a locked area to prevent unauthorized access.

Environmental Storage Conditions

Storing the product in a dry and frost-free environment.

Remove Drill Bit for Transport

Removing the drill bit before transportation or storage to prevent damage.

Transport Safety Measures

Safety measures to prevent damage and accidents during transportation.

Technical Data

Drill Motor Specifications

Details on electrical motor, voltage, output, current, and weight.

Spindle Idle Speed

Idle speeds for different gear positions of the drill motor.

Drill Bit Compatibility

Maximum drill diameter and spindle thread specifications.

Water System Specifications

Maximum water pressure and water connector type.

Noise Emissions Data

Sound power levels and operator ear sound pressure measurements.

Vibration Level Data

Vibration measurement for the drill motor handle.

Drill Stand Dimensions

Height, width, and depth specifications for the drill stand.

Drill Stand Weight

Weight specifications for the drill stand.

Drill Column Travel and Angle

Travel length of the drill column and its angle range.

Service Information

Finding Approved Service Centers

Information on how to locate authorized Husqvarna service centers.

EU Declaration of Conformity

Product Identification Details

Product description, brand, type/model, and identification number.

Applicable EU Directives

List of EU directives and regulations with which the product complies.

Harmonized Standards Applied

List of harmonized standards and technical specifications applied.

Declaration Authorization

Signature and details of the authorized representative.

UK Declaration of Conformity

Product Identification for UK

Product description, brand, type/model for UK market compliance.

Applicable UK Regulations

List of UK regulations with which the product complies.

UK Applied Standards

Technical standards applied for UK conformity.

UK Importer Information

Details of the authorized UK importer for the product.

Husqvarna DMS 240 Specifications

General IconGeneral
Voltage230 V
Drill bit diameter, max250 mm
Weight1.2 kg
Spindle speed full load580/1400/2900 rpm
Spindle speed gear 1580 rpm
Spindle speed gear 21400 rpm
Spindle speed gear 32900 rpm
Water coolingYes
Power2.4 kW

Related product manuals