16
D10-991-2400B
D/G-10 Service (Hydraulic End)
1. Remove Pump Housing
a. Remove head of pump, and diaphragms, as outlined in the
Fluid-End Service Section.
b. Drain oil from pump housing by removing drain plug (34).
c. Set hydraulic end of pump face- down on cylinder
housing (24), onto smooth, clean surface.
d. Check shaft for sharp burrs. Smooth any burrs, to prevent
scarring housing seals (64) when you disassemble pump.
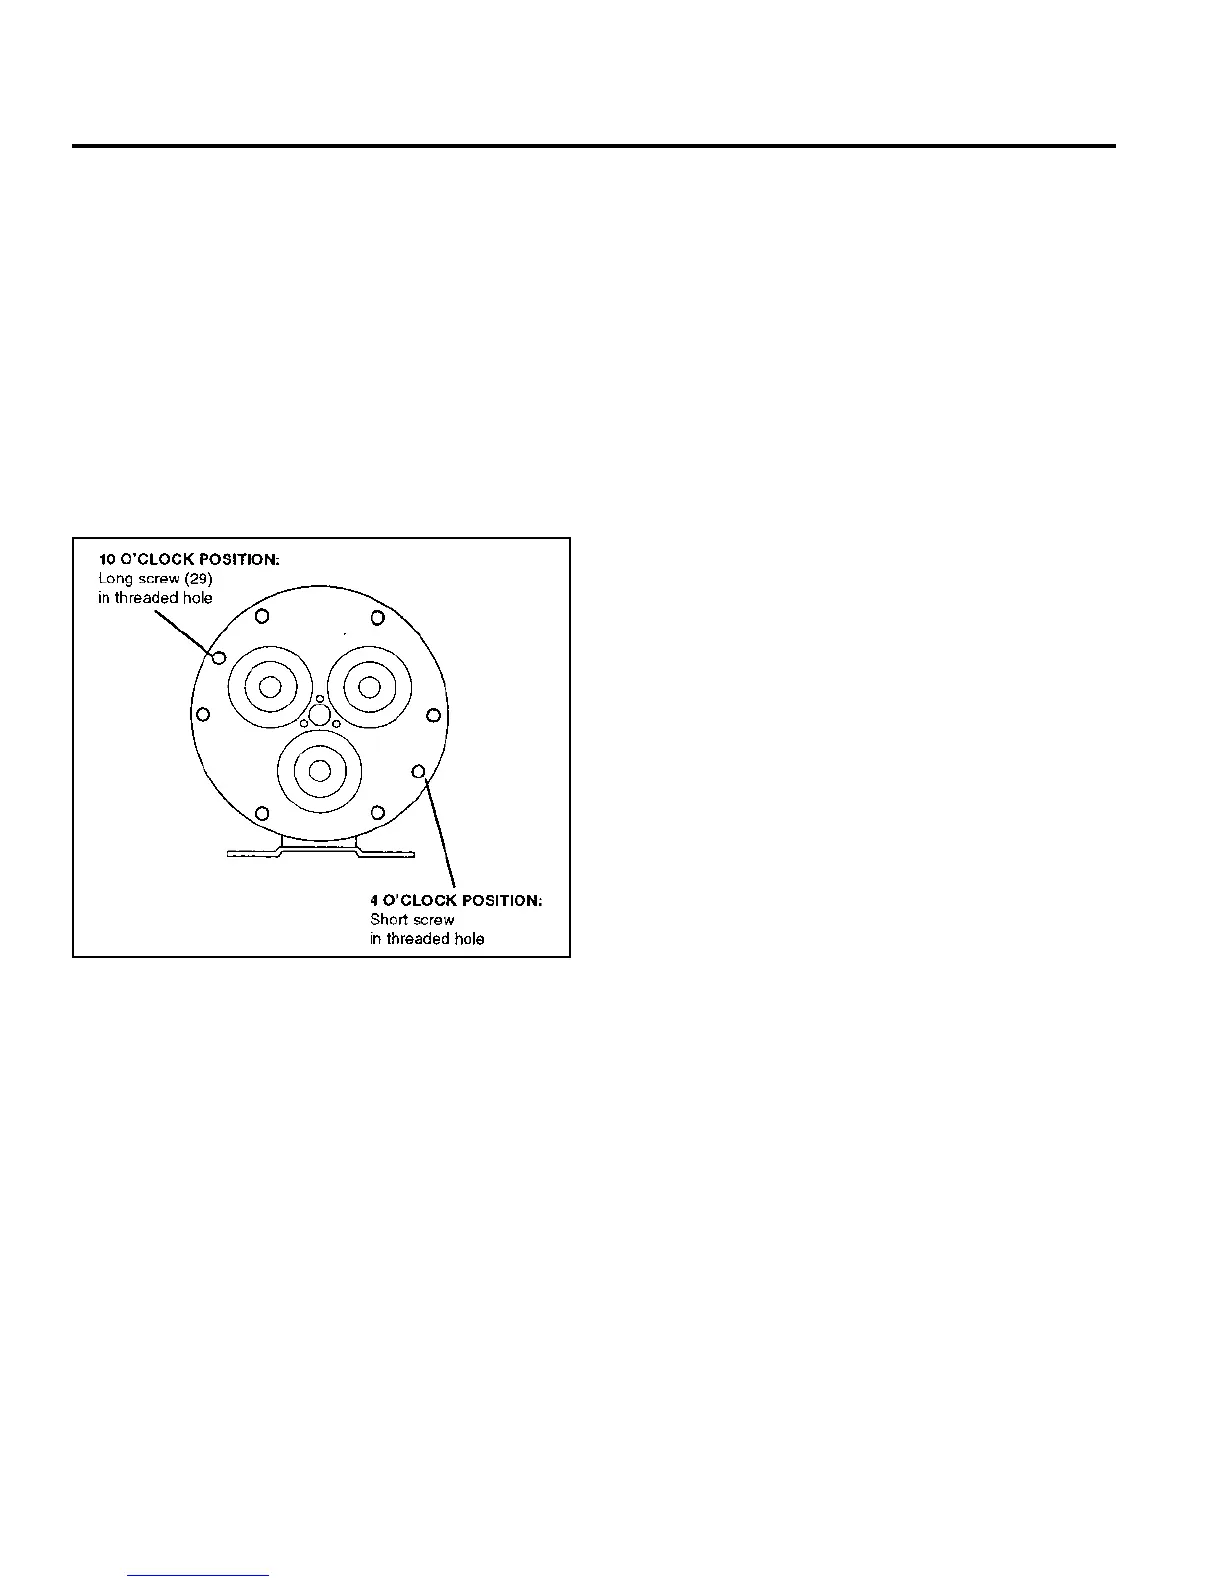
e. Remove bolts (29; 25 or 44) that secure housing to cylinder
casting. Piston return springs (50) will force cylinder housing
and housing apart.
NOTE: When reassembling later, note that one bolt (29)
is 1/4 in. (5 mm) longer than the other (25 or 44). The
longer bolt must be installed in the 10 o’clock position
of the cylinder housing (24).
f. Lift off housing (30).
g. Inspect cam and bearings (62), and bearing race in rear of
housing. If bearings are pitted or binding, or if housing race
is worn, replace them both.
NOTE: The numbers in parentheses are the Reference
Numbers on the exploded view illustrations found in this
manual and also in the Parts Manual.
CAUTION: Do not disassemble the hydraulic end of the
pump unless you are a skilled mechanic. For assistance,
contact Wanner Engineering (TEL 612-332-5681 or FAX
612-332-6937) or the distributor in your area.
CAUTION: The two bolts (29; 25 or 44) that screw through
the back of the housing into the cylinder housing (24) hold
the housing to the pump housing. Do not remove them
except when repairing the hydraulic end.
NOTE: The following service procedures refer several times
to the Wanner Tool Kit (P/N A03-175-1101). We strongly
urge you not to try to repair the hydraulic end of the pump
without using the tools in this kit (available from Wanner
or your local distributor).
2. Disassemble Pistons
a. With pump housing removed (see above), turn unit over and
set it on flat surface, piston side down.
b. With diaphragms removed (see Fluid-End Service Section),
reinsert follower screw (17) into hole in one of valve plungers
(54). Tap screw lightly with hammer and plunger (21) should
slip off valve plunger (54).
Hydraulic piston assembly (50-59) can now be disassembled.
Inspect all parts, and replace all O-rings and any other parts
that are worn or damaged.
c. Repeat step b. for remaining pistons.
NOTE: When you reassemble the hydraulic piston, use
new plungers (21). They are press-fit onto the valve
plungers (54) and are not reusable.
3. Reassemble Pistons
a. Drop ball (58) into each opening in bottom of piston
assembly (59).
b. Insert retaining washer (57) and O-ring (56) to hold balls in
place.
c. Insert valve plunger (54) into valve cylinder (55). Slide
spring (53) over plunger, inside valve cylinder.
d. Insert O-ring (52) into spring retainer (51).
e. Slide assembled valve cylinder, plunger, and spring (53-55)
into spring retainer (51).
f. Slide complete cylinder-and-retainer assembly (51-55) into
piston assembly (59).
g. Insert return spring (50) into piston assembly, wide end first.
This is tight fit, and can best be done by turning spring in
counterclockwise.
h. Repeat above procedure for other two pistons.
4. Reassemble Pump Housing
and Cylinder Housing
NOTE: Inspect the shaft seals (64) before continuing. If
they look damaged in any way, replace them (remove by
pounding them out from inside the pump housing). Both
seals should be replaced at the same time. Clean the bore
in the housing using emery cloth or ScotchBrite™.
a. Place cylinder housing (24) face-down on flat surface.
b. Insert assembled pistons (50-59) into cylinder housing.
Holes on foot end of pistons should all point toward center
of casting.
c. Note location of outer ring of holes in cylinder housing and
in pump housing flange (in particular, holes where bolts (29)
and (25 or 44) will be installed).
d. Stand camshaft assembly (62) on cylinder housing (24).
CAUTION: The pilot bearing MUST be properly nested
in the bearing race during assembly. If misaligned, the
bearing will be damaged and the pump will fail within
the first hours of operation.