Programmable Keys
For
enhanced
convenience,
you may
request
your
dealer
to
program the keys SK1, SK2,
TK
,
GJ
and Q
as
shortcuts to the functions listed below:
No.
Shortcut Key Function
1 Zone Up
To
select a desired zone
2 Zone Down
quickly
3 Keypad Lock
To
lock or unlock the keypad
!quickly
4 Contact List
To
access the menu
" Contact List"
quick!~
Message M
To
access the menu
5
"Message"
_guick_ly_
J
6
Call
Log
§
To
access the menu "Call
Logs"
quick_ly_
7 Adjust Power Level
To
adjust power level quickly
8
Talk Around
To
directly communicate with
other radios
9
Monitor 8
To
adjust the condition for
10
Monitor Momentary
8
incoming signal match
11
Squelch
Off
8
To
always unmute speaker
Squelch
Off
no matter whether carrier is
12
Momentary
fJJ
present or not
To
quickly return to the
13
Home Screen
previous menu
or
home
screen
14
Scan
To
receive signals
on
other
channels
15
Nuisance
To
temporarily ignore
Temporary Delete unwanted channel activity
16
Emergency
To
summon help in emergent
situations
Adjust
Squelch
To
temporarily adjust the
17
Leve1
{(9
squelch threshold requi
red
for the radio to unmute
18
Battery Strength
To
indicate the battery
Indicator strenoth.
19
20
21
22
23
24
25
26
27
To
activate Emergency
in
the case that the radio
Man Down
is
positioned aslant for a
preset time period due
to
an
unexpected situation
Scrambler:
To
encrypt
your voice so as to
guarantee privacy of your
Scrambler
f!J
t
communication
Encrypt @
Encrypt:
To
encrypt your
voice and message so
as
to
guarantee privacy of your
communication
Lone Worker
To
protect the operators from
accidents
One Touch
Call1-5
To
make appropriate
services quickly
Status 8
To
access the menu " Status
List "
_quickly (for
5-Tone~}
Telemetry
~
To
supervise remote devices
To
enter or exit the DTMF
keypad mode (In the DTMF
DTMF Keypad
Keypad mode,
you
can enter
a number via the keypad
to
make a phone
call~
Phone List
To
access the menu " Phone
List"
_quickly
To
communicate between
Roam §
sites
in
the
IP
Multi-site
Connect system
Note:
• Long and
short
press
of
a key can be
assigned with different functions by
your
dealer.
•
The
TK
is
programmed
as
the Emergency
key by
default, and
is
programmable
by
your dealer.
Before Use
Charging the Battery
Use
only
the
charger
and
battery
specified
by us.
Charger LED can indicate the charging process.
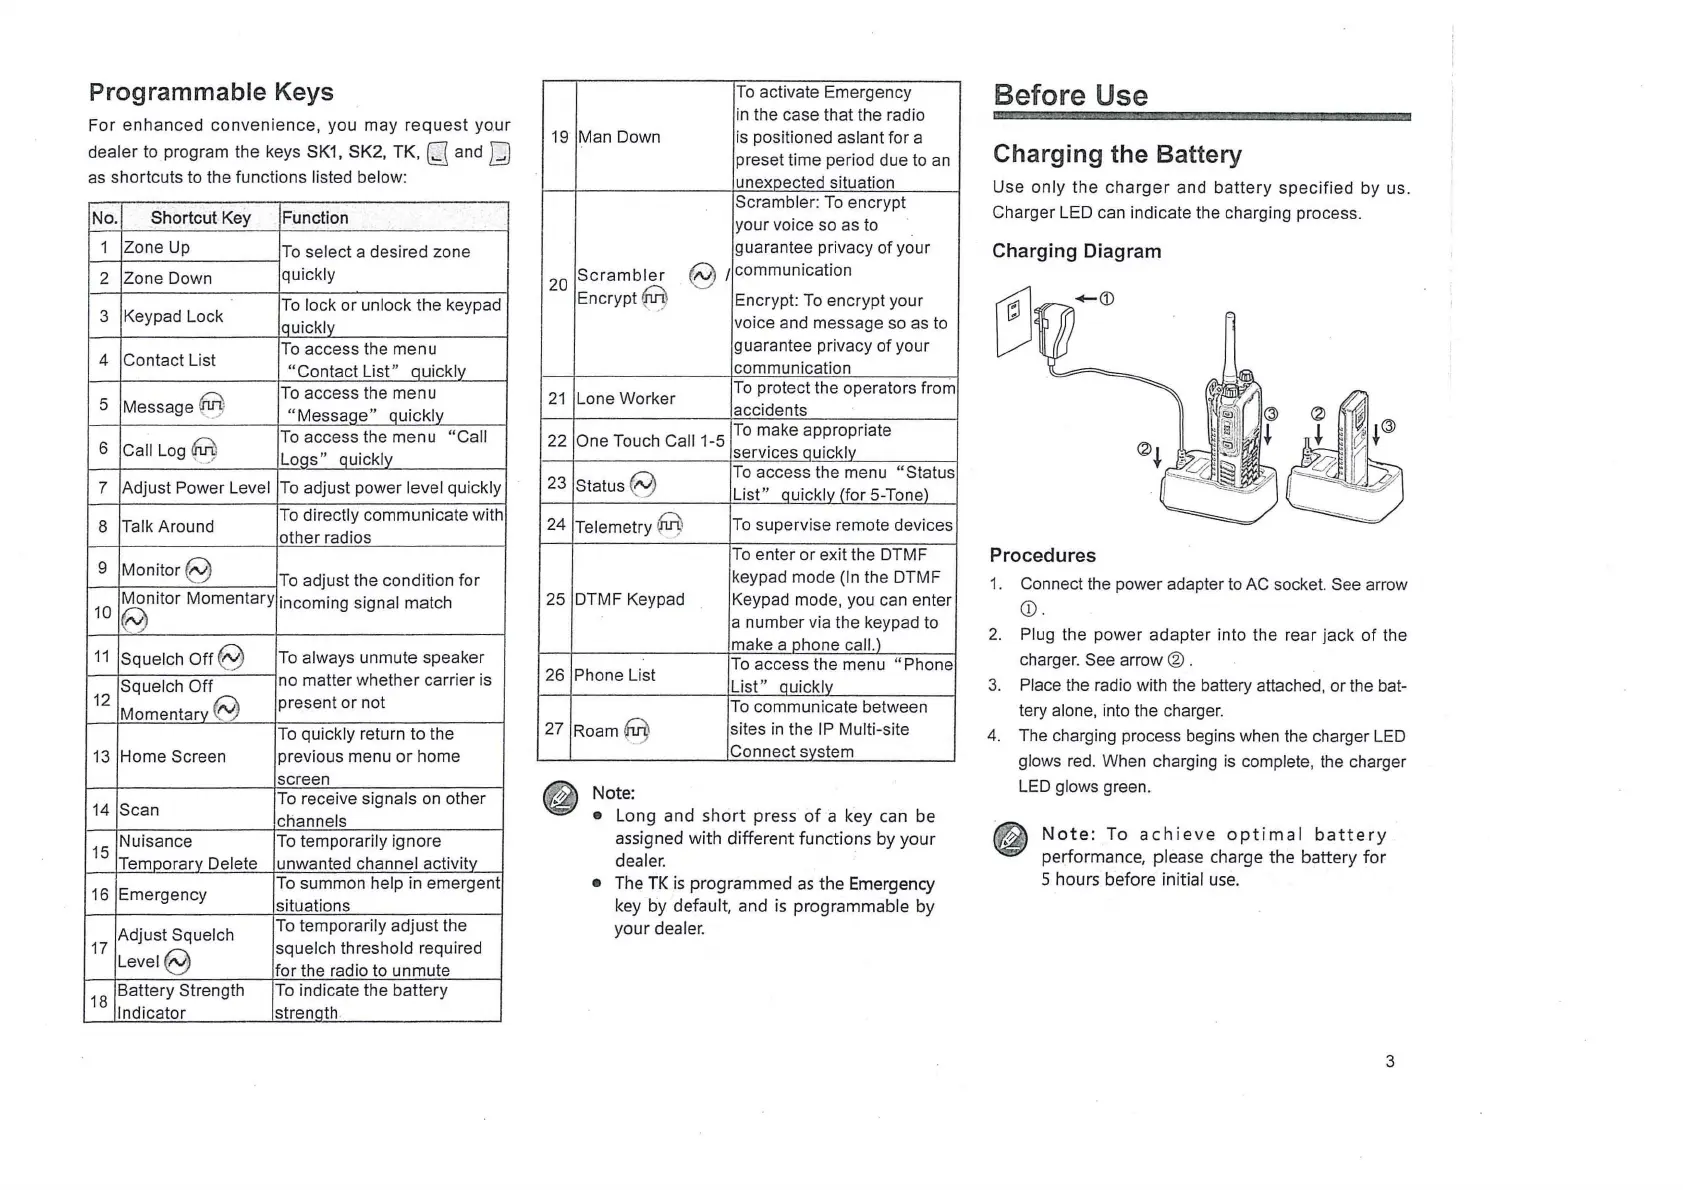
Charging Diagram
Procedures
1. Connect the power adapter
to
AC socket. See arrow
CD.
2. Plug the power adapter into the rear jack
of
the
charger.
See arrow @ .
3. Place the radio with the battery attached, or the bat-
tery alone, into the charger.
4. The charging process begins when the charger
LED
glows
red
. When charging
is
complete, the charger
LED
glows green.
~
~
Note:
To
achieve
optimal
battery
performance, please charge the battery
for
5 hours before initial
use.
3