Do you have a question about the IDEAL Halo Combi Wi-Fi and is the answer not in the manual?
Installation must be performed by a competent person with appropriate safety qualifications.
Read instructions carefully to prevent product damage or hazardous conditions.
Instructions apply only to stated Ideal Boiler models and must comply with all applicable standards.
Always isolate the mains supply before installing or working on any boiler electronic components.
Download the Halo app from the Apple App Store or Google Play. Householders can set up accounts during installation.
Lists all items in the Halo Combi Wi-Fi kit: display unit, rear housing, trim plate, desk stand, Smart Interface, guides, batteries, and fixings.
Zigbee communication range is up to 30 meters. Avoid solid walls or metal frames. Consider Zigbee Booster if needed.
Position Wi-Fi router no more than 30 meters from the Smart Interface. Avoid directing Wi-Fi through metal or concrete.
Steps for wall mounting the Halo, with or without the trim plate. Check signal strength before fixing.
Instructions for desk mounting the Halo using its integrated rear housing and desk stand.
Isolate the mains supply to the boiler before proceeding with installation.
Locate 230V and low voltage terminals. Connect link wires to room stat/timer and OpenTherm as per diagrams.
Remove the blanking plate on the boiler front, connect the Smart Interface plug, and push it into the aperture.
Switch on the boiler. The Smart Interface powers up and begins setup (up to 90 seconds).
Press the Override button to verify connection. The Override LED should be green, and the boiler should fire.
Ensure the Halo Smart Interface Zigbee LED flashes red. The Halo unit powers up automatically after battery insertion.
Follow the on-screen guide to select boiler type and zones. The screen will show pairing progress.
Confirm 'Pairing Complete', set time and date, and optionally add installer contact details.
Press and hold the Pair button on the Smart Interface until the Zigbee LED turns solid green.
Ensure router is connected to the internet and 2.4GHz is enabled. Download the Ideal Halo app.
Open the Ideal Halo app, create an account, and follow the in-app instructions for connection.
The householder will need their Wi-Fi network name and password to complete the setup.
Details menu options such as Holiday mode, Timed heating schedule, Support, Fault page, Time/date, Advanced, and Landlord settings.
Explains the meaning of Power, Boiler, Connectivity, Zigbee, and Override LEDs on the Smart Interface.
Details settings like Optimised start/stop, Delayed start, Display tolerance, Temperature offset, and Frost protection.
Includes Daylight saving time, Frost protection settings, and inputting the Service phone number.
Confirm pairing via 'Identify' function and check Zigbee RSSI from 0 to -65.
Test boiler firing and shutdown by adjusting temperature on Halo. Check Boiler LED status.
Verify Smart Interface LEDs, battery level, network icons, time/date, and installer details.
Addresses no power on Smart Interface and boiler failing to fire. Check connections, power, and temperatures.
Troubleshoots failed pairing, low Zigbee RSSI, and Smart Interface not connecting to Wi-Fi.
Covers deleting Halo from Zigbee network, deleting Zigbee network, and factory resetting the Smart Interface.
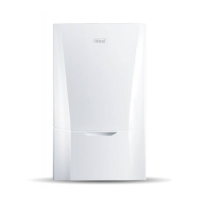
The Ideal Halo Combi Wi-Fi is an internet-connected wireless single-zone programmable room thermostat (PRT) designed to provide intelligent control over your home's heating system. This device is an ERP Class VI Boiler+ Compliant product, ensuring energy efficiency and adherence to relevant standards. It is compatible with a range of Ideal boilers, specifically those with serial letter code AFQ onwards, including Logic Combi C, Logic Combi C IE, Logic Combi ESPI, Logic Code Combi ESPI, Logic+ Combi C, Logic Max Combi C, Logic Max Combi C IE, Vogue Gen2 Combi, and Vogue Max Combi, Vogue Max Combi IE. For older boilers, a separate bracket (Product Code: 220366) is required for installation, and further details on compatibility and installation can be found on the Ideal Boilers website.
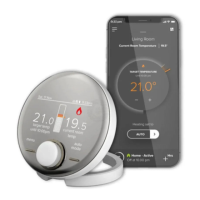
The Halo Combi Wi-Fi system consists of two main components: the Halo PRT and the Halo Smart Interface. The Halo PRT is a wireless unit powered by four AA batteries, and it communicates with the Smart Interface via Zigbee, a local RF protocol. The Smart Interface, in turn, plugs into the front aperture on the boiler and communicates with the boiler via OpenTherm. This setup allows for seamless control and monitoring of your heating. The Smart Interface also features Wi-Fi connectivity, enabling it to connect to your home Wi-Fi network and allow app-controlled heating through the Ideal Halo app.
The primary function of the Halo Combi Wi-Fi is to provide precise and programmable control over your home's heating. Users can set timed heating schedules, allowing the boiler to operate according to their daily routines. The device supports up to six heating periods per day, offering flexibility in managing comfort and energy consumption.
The Halo system incorporates several intelligent features to enhance its functionality. "Optimised start" allows the boiler to begin heating in advance of a scheduled time, ensuring the desired temperature is reached precisely when needed. Conversely, "Optimised stop" enables the boiler to stop heating early if the target temperature is already achieved, saving energy. A "Delayed start" feature further refines energy efficiency by delaying heating if the room temperature is already close to the target.
For convenience, the Halo display tolerance can be adjusted, allowing users to set the sensitivity of the room temperature display in increments of 0.5°C or 0.1°C. A "Temperature offset" feature provides fine-tuning of the room temperature display, adjustable from -2.5°C to 2.5°C. The device also automatically adjusts for "Daylight saving time" and includes a "Frost protection" feature, which maintains a minimum temperature of 5°C to prevent pipes from freezing when the thermostat is off.
The Halo app, available on the Apple App Store and Google Play, extends the control capabilities of the system. Through the app, users can download and set up the thermostat, manage heating schedules, and monitor their heating system remotely. The app also allows for the creation of an account and provides in-app instructions for setup and usage.
The Halo Combi Wi-Fi offers flexible installation options, allowing it to be either wall-mounted or desk-mounted. For wall mounting, the unit can be installed with or without the provided trim plate. The rear housing is first secured to the wall, and then the Halo display unit is clipped into place. When desk mounting, the Halo has an integrated rear housing and desk stand, providing a convenient tabletop solution. In both configurations, four AA batteries power the Halo display unit, and careful attention should be paid to the battery orientation as indicated in the housing.
Location guidelines are crucial for optimal performance. The Halo PRT should be mounted 1.2-1.5 meters above the floor, away from direct sunlight, radiators, heat sources, and drafts. It should also not be fitted behind curtains. The wireless Zigbee communication between the Halo and the Smart Interface has a maximum range of 30 meters, though this can be reduced by construction materials like metal frames or solid concrete walls. If the distance is greater than 30 meters or if the installation location presents communication challenges, a Zigbee Booster (Product Code: 221132) or external mounting of the Smart Interface using a bracket (Product Code: 220366) may be necessary. Similarly, the home Wi-Fi router should be positioned no more than 30 meters from the Smart Interface to ensure reliable Wi-Fi connectivity.
Installation of the Smart Interface involves isolating the mains supply to the boiler, locating the wiring terminals (230V and low voltage connections), and making the necessary electrical connections. If an existing 230V device is installed, it must be removed, and the link wire should be moved to the room stat/timer connection. If an OpenTherm device is in use, it should be removed, and the link wire should be added to the "opentherm" connection. The blanking plate on the front of the boiler is then removed, and the link wire plug is safely stored. The Halo Smart Interface plug is connected to the connector in the boiler's aperture, and the unit is pushed into place.
After physical installation, the system needs to be paired. First, the boiler is switched on, and the Halo Smart Interface undergoes a setup process that can take up to 90 seconds, indicated by a green Power LED. The Smart Interface connection to the boiler is checked by pressing the Override button; a green Override LED indicates the boiler is firing. To begin pairing with the Halo PRT, the Pair button on the Smart Interface is pressed and held until the Zigbee LED starts flashing red.
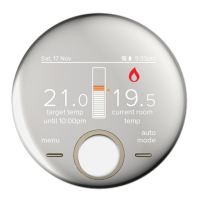
The Halo PRT, once batteries are inserted, powers up automatically. The device guides the user through the pairing process, prompting for boiler type and number of zones (Combi boiler and single zone in this case). The Halo screen displays "Pairing in Progress," then "Synchronisation in Progress," and finally "Pairing Complete" once successfully connected to the Smart Interface. The device automatically sets up the time and date. Users have the option to input an installer contact phone number, which defaults to the Ideal Boilers Customer Service Number if not changed. The home screen then displays the current and target temperatures, along with the temperature bar and a Zigbee communication icon. The pairing process is finalized by pressing and holding the Pair button on the Halo Smart Interface until the Zigbee LED turns solid green.
Connecting the Halo to the internet is done through the Ideal Halo app. Users must ensure their home router is connected to the internet and that 2.4GHz Wi-Fi is enabled. The app is downloaded from Google Play or the Apple App Store, an account is created, and the in-app instructions are followed to link the Halo Smart Interface to the home Wi-Fi network. The homeowner will need to provide the Wi-Fi network name and password to complete the setup. Minimum operating requirements for the app include Smart Phone/Tablet - iOS 9 Android 4.4.3 and PC latest version of Chrome, Safari, Firefox or Internet Explorer on Mac OS or Windows 7.
The Halo offers various configuration options accessible through the settings menu. "Holiday" mode allows the device to be switched off for a predefined period, automatically returning to the programmed schedule afterward. "Timed heating schedule" enables setting up to six heating periods per day. The "Support" menu provides information such as software version and key contact numbers. The "Fault page" displays the latest fault code and description. "Time and date" can be adjusted via the menu. "Advanced settings" are intended for adjustment by a competent person, as incorrect configuration can negatively impact the thermostat and heating system. "Landlord settings" provide specific configurations for landlords.
The Halo Combi Wi-Fi system includes several indicators and troubleshooting steps to assist with maintenance and problem resolution. The Smart Interface LED key provides visual cues for the status of various functions:
The "Override and Failsafe active" status is only relevant when communication is lost between the Halo and Halo Smart Interface. More details can be found in the Halo User Guide.
A commissioning checklist is provided to ensure a complete and correct installation. This checklist includes verifying successful pairing using the "Identify" function, confirming the Halo's positioning, checking the RSSI (Received Signal Strength Indication) of the Zigbee wireless connection and Wi-Fi connection (target RSSI between 0 and -65 and text green). It also involves testing the boiler's operation by setting the Halo to AUTO mode and increasing/decreasing the temperature to observe flame ON/OFF and Boiler LED status. Finally, it confirms the Smart Interface indications (Power, Zigbee, Connectivity LEDs green) and the full battery level and network icons on the Halo home screen.
Troubleshooting steps are outlined for common issues:
The Ideal Boilers Ltd declares that this device (model 222142) complies with Directive 2014/53/EU. The full text of the EU declaration of conformity is available on the Ideal Boilers website. The device operates at an RF frequency of 2405 - 2480MHz with a maximum RF output power of 10dBm.
| Type | Smart Thermostat |
|---|---|
| Connectivity | Wi-Fi |
| Compatibility | Combi boilers |
| Energy Saving | Yes |
| Weather Compensation | Yes |
| OpenTherm Support | Yes |
| Geofencing | Yes |
| Voice Control | Amazon Alexa, Google Assistant |
| Warranty | 2 Years |
| Control Method | App, Manual |
| Display | LCD |
| Control | Remote |
| Power Supply | Mains |