4. Mark the level lines for the wall
cabinets and suspension rail
Using the high point on the floor that
you marked in Step 1, measure up the
wall 83
7
/8” for the top of 30” wall cabinets
or 92
5
/8” for 39” wall cabinets. Next,
locate the bottom of the suspension rail
by measuring down 2
1
/2” (3” for horizon-
tal cabinets) from the first mark. Then
draw level lines on the wall.
1. Checking for uneven spots
Start by checking the walls visually
and running a 4 foot level along the
surface. Mark any irregularities, such
as bows and high spots. If major prob-
lems need to be fixed, you may want
to hire a professional. It may also be
necessary to use shims when mount-
ing the cabinets.
10. Level and secure the cabinet
Fit the small metal plate over the bolt,
thread the nut loosely in place. Level
the cabinet, using shims at the bottom
edge if necessary. With your wrench,
loosely secure the cabinet hardware.
Do not tighten; this will allow you to
make adjustments once all of the cabi-
nets are installed.
9. Hang the corner cabinet
Starting with the corner cabinet, align
one piece of the suspension rail hard-
ware with the predrilled hole at the top
of the cabinet. Position the second hole
and its hardware. Note: If you don’t
have a corner cabinet, install a cabinet
that fits against both the back and side
walls, allowing the filler space shown
on your plan.
8. Secure the suspension rail
Secure the suspension rail to the studs,
aligning the bottom edge of the rail
with the level line marked on the wall.
If you found a bow in the wall of more
than
1
/4”in Step 1, shim the suspension
rail until it is straight. Should the end
of the rail fall between studs, secure it
to the wall with a heavy duty anchor.
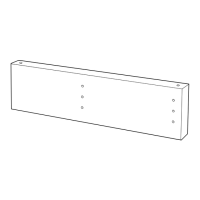
7. Insert suspension rail hardware
Slide the suspension rail hardware into
the suspension rail before putting it up.
You’ll need two pieces per wall cabinet.
(Be sure to position one piece on each
side of the corner cabinet if your plan
calls for one.) You may find it helpful to
tape the hardware into place until the
rail goes up.
6. Cut the suspension rail
Measure the length of the wall cabinets
to be installed along one wall. Include
the length of wall behind a high cabinet
only if the high cabinet is 12” deep.
Subtract
1
/4” from the overall measure-
ment. (This will leave
1
/8” of space at
either end of the rail.) Use your hack
saw to cut the suspension rail to this
length.
Note: If you will be installing a high
cabinet, final adjustments and tight-
ening of the mounting hardware
should be done after the high cabi-
net is installed to ensure that every-
thing is level.
14. Tighten the mounting screws
When all wall cabinets have been
mounted, aligned and connected, and
final adjustments have been made,
tighten all of the mounting hardware.
Slide the plastic covers in place over
the metal corner bracket.
13. Fasten cabinets together
Place the connection screws enclosed
with the cabinet frames into the holes
and tighten. Remove the clamps.
Continue fastening the remaining cabi-
nets together in the same way.
12. Drill through cabinet walls
You’ll find predrilled holes on the inside
of each cabinet. For all doors except
ULRIKSDAL use a
3
/16" drill bit to drill
through the fourth holes from the top
and bottom edges. (The second and
third holes are for the door hinges.) For
ULRIKSDAL door, drill through the
second holes from the top and bottom
edges. (The hinges for ULRIKSDAL fit
into the third and fourth holes from the
top/bottom.)
11. Hang the remaining
wall cabinets
Hang the rest of the cabinets in the
same way, aligning each with the previ-
ous one. Use your clamps to temporarily
hold adjacent cabinets into position. To
avoid marring the surface of your cabi-
nets, use a small scrap of wood between
the clamp and the cabinet.
Step 3. Hang the wall cabinets
When you’ve completed Step 3, all of the wall cabinets will be in place.
© Inter IKEA Systems B.V. 2004.
Hang these
instructions on
the wall so you’ll
have your
hands free
AKURUM wall cabinets are mounted
using a sturdy steel suspension rail. This
ensures a strong installation, and makes
it easier to hang and level the cabinets.
If you haven’t already done so in Step 1,
measure and draw the position of the cab-
inets on the wall to ensure that everything
will fit. Also be sure you’ve marked uneven
and high spots on the wall.
5. Finding the studs in drywall
At the marked suspension rail line, tap
the wall from the corner out (or use a
stud-finder) to check for the first stud.
Mark its position. While subsequent
studs are usually at 16”intervals, they
may be at 12” or 24”intervals in some
kitchens. Mark the location of each stud
along the line. This will show you where
to attach the suspension rail to the wall.
2. Next
Check the floor to find its high point.
The level will help you here as well.
Check all areas where you’ll be
installing base or high cabinets, and
mark the high and low points on the
wall.
3. Finally
Fit a combination square or right
angled wood panel into each corner,
and see if there are any gaps between
i
t and the wall. If the gap is more than
1
/4”, call your IKEA expert for assis-
tance. In a “U” shaped kitchen, meas-
ure between opposite walls at a num-
ber of spots to see if they are parallel.
 Loading...