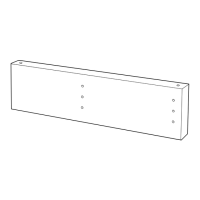
Note: Legs can be shared by two
cabinets, see the instructions. Place the
corner cabinet against the wall so that
its back edge is resting on the support
board. Through the holes at the top
back corners of the cabinet, mark where
to drill for the fixing screw. Set the cab-
inet aside. Note: If there´s no corner
cabinet, install the cabinet that will fit
against the back and side walls,
allowing the filler space shown on your
plan.
3. Secure the support board
Align the top edge of the support board
with the level line you marked at 4
5
/16”.
Secure it to the studs. Should the end of
the support board fall between studs,
secure it to the wall with a heavy-duty
anchor.
2. Cut base cabinet support boards
Measure the length of the base and
high cabinets to be installed. Do not
include the wall space behind appli-
ances. Cut the base cabinet support
board into measured lengths. Cut the
board 1
1
/2” shorter where a side toekick
is planned.
9. Drill through the cabinet walls
For all doors except ULRIKSDAL use a
3
/16" drill bit to drill through the fourth
holes from the top and bottom edges.
For ULRIKSDAL door, drill through the
second holes from the top/bottom. When
installing a drawer cabinet, drill
through the fifth hole from the top.
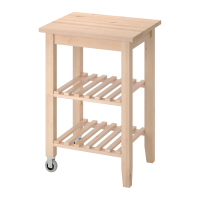
8. Install the next base cabinet
Mark, drill, and insert the screws for
the next cabinet. Lift the cabinet into
place, carefully aligning it with the
previous cabinet and securing them
together with a clamp.
7. Secure the cabinet to the wall
Tighten the screws, but not completely.
Assure that the cabinet is level front-to-
back and side-to-side. Hint: Installing
the LAZY SUSAN is easier now than
after the countertops are in place.
6. Install the corner cabinet
Lift the corner cabinet back into place
and ad
just the legs so that it stands
level.
5. Drill, anchor and screw
Using the appropriate drill bit and type
of screw for your wall material, drill
holes at the spots you’ve marked. If
there’s no stud, insert a heavy-duty
anchor then the screw and tighten
halfway.
12. Tighten all the screws
When all base cabinets have been
mounted and aligned, tighten all screws
into the wall. Now the high cabinet is
in place, make the final adjustments to
the wall cabinets and tighten all the
screws.
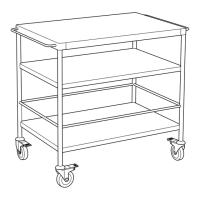
11. Install the high cabinet
The high cabinet should be installed
the same way you installed the base
cabinets. If you´re using a cover panel
on one side, mount this before install-
ing the cabinet using the enclosed
instructions
10. Fasten cabinets together
Place the connection screws enclosed
with the cabinet frames into the holes
and tighten. Continue in this fashion
with the remaining base cabinets
Step 4. Install the base and high cabinets
Hang these
instructions on
the wall so you’ll
have your
hands free
When you’ve completed Step 4, all of the cabinet frames will be in place.
18. The finishing touch
Dab your finger into a 3-in-1 oil to pre-
vent the caulk from sticking, then run
your finger along the caulk, forcing it
into the crevice. Remove the tape for an
airtight seal and a straight edge.
17. Prepare the area to be caulked
To produce an airtight seal between the
wall and the cabinet, you’ll need to
caulk around the filler pieces. Choose a
well made latex brand (it doesn’t need
to be waterproof.) Tape alongside the
area to be caulked. Apply a bead of
caulk into the crevice.
15. Install filler pieces
Put the filler piece in place with the cut
edge against the wall. Attach by drilling
a screw through the predrilled holes
from the inside of the cabinet. Install
other filler pieces in the same way.
When you’ve finished installing all
filler pieces, go to picture 17.
Cut the template material so that it’s
the same height as the cabinet. Hold it
in place where the filler will be
installed. Open the compass a couple of
inches and place the point against the
wall. Holding the compass horizontal
and level, follow the line of the wall so
that the pencil traces a clear line on the
template. To cut the template to the cor-
rect width, measure the distance from
the farthest point on the wall to the cab-
inet. Fi
nd the same point on the tem-
plate and mark it. Draw a straight line
from this point to the top and bottom of
the template to form the flat edge that
will fit against the cabinet. Cut the tem-
plate and check that it fits, then trace
the shape onto the fller and follow the
cutting directions in picture 14.
16. If the wall is uneven
If the wall is not level and flat, the filler
must be cut to conform to the wall’s
shape. To do this, you’ll need to make a
template for tracing the wall’s shape
onto the filler. A piece of thin plywood or
heavy cardboard makes a suitable tem-
plate. You’ll also need a measuring tape,
pencil and compass.
© Inter IKEA Systems B.V. 2004.
Next, it’s time for the base and high
cabinets. Before you begin, note all plumb-
ing, power sources and other utilities.
Measure these locations carefully, and,
using a hole saw, cut the appropriate
openings before each cabinet is installed.
In the following steps, you’ll install
the legs at the front of the cabinets, and
secure a cabinet support board to the wall.
This is a length of particleboard packed
together with the toe-kick panels. If you
prefer, you can use legs on the back of the
cabinets in lieu of the support board.
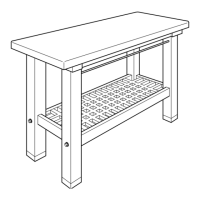
4. Start with the corner cabinet
Attach legs to the front edges of the
cabinets according to package instruc-
tions. If you are not using the support
board, attach back legs as well.
Always use a back leg at the end of the
run, as this makes attaching the side
toe-kick easier.
14. Cut filler pieces
With a handsaw: draw a line connecting
the top and bottom marks on the front
side of the filler, and cut it with the face
side up. Jigsaw: mark both sides of the
filler. Put masking tape over the line on
the front side to prevent chipping. Cut
it from the back side.
1. Marking the level lines
Using the high point of the floor that
you marked earlier, measure up 4
5
/16”.
Use a 4 foot level to draw a line on the
wall at this height. Now measure 34
1
/2”
from the same point on the floor and
draw another level line. This will help
you level the top of the base cabinets.
13. Measure filler pieces
Check the wall with your level to see if
it is even and flat. If so, measure the
distance from the wall to the cabinet
and mark this distance at the top and
bottom of the filler piece. Note: If the
wall is uneven, skip to picture 16
.
 Loading...