GB-13
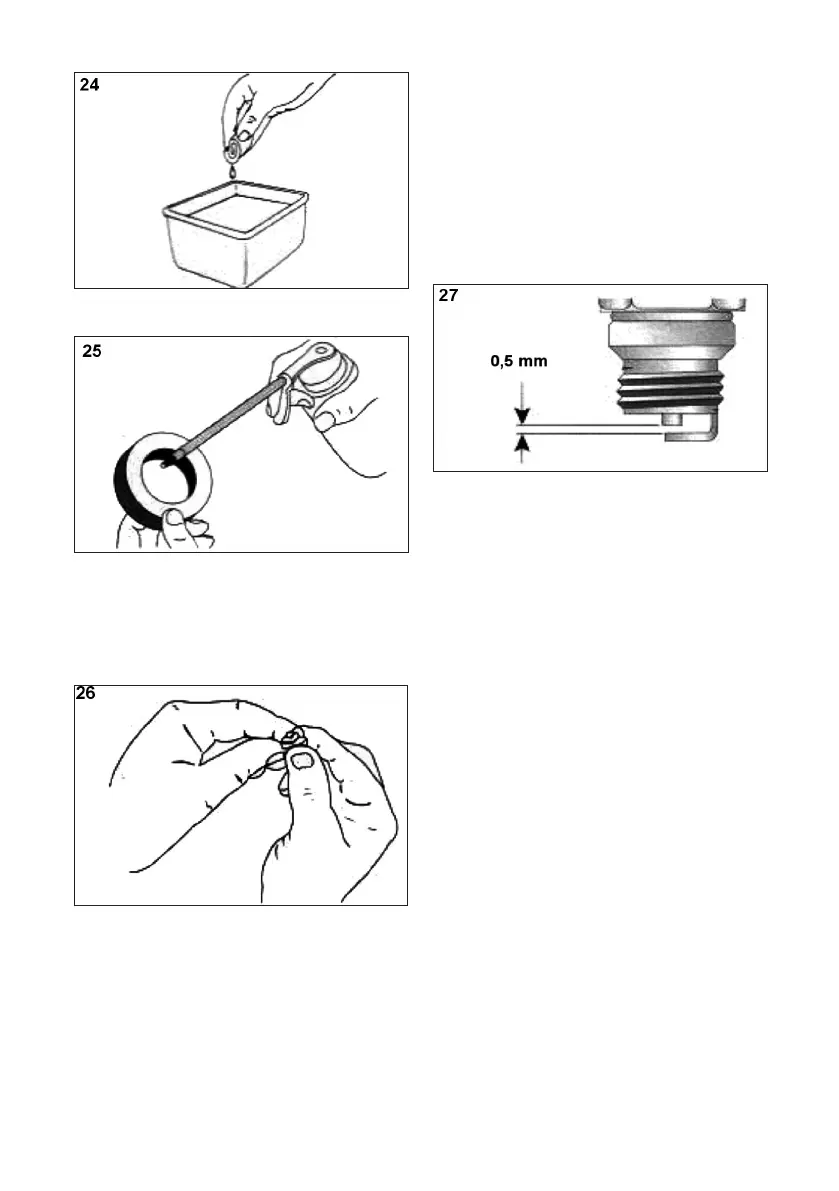
4. Apply enough clean oil to lightly coat the lter (Fig.
25).
5. Squeeze the lter to spread and remove excess oil
(Fig. 26).
6. Replace the air lter in the air lter/mufer cover
(Fig. 23).
NOTE: Operating the unit without the air lter and
air lter/mufer cover assembly, will VOID the war-
ranty.
Installing the Air Filter/Mufer Cover
1. Place the air lter/mufer cover over the back of the
carburettor and mufer.
NOTE: The choke lever must be in position B (Fig.
22) to install the air lter/mufer cover.
2. Insert the four (4) screws into the holes in the air
lter/mufer cover (Fig. 22) and tighten them. Use a
at blade or T-20 Torx bit screwdriver. Do not over-
tighten. Do not use excessive force.
REPLACING THE SPARK PLUG
Use a type RDJ8J spark plug (or equivalent ). The cor-
rect air gap is 0.5 mm (0.020 in). Remove the plug after
every 50 hours of operation and check its condition.
1. Stop the engine and allow it to cool. Grasp the plug
wire rmly and pull the cap from the spark plug.
2. Remove any dirt from around the thread. Remove
the spark plug from the cylinder using a 5/8 in. spark
plug wrench and turning it counterclockwise.
3. Replace cracked, fouled or dirty spark plugs. Set the
air gap at 0.5 mm (0.020 in) using a feeler gauge
(Fig. 27).
4. Install a correctly gapped spark plug in the cylinder
head . Tighten the spark plug using a 5/8 in. spark
plug wrench and turning it clockwise until snug. Do
not over-tighten.
If using a torque wrench, torque to 12.3-13.5 Nm
(110-120 in.lb).
CLEANING AND STORAGE
CLEANING THE UNIT
Use a small brush to clean off the outside of the unit
and to keep the air vents free of obstructions.
CLEANING THE VACUUM BAG
1. Empty the bag after each use to avoid deterioration
and obstructions of the air ow, which will reduce
the performance of the vacuum.
2. Wearing eye protection and a dust mask, clean the
bag as needed. Turn the bag inside out after empty-
ing and vigorously shake out dust and debris.
3. Wash the bag once a year or more often if needed.
Proceed as follows:
a. Remove the vacuum bag.
b. Turn the bag inside out.
c. Hang up.
d. Hose down thoroughly.
e. Hang to dry.
f. Turn bag right-side out and reinstall.
STORAGE
• Allow the engine to cool before storing.
• Store the unit in a locked-up place to prevent unau-
thorized use or damage.
• Store the unit in a dry, well ventilated area.
• Store the unit out of the reach of children.
 Loading...