Do you have a question about the imex E60 and is the answer not in the manual?
Congratulations on your purchase. Manual contains safety and operating instructions for the Imex E60.
Location of the serial number on the E60 laser level. Record for contact with distributor.
This manual applies to the Imex E60 for basic operation. More information is available online.
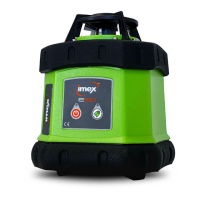
Identifies key parts of the E60 laser unit, including aperture, indicators, and tripod mount.
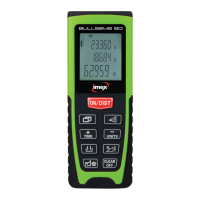
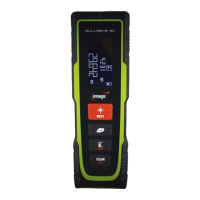
Identifies key parts of the LR1 laser detector, including sensor, display, and controls.
Instructions for placing the E60 on a stable surface and mounting it securely on a tripod.
Steps for turning the E60 laser on and off, including self-levelling behavior and warnings.
Explains the TWS function to prevent inaccurate readings caused by knocks or movement.
Instructions on operating the LR1 laser detector to find the laser beam and its detection modes.
Details battery types for the E60 and LR1, and notes on correct battery placement.
States factory calibration accuracy and user responsibility for periodic checks.
Step-by-step guide to verify the laser's accuracy against specified tolerances.
Guidelines for safely transporting the E60 laser to maintain calibration and prevent damage.
Recommendations for storing the E60 laser, including temperature limits and cleaning.
Lists key technical specifications of the Imex E60 laser, such as range, accuracy, and power.
The Imex E60 is a rotary laser level designed for professional use, incorporating the latest laser technology for robust and trouble-free operation. This quick start manual provides essential instructions for setting up, operating, and maintaining the device, along with important safety directions.
The Imex E60 is a self-leveling rotary laser that emits a rotating laser beam to establish a level line. It is designed to provide accurate horizontal leveling for various construction and surveying tasks. The device features a protective lighthouse for the rotary laser aperture, ensuring durability and protection of the internal components. When powered on, the E60 automatically self-levels within a 5° range, and its laser head begins to spin, projecting a continuous laser line.
A key feature of the E60 is its Tilt Warning System (TWS). This system prevents the laser from providing inaccurate readings if the unit is knocked or moved from its original position. When TWS is activated, any interference will cause the laser to stop spinning, and a TWS indicator light will flash. The operator must then manually reset the laser to resume operation, ensuring that the level is re-established accurately. This feature is crucial for maintaining precision on the job site and avoiding errors caused by accidental disturbances.
The E60 is typically used in conjunction with an LR1 Laser Detector. The detector helps locate the laser beam, especially over longer distances or in bright conditions where the beam might not be visible to the naked eye. The detector provides visual and audible feedback to indicate the position of the laser beam relative to the detector's sensor.
To set up the E60, place it on a stable surface or securely attach it to a tripod. When using a tripod, extend the legs to the desired height and ensure they are spread far enough apart for stability. The E60 attaches to the tripod using a 5/8 tripod bolt. In windy conditions, it is advisable to secure the tripod further. For optimal performance, choose a location free of obstructions that could block or reflect the laser beam. In dusty environments, position the E60 up-wind to prevent dirt from accumulating on the laser.
To turn on the E60, simply press the power button. The power indicator will illuminate. If the unit is within its 5° self-leveling range, it will automatically level itself, and the laser head will begin to spin, emitting a rotating laser beam. If the unit is bumped or senses interference, the laser head will stop spinning and re-level. Once re-leveled, it will resume spinning. However, it's important to note that if the unit has been bumped or moved, the instrument may not return to its original level position. Therefore, it is always recommended to recheck your RL/datum point after any such incident.
The TWS is activated by pressing the TWS button, which will cause the LED indicator to light up. Once activated, if the E60 is knocked or interfered with, the laser will stop spinning, and the TWS indicator light will flash. To reactivate the TWS and resume laser operation, press the TWS button again. The laser will then re-level and begin to spin. As a best practice, always check your RL/datum point when the unit re-levels after a TWS activation.
To use the LR1 detector, power it on by pressing its power button. The detector will beep once, and its LCD screen will display the battery level, detection mode, and speaker status. You can switch between course and fine detection modes using the Course/Fine button. Move the detector into the path of the laser beam. The LCD screen will show arrows indicating the direction to move the detector to find the beam. Once the laser beam is located, the detector will emit a constant beep, and the LCD will display a horizontal line, indicating the level position.
Regularly checking the accuracy of the E60 is crucial for reliable performance. To do this, place the E60 on a flat, level surface or a tripod approximately 30m from a wall. Align the first axis square to the wall, allow the E60 to self-level and rotate. Mark the center of the beam on the wall. Carefully rotate the laser on the tripod 180° and allow it to self-level, then mark the beam's position again if it differs from the first mark. Next, align the second axis flat to the wall by rotating the laser 90° on the tripod, allow it to self-level, and mark the beam's position. Finally, rotate the laser 180° again, allow it to self-level, and mark the beam's position. The E60 is considered accurate if all four marks are within 6mm from the center (6mm maximum extreme edges) at 30m. It is the user's responsibility to periodically check the laser's accuracy. If adjustment is needed, contact your nearest Imex dealer.
The E60 operates on 4x AA 1.5V Alkaline batteries, while the LR1 Receiver uses a 1x 9V battery. When inserting batteries into the laser unit, ensure correct polarity of the terminals.
Always transport the E60 in its original foam-lined carry case. Never transport the unit loose in a vehicle, as shock and vibration can affect its accuracy and calibration. If transporting the unit overseas by sea or air, ensure that correct procedures for transporting batteries are followed.
Store the E60 within the recommended temperature range of -10°C to +50°C. After long periods of storage, check the battery charge. Always clean the unit before storing, even if it's in regular use. If the unit has been used in damp weather, ensure it is thoroughly dried before placing it back in its carry case to prevent moisture ingress.
| Accuracy | ±1.5mm |
|---|---|
| Laser Class | Class 2 |
| Laser Type | 635nm, <1mW |
| Battery Type | 2 x AAA |
| Protection Class | IP54 |
| Dimensions | 115 x 48 x 28 mm |
| Weight | 135g |
| Measuring Range | 0.05m to 60m |
| Operating Temperature | 0°C to 40°C |
| Battery Life | up to 5, 000 measurements |
| Storage Temperature | -10°C to +60°C |