: Sign of difference mode.
: Sign of scan mode.
3
Key Functions
4
Key
Function
--Turn on/off the instrument (long press)
--Turn on/off the backlight (short press)
Data save: after get a new reading, press this key once and the
screen appear “*”, then long press this key to save the reading.
Function key: continue to press this key and select the functions
then press enter key to set.
Velocity key: continue to press this key and select the velocity
and you can press the up or down keys to adjust the value.
Up key and quickly enter scan mode
Down key and quickly enter alarm mode
Enter key
Calibration key
Basic operations
1
3
2
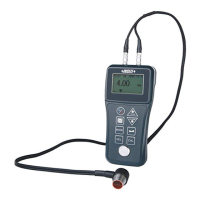
Power on and off:
Long press the key until screen show the picture as below:
Insert the plus of the probe into the socket on the instrument.
FILE1: File selection(5 files in total).
5M: Probe selection(4 kinds of probe: 2M, 5M, 7M, H2M).
MENU: Menu selection.
20:30: System time.
: Sign of coupling.
: Battery information(When it is , the battery should
be charged).
: Sign of alarm mode.
Transducer setting:frequency
The frequency of the transducer should be preset to the instrument
before measuring operation. This enables the user to select the
transducer type among supported transducers according to frequency
and diameter depending on application requirements.
Use the following steps to select your transducer frequency:
Press the key to select the desired frequency of the probe.
On the measurement screen, press the key twice to activate the
transducer frequency tab.
Press the key back to the measurement screen.twice
Sound velocity setting:
In order for the gage to make accurate measurements, it must be
set to the correct sound velocity for the material be measured.
Use the following steps to select your transducer frequency:
On the measurement screen, press the key to preset commonly
using velocity.
Use the and to adjust the value until it matches the sound
velocity of the material to be measured.