5
6
4
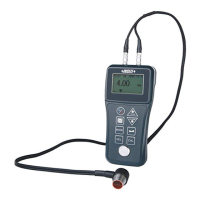
Zero setting:
Plug the transducer into the instrument, make sure that the
connector are fully engaged. Check that the wearface of the
transducer and surface of the zero disc is clean.
Select the frequency(5M) and sound velocity(5920m/s).
Apply a single droplet of couplant to the face of the zero disc.
Press the transducer against the probe disc, makeing sure that
transducer sits flat against the surface.
While the transducer is firmly coupled to the zero disc, the
thickness value is shown on the screen.
Press the key to set the value to 4.00mm.
5
Thickness measurement:
When the screen is displaying thickness measurements, the
display will hold the last value measured, until a new
measurement is made.
Plug the transducer into the instrument, make sure that the
connector are fully engaged. Check that the wearface of the
transducer and surface of the workpiece is clean.
Select the frequency and sound velocity according to material
of the workpiece.
Apply a single droplet of couplant to the face of the workpiece.
Press the transducer against the , makeing sure that
transducer sits flat against the surface.
workpiece
While the transducer is firmly coupled to the , the
thickness value is shown on the screen.
workpiece
6
Calibration to a known velocity:
Make measurement of the test block whose thickness is
known(for example: 10mm) according to chapter “Thickness
measurement” correctly.
After the thickness value shows on the screen, press key
and remove the transducer from the surface, the display will
hold the last measurement made. At the same time, sign *
shows on the right of the screen as below.
Press key or to change the value to the exact value
10.00mm.
Press key , the sound velocity of the material measured will
show and it is saved as one of the commonly using velocities
at the same time.
System setup
1
Scan mode setting:
While the gauge excels at making single point measurements, it
is sometimes desirable to examine a larger region, searching for
the thinnest point. The gauge includes a feature, called Scan
Mode, which allows it to do just that.
On the measurement screen, press the key multiple times to
activate the【MENU】tab.