VHD Guide
Bootable VHD Creat
RUFUS Download and Run
RUFUS Setting
VHD file usage and precautions
Fixed / removable change
Press the button and select the [MODE Select] item.
● VHD files can use various settings.
● You can change the properties of the VHD file at any time
with the [Mode Manager] menu.
Never delete a VHD file that is in use (mounted) or change
its file location, as this may cause a fatal error in the SSD.
and Unschedule the disk defragmentation of iodd ST
VHD file create
VHD file mount
● The Iodd ST can use VHD files to use the Virtual Drive (HDD)
and Virtual USB Memory Stick (RMD)
● Download the [VHD Tool]
ftp://iodd.kr/open/vhd_tools/
● Press the key to mount the VHD file.
The created VHD file is recognized as 'uninitialized drive'
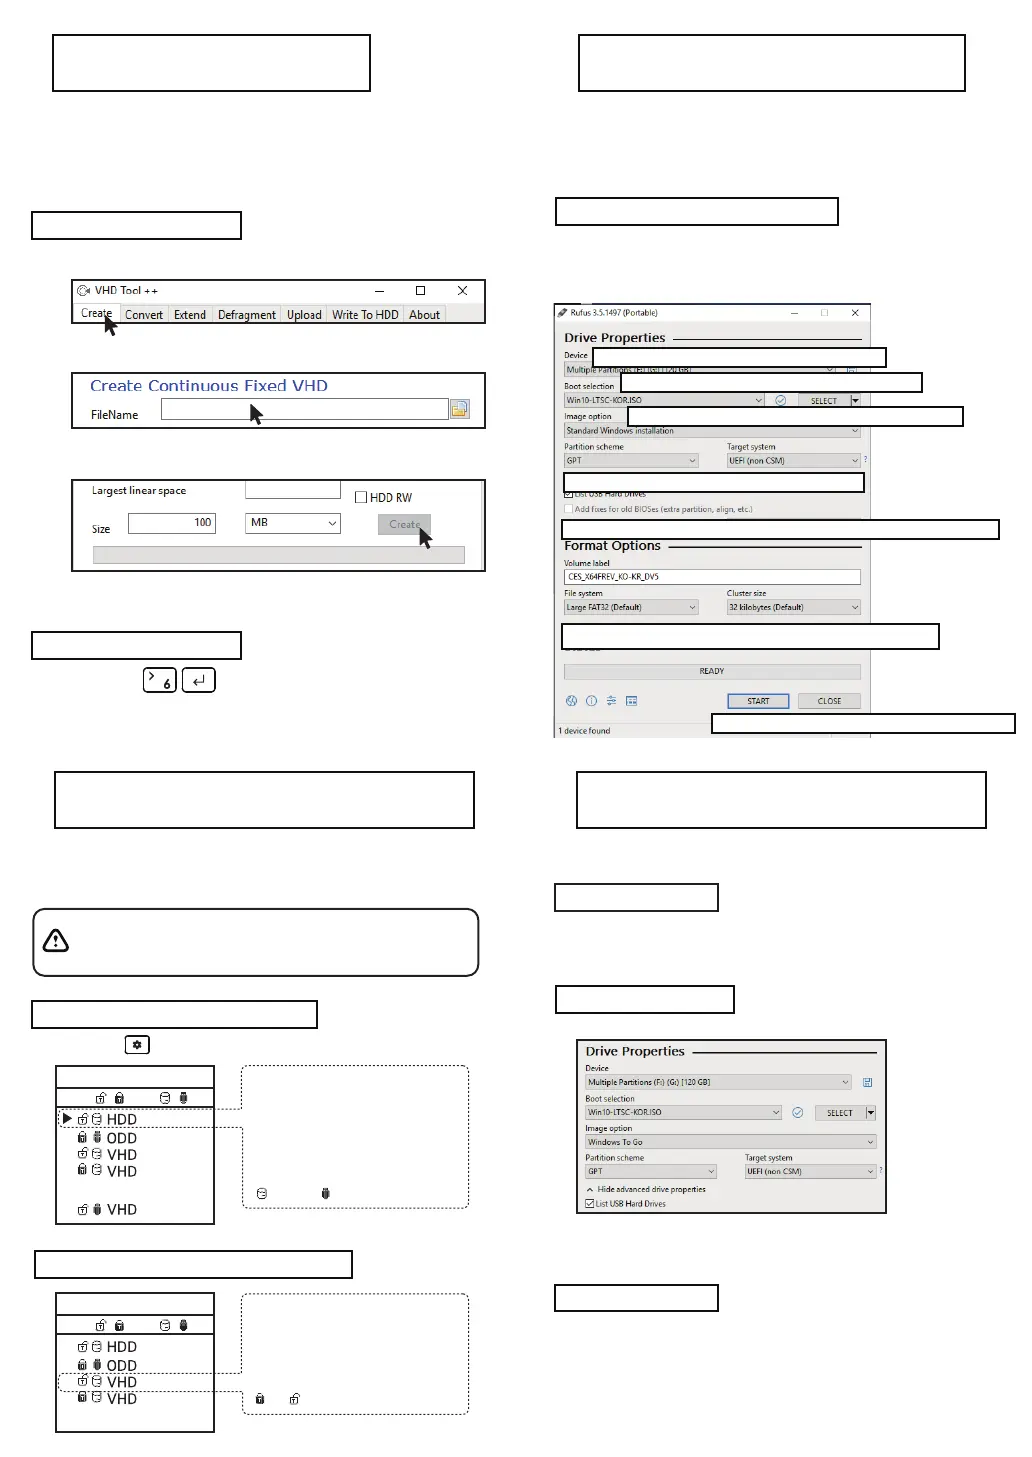
● Select the [Create] tab of the VHD Tool.
● Specify the location and file name of the ST in [File name].
● Enter the size of the VHD file to be created in [Size].
!!! Must be smaller than or equal to the size of [Biggest linear Space].
● Click the [Create] to create the VHD file in the selected path.
Mode select
Write Protection On/Off
//
5 - ,6-
-------- Disable -------
Button 6 on the selected device (▶).
The device can be changed to
removable or fixed.
Removable: Recognized as removable
disk by the host
Fixed: Recognized as external HDD
Fixed Removable
Mode select
//
5 - ,6-
-------- Disable -------
In the selected device (▶),
use button 5 to set the device to
write protection On/Off
This option can be checked by the
lock status.
On OFF
Bootcamp for MAC OSX
● The WTG and encryption features of the IODD ST
make it possible to boot securely even on MACs.
● With your Mac turned off, connect the Ipod ST and press
the power button while holding down the [option] key to select
a boot disk. Choose the yellow UEFI disk
[Press and hold the Control key when first installing]
● Install the bootcamp support driver.
● External USB or VHD file for boot camp driver
-Download the driver from the boot camp control panel.
● VHD file for boot camp installation (fixed recommended)
● The RUFUS * utility can be used to create UEFI bootable
VHD files or Windows-to-go disks.
● You can boot Only support UEFI system
● The VHD file must be set as the [removable] disk
● The default settings are the same as for UEFI boot.
Select [USB Hard Drive List] in [Advanced Drive Properties].
Select the target VHD drive (fixed) to install on the device.
Set the partition type to [GPT] and the target system to [UEFI].
● Download Site(Official)
https://rufus.ie/
● After installation, run as adSTstrator
Preparations
After work
ioddST.vhd
5120410
1. Select the mounted VHD drive in [Device] Item.
3. image Options, select Standard Installation or Win-to-Go
4.Partition scheme set GPT / Target system to UEFI.
5. For Win-To-Go installations, MBR / BIOS (or UEFI-CSM) be more compatible.
6.Recommends default values for file systems and Cluster size
7. Press the start button and the boot file is created.
2. Select the original ISO file from the boot selection.
 Loading...