1
Ioline Corporation • Woodinville, Washington USA • 1.425.398.8282 • www.ioline.com
Step 1 Unpack
Remove the machine, cradle parts, and accessory kit from
the box. Check the packing list. Always lift the cutter with
two people, one person at each end. Save all of the pack-
ing materials.
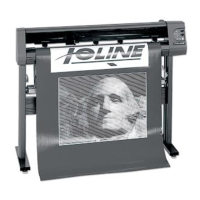
Step 2 Attach the Cutter to the Cradle
This quick start guide shows how to assemble and setup the Ioline 100 cutter. Consult the user guide
on the CD-ROM for more detailed information about installation and operation. The user guide may
be printed from the provided Adobe
®
Acrobat
®
viewer if necessary.
A. Pinchwheel
B. Drive Shaft Marker
C. Carriage
D. Platen
E. Idler Wheel
F. Carriage Rail
G. Pinchwheel Lever
H. Keypad
D
F
C
B A
G H
Caution: The cutter is heavy and could cause an injury if it falls. A minimum of two
people are required to safely unpack the machine and attach it to the cradle. One person
should hold the machine while the screws holding it to the cradle are inserted.
A
E
PRINT: 107196r2 • FILE: 107197r1
Quick Start Guide
100 System Cutter
Tools Required for Assembly:
Phillips screw driver
Place Machine on the Cradle
One person should hold the machine while the other
person positions the cutter. Slide the tabs on the bottom
of the machine outside the top of both cradle feet. The longer
portion of the foot should extend from the back of the ma-
chine. Make sure that the holes line up with the threaded
holes in the tabs. Place the metal material roll axle in the
notches on cradle brackets.
Back
Front
Tab