Do you have a question about the ITech IT8511A+ and is the answer not in the manual?
The materials contained in this document are provided "as is", and is subject to change, without prior notice.
The hardware and/or software described herein are furnished under a license and may be used or copied only in accordance with the terms of such license.
Restricted permissions of the U.S. government. Permissions for software and technical data which are authorized to the U.S. Government only include those for custom provision to end users.
A CAUTION sign denotes a hazard. It calls attention to an operating procedure or practice that, if not correctly performed or adhered to, could result in damage to the product or loss of important data.
A WARNING sign denotes a hazard. It calls attention to an operating procedure or practice that, if not correctly performed or adhered to, could result in personal injury or death.
A NOTE sign denotes important hint. It calls attention to tips or supplementary information that is essential for users to refer to.
ITECH warrants that the product will be free from defects in material and workmanship under normal use for a period of one (1) year from the date of delivery.
This Warranty will be rendered invalid in case of the following: Damage caused by circuit installed by customer or using customer own products or accessories;
Includes warnings on voltage, physical damage, power cords, wiring, modifications, and intended use.
Includes cautions on proper use, cleaning, and ventilation to maintain protective features and performance.
Unpack the box and check the contents before operating the instrument. If wrong items have been delivered, contact the dealer.
The instrument should be installed at well-ventilated and rational-sized space. Please select appropriate space for installation based on the electronic load size.
IT8511+/IT8511A+/IT8511B+/IT8512+/IT8512A+/IT8512B+/IT8512C+/IT8512H /IT8513A+/IT8513C+ series loads are equipped with a handle for user to easily carry and place it.
Please disassemble the load handle before installing equipment on the support.
IT8511+/IT8511A+/IT8511B+/IT8512+/IT8512A+/IT8512B+/IT8512C+/IT8512H+/IT8513A+/IT8513C+ loads can be installed on standard 19-inch rack.
To prevent electric shock and damage to the instrument, observe the following precautions.
To prevent electric shock and damage to the instrument, observe the following precautions.
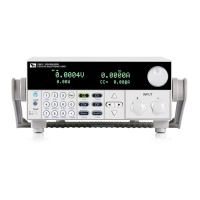
This chapter introduces the front panel, the rear panel, key functions and VFD display function of the electronic load.
High-visibility vacuum fluorescent display (VFD). Measurement resolution: 0.1mV,0.1mA. Voltage and current measurement speed: up to 40KHZ.
IT8500+ series electronic load different models have different front panels, the front panels and keyboards of different models are shown as below.
The Shift composite button is used in combination with other buttons to implement the functions marked under these buttons.
Press [Shift] button first and then other keys to achieve all kinds functions in the following table.
OFF: The load input is off. CC: Constant current mode. Error: An error has occurred. Trig: Waiting for the trigger signal.
IT8500+ series electronic load different models have different rear panels, the rear panels and keyboards of different models are shown as below.
A successful test process indicates that the instrument meets the factory specifications and can be operated well.
There are two types of control modes for IT8500+ series products: Local mode and Remote mode.
There are four operation modes of IT8500+ series products: Constant current mode (CC), Constant voltage mode (CV), Constant resistance mode (CR), Constant power mode (CW).
[On/Off] button on the front panel is used to manually control input on or off.
Press the combined keys [Shift] +[On/Off] (Lock) to lock the front panel keys, and VFD will display a Lock label.
Short circuit simulation and short circuit current measurement: you may press [Shift] + [1] (Short) button to emulate a short state.
Press [Shift] + [8] (system) to enter the system menu.
Press [Shift]+ [ 9 ] (Config) to enter the configuration menu.
Triggering is used with the transient operation; list operation and auto-test function. There are four types of triggers you can use for IT8500+ products.
LIST mode provides an accurate, fast and low-cost way to complete any complicated current change mode.
The transient test allows switching between two different load values. A common application is to test the dynamic characteristics of DC source.
IT8500+ series electronic load supports the over current protection (OCP) test function.
IT8500+ series electronic load supports the following protection function: Over voltage protection (OVP), Over current protection (OCP), Over power protection (OPP), Over temperature protection (OTP).
Current monitoring terminal will output 0-10V analog signal to corresponding to 0 to full range of input current.
IT8500+ series DC electronic loads have test ripple function. In the main interface by pressing the up and down keys, you can read the VPK, APK value
The IT8500+ has two automatic test editing modes. One is the IT8500+ special editing mode, and the other is compatible with the IT8500 automatic test editing mode.
Press [Shift]+[8] (System) to enter the system menu, and press to select the TESTMOD item.
Automated testing can be used to program, test, and show whether a test passes or fails.
Set the maximum current value and press [Enter] to confirm. Set the maximum voltage value and press [Enter] to confirm.
DB9 in the rear panel of the DC load IT8511+/IT8511A+/IT8511B+/IT8512+ /IT8512A+/IT8512B+/IT8512C+/IT8512H+/IT8513A+/IT8513C+ is TTL level, which can be connected to the serial port of the PC through the level conversion of the accessory.
The DB9 interface connector on the rear panel of the DC load is TTL voltage level; you can use the communication module IT-E121 and a standard RS232 extension cable...
The DB9 interface connector on the rear panel of the DC load is TTL voltage level; you can use the communication module IT-E121A and a standard RS232 extension cable...
The DB9 interface connector on the rear panel of the DC load is TTL voltage level; IT-E122 has a USB interface (male connector B) on one end...
The DB9 interface connector on the rear panel of the DC load is TTL voltage level; The interface on both side port of IT-E123 are DB9 interface and RS485 interface...
Before using the remote operation mode, please make sure that the baud rate and communication address in the DC load are the same as in the computer software...
In order for the computer to communicate with the DC load, both must be set to the same RS-232 settings.
IT8513B+/IT8514B+/IT8514C+/IT8516C+ electronic load has a DB9 interface on rear panel.
Connect the load and the computer using a cable with two USB interfaces (each end). All functions of the load can be programmed via USB.
ITECH provides you with optional red and black test lines, which individual sales and you can select for test.
| Model | IT8511A+ |
|---|---|
| Max Power | 150W |
| Current Range | 0-30A |
| Interface | USB, RS232 |
| Cooling | Forced air cooling |
| Voltage Resolution | 1mV |
| Current Resolution | 1mA |
| Voltage Accuracy | 0.05%+0.05%FS |
| Current Accuracy | 0.1%+0.1%FS |
| Accuracy | 0.05%+0.05%FS |
| Resolution | 1mV, 1mA |
| Operating Modes | CC, CV, CR, CP |