34
E
F
G
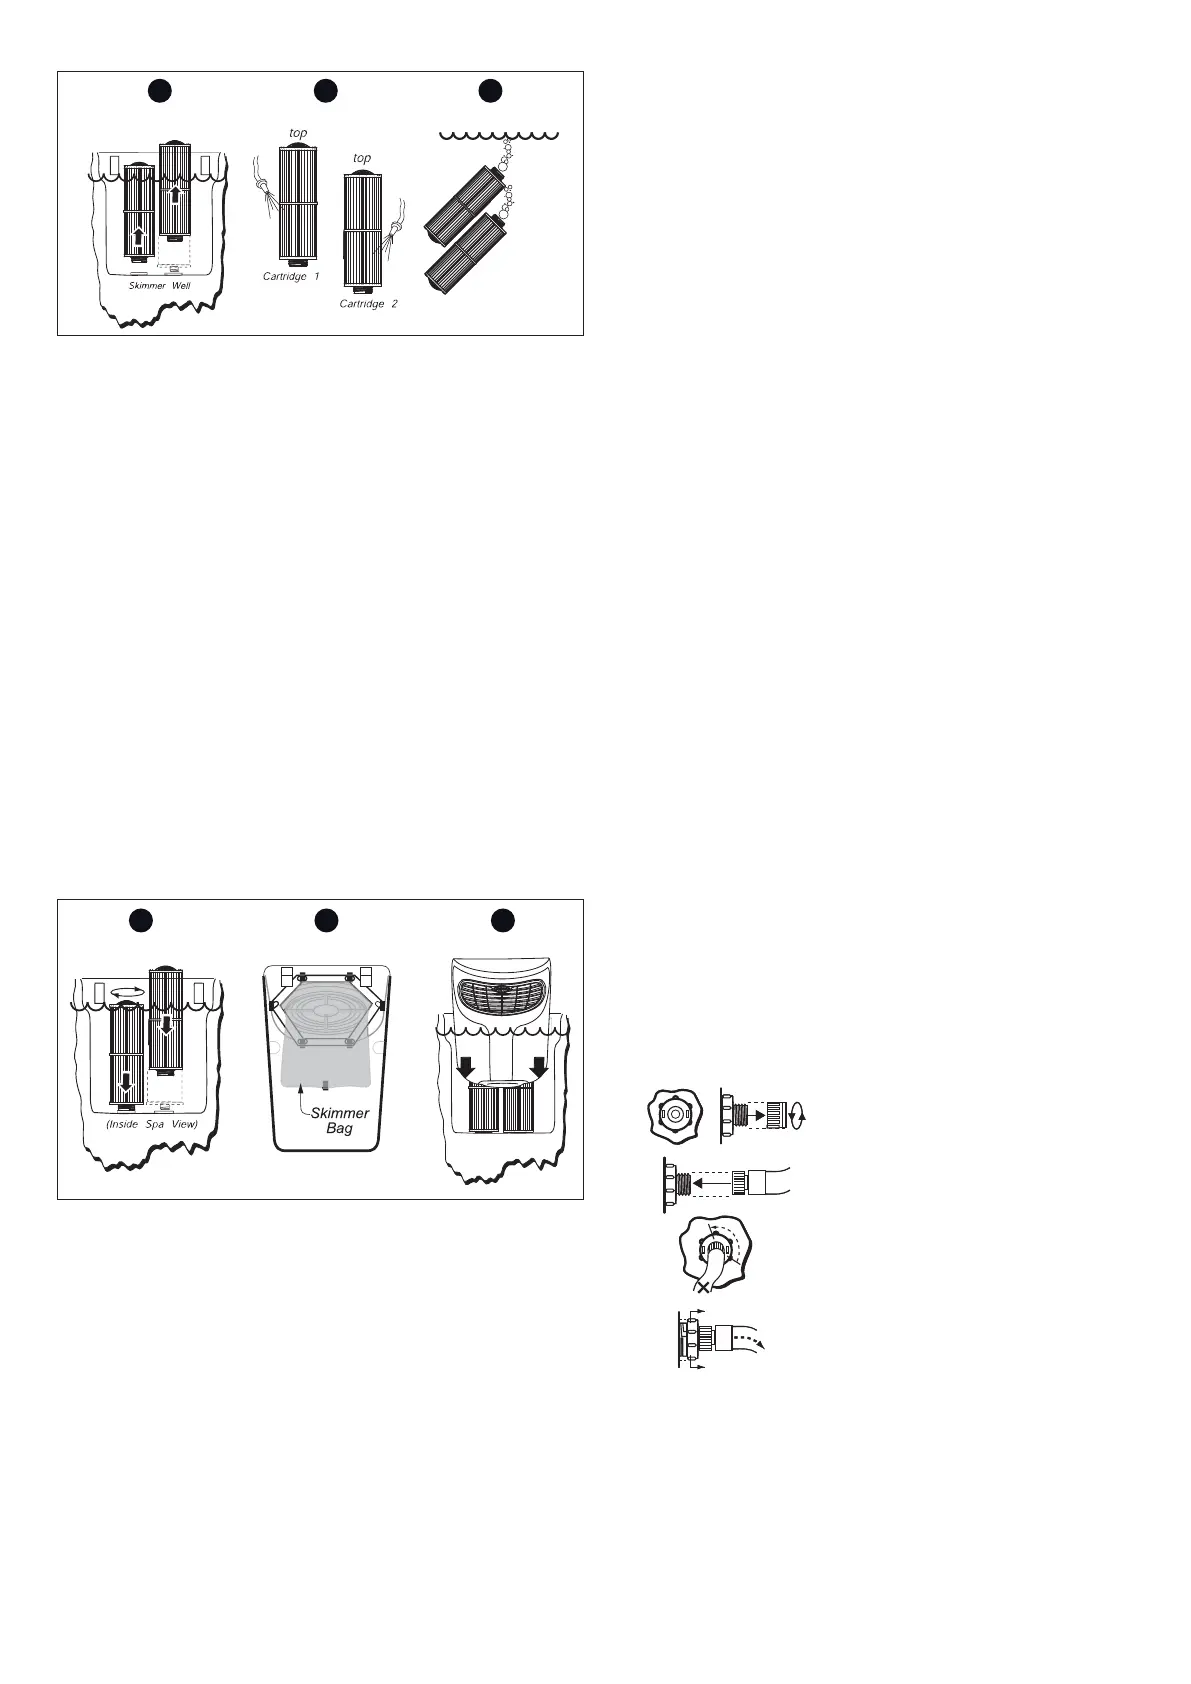
Trapped
Air
Bubbles
Cartridge 1
Cartridge 2
A. TURN POWER TO SPA OFF!
B. Lift upward on lter cover to remove it from the mating retai-
ning clips. Then tilt forward to access lter cartridges.
C. Remove skimmer bag from clips, then clean out debris.
D. Rotate each lter cartridge handle counterclockwise to un-
thread from mating wall tting.
E. Lift unthreaded lter cartridge from skimmer well.
F. If used, remove the chemical feeder as instructed prior to rin-
sing the lter cartridges. Rinse debris from lter pleats on each
cartridge using a garden hose and high pressure nozzle. Start
at the top and work downward towards handle. Repeat until all
pleats are clean.
G. Submerge both lter cartridges in spa. Tilt threaded end
upward to removed trapped air bubbles, then keep cartridges
submerged to prevent air entrapment during installation (step H).
H
I
J
(Filter Cover Back View)
H. Place each cartridge back into skimmer well, then rotated
each cartridge handle clockwise to thread back into wall tting.
DO NOT OVERTIGHTEN!
I. Install clean skimmer bag back onto the lter cover clips as
shown.
H. Place each cartridge back into skimmer well, then rotated
each cartridge handle clockwise to thread back into the wall t-
ting. Do not over tighten.
I. Install clean skimmer bag back onto the lter cover clips as
shown.
J. Tilt lter cover back then gently press down to latch against
retaining clips.
L. Turn power to spa back on.
Periodically, the lter cartridge will need a more thorough cle-
aning to remove imbedded oils and minerals.
For this, we suggest cleaning followed by soaking the lter
overnight in a plastic container lled with a solution of water
and specially formulated lter cleanser available from your au-
thorized Jacuzzi dealer.
The average life expectancy of each lter is approximately two
years with proper care and water quality maintenance.
Replacement cartridges may be purchased from your authori-
zed Jacuzzi dealer.
Draining and Relling
About every 3 months, you will want to replace the spa’s water.
The frequency depends on a number of variables including the
amount of use, attention paid to water quality maintenance, etc.
You will know it is time for a change when you cannot control
sudsing and/or you can no longer get the normal feel or sparkle
to the water even though the key water balance measurements
are all within the proper parameters.
CAUTION! READ THIS BEFORE DRAINING: To prevent da-
mage to the spa’s components, turn o power to the spa at
the circuit breaker before draining it. Do not turn the power
back on until your spa has been relled.
There are certain precautions to keep in mind when draining your
spa. If it is extremely cold, and the spa is outdoors, freezing could
occur in the lines or the equipment, see “WINTERIZING”.
To drain your spa, perform the following steps:
1. Turn o power to spa at breaker.
2.
3.
4.
5.
2.
3.
4.
5.
2. Locate the drain valve on the front/lower plastic pan. Hold the
larger (rear) body to prevent it from turning, then loosen and re-
move the front cap to expose the underlying male hose threads.
3. Attach a garden hose to the exposed threads.
 Loading...