16
X
Threader plate
supporter
Threader
positioning
plate
FIG. 3
Pin
Adjustment of left or right direction
Threader plate
Nut
w
View from "X"
q
Vertical adjustment FIG. 2
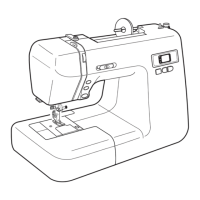
REPLACEMENT AND ADJUSTMENT OF THE NEEDLE THREADER PLATE
If the hook of the threader plate is damaged, change and adjust the part as follows:
TO CHANGE THE THREADER PLATE:
1. Push down the needle threader knob and pull the threader plate supporter down to remove it (see FIG 1).
2. To install the needle threader plate, line the groove up with the pin and push it up to snap fit.
TO ADJUST THE THREADER PLATE POSITION:
1. If the hook on the threader positioning plate touches the top or bottom side of the needle hole, loosen
setscrew
q
and adjust the hook position (FIG.2).
2. If the hook on the threader plate touches the left or right side of the needle hole, loosen setscrew
w
and
adjust the hook position (FIG 3).
Replacing the threader plate supporter
(with the threader plate attached)
FIG. 1
MECHANICAL ADJUSTMENT