APPLIANCES
COOKING SAFETY
Grease is flammable. Never allow grease to collect around top
burners or on the cook top surface. Wipe up spills immediately. Always
stay near and pay attention when food is cooking.
In Case Of a Grease Fire
1. Turn off the heat source.
2. Extinguish the fire.
Option A. If the fire is in a pan, use a metal lid or cookie sheet to
cover the flames. Leave the cover on until the flames
are extinguished and the pan is cool.
Option B. Pour baking soda or salt on the fire to smother it.
Option C. Spray the fire with a Class B dry chemical fire
extinguisher.
Additional tips:
• Do not try to extinguish the fire with water.
• Do not attempt to move the pot or pan outside.
• Do not use flour, baking powder or other cooking powders that
resemble baking soda or salt – they will make the fire worse.
• If the grease fire cannot be extinguished, evacuate everyone
from the RV and call emergency services (911).
(See page 88)
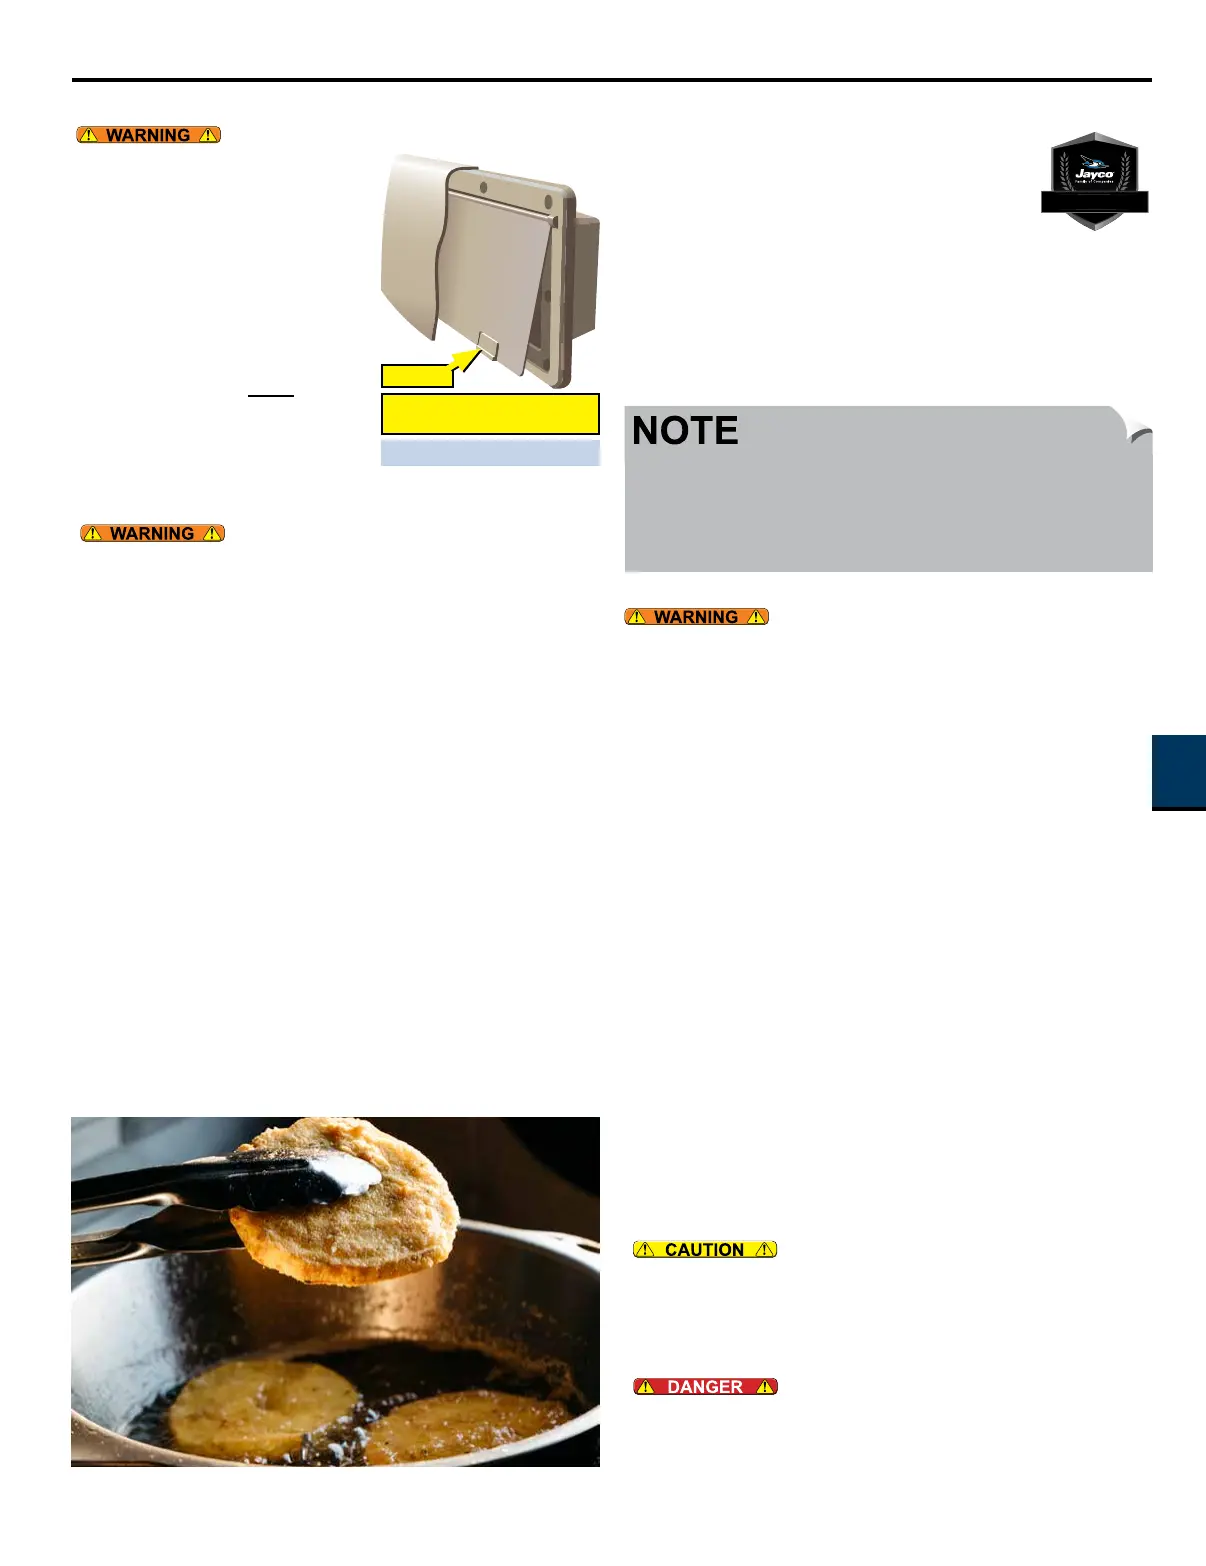
RANGE HOOD (IF EQUIPPED)
If your RV is equipped with a range
hood, it will be connected to an exterior
vent. The vent has an inner flap
with two snaps. This flap should be
snapped shut when the RV is in motion,
or during storage to keep insects,
debris, snow, rain, etc. from entering
the RV.
Anytime the stove inside the RV
is being used, this flap MUST be
unsnapped and the range hood
turned ON to vent fumes outside the
RV.
(See page 88)
Push near top of snap to close.
Lift from bottom of snap to open.
Range Hood Exterior Vent Cover
Flap Snap
REFRIGERATOR
The refrigerator is not intended for quick freezing or
cooling. We recommend stocking it with pre-frozen or
pre-cooled food when possible. The shelves should
not be covered with paper or plastic and the food
items should be arranged so air can circulate freely.
Keep the area at the back of the refrigerator clean and free of debris.
Check for and remove obstructions in the exterior refrigerator vent
area (i.e., spider webs, bird nests, etc.).
For detailed operating, cleaning, and safety information for any type or
refrigerator listed below, refer to the manufacturer’s user guide located
in the Customer Information Packet.
Gas/Electric Refrigerators (if equipped)
The refrigerator control panel is typically located near the top of the
unit, or between the freezer and fresh food requirement. Control
layout will vary between models, but standard controls include Power,
Mode, and Temperature Set buttons.
• Power: The unit will default to power OFF, and should only be
set to ‘ON’ once the RV is parked and setup for camping.
• Mode: The unit typically has 3 running modes.
» Auto (recommended): The refrigerator’s electronic
controls automatically select the most energy efficient
source that is available, AC or DC (depending on model).
If AC/DC power is not available, the unit will automatically
switch to Gas Mode.
» Manual AC/DC: The refrigerator cools using electric
power (AC or DC depending on model) only.
» Manual Gas: The refrigerator cools using only propane.
• Temperature Set: Sets the unit’s internal temperature to the
preferred setting. Typically the highest setting is the coldest.
• Night Mode (if available): Reduces compressor speed
for 8 hours, lowering the cooling capacity of the refrigerator.
It assumes the unit will be rarely opened and the external
temperatures will be lower to conserve energy and lower noise.
Residential Refrigerators (if equipped)
Residential refrigerators use 120V power either from shore power
or the battery/inverter system when shore power is not available.
Inverter controls are found in the command control panel/system.
12V Refrigerators (if equipped)
12v refrigerators run on the 12v electrical system only. Pay close
attention to battery levels when not connected to shore power. These
units do not have vents on the exterior of the RV.
U
NIVERSIT
Y
A good rule of thumb is to have the RV refrigerator running, fully
stocked with food (not ice trays), the night before any trip that takes
less than a day to arrive. Turn off the refrigerator before you leave
for your trip, and everything should stay cold until you arrive on site.
Once on site, turn your refrigerator back on.
(See page 88)
(See page 88)
(See page 87)
Page 83
APPLIANCES
10