Do you have a question about the JBL AVA7 and is the answer not in the manual?
Congratulates user on purchase of AVA7 amplifier and highlights JBL's expertise in audio reproduction.
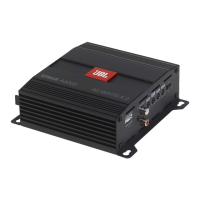
Details the AVA7's design for multichannel audio, ideal for home theater rear and side channels.
Explains the AVA7's 125W per channel output and its contribution to wide dynamic range for home cinema.
Describes automatic system turn-on via surround processor and power-on sequencing for amplifier safety.
Explains the AVA7's dual-fan cooling system with thermal sensing for reduced noise and long-term reliability.
Details the AVA7's sophisticated, optically coupled protection circuitry for each channel against fault conditions.
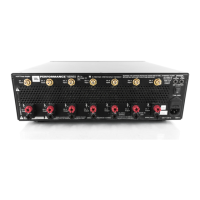
Covers the front-panel power switch, standby indicator, and rear main switch for amplifier operation.
Details the input jacks for audio signals and speaker terminals for connecting loudspeakers.
Explains fuse replacement procedures and the use of trigger jacks for system automation.
Specifies the AC inlet type and warns against using non-compatible power cords for the 120V, 60Hz supply.
Provides an overview of system setup, amplifier usage, and connection guidelines for the AVA7.
Illustrates a recommended rack-mounting configuration for the AV1 processor and AVA7 amplifier.
Highlights crucial points for safe and optimal amplifier installation, including airflow and placement.
Details the step-by-step process for mounting the AVA7 amplifier into an EIA standard rack using rack ears.
Addresses issues where the amplifier fails to power on, checking power and main switch status.
Troubleshoots the standby indicator remaining red, checking system integration and trigger signals.
Diagnoses lack of audio output, verifying source, connections, and speaker wiring integrity.
Solves system-wide power-on issues, checking cable connections and individual amplifier switches.
Guides users on increasing sound output by adjusting surround processor or equalizer levels.
Addresses low bass issues by verifying speaker wiring polarity and connection to the amplifier.
Helps eliminate hum by checking ground connections, cable routing, and experimenting with ground wires.