11
Use only 3-wire extension cords that have 3-prong
grounding plugs and 3-pole receptacles that accept
the tool's plug.
Repair or replace damaged or worn cord
immediately.
2. Grounded, cord-connected tools intended for use
on a supply circuit having a nominal rating less than
150 volts:
This tool is intended for use on a circuit that has an
outlet that looks like the one illustrated in A, Figure
6-1. An adapter, shown in B and C, may be used to
connect this plug to a 2-pole receptacle as shown in
B if a properly grounded outlet is not available. The
temporary adapter should be used only until a
properly grounded outlet can be installed by a
qualified electrician. This adapter is not permitted in
Canada. The green-colored rigid ear, lug, and the
like, extending from the adapter must be connected
to a permanent ground such as a properly grounded
outlet box.
7.2 Extension cords
The use of extension cords is discouraged. Try to
position equipment near the power source. If an
extension cord becomes necessary, use only three-
wire extension cords that have three-prong
grounding type plugs and three-prong receptacles
that accept the tool's plug. Replace or repair
damaged or worn cord immediately.
Make sure your extension cord is good condition,
and is heavy enough to carry the current your
product will draw. An undersized cord will cause a
drop in line voltage resulting in loss of power and
overheating.
Table 1 shows the correct size to use depending on
cord length and nameplate ampere rating. If in
doubt, use the next heavier gage. The smaller the
gage number (AWG), the heavier the cord.
Amp Rating Volts Total length of cord in feet
More
Than
Not
More
Than
120 25 50 100 150
AWG
0 6 18 16 16 14
6 10 18 16 14 12
10 12 16 16 14 12
12 16 14 12
Not
Recommended
Extension Cord Recommendations
Table 3
8.0 Adjustments
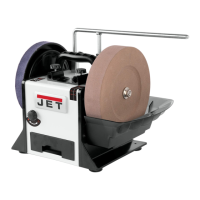
8.1 Sharpening jig set up
1. Use the existing angle measuring device to
establish the tool’s cutting edge (Figure 10-1).
Figure 8-1
2. Clamp the tool in the appropriate jig.
3. Adjust the support arm (Figure 10-2) and
change the tool clamping position to achieve
the correct grinding angle.
4. Set the tool angle and wheel diameter on
supplied angle measuring device. See Figure
10-2. Tighten both knobs.
Figure 8-2
5. Place device on wheel and against jig, as
shown. Make additional adjustments to jig
position as needed.
NOTE: The correct stone diameter needs to be
set on the scale to achieve proper angle
reading.