Do you have a question about the JL Audio Fathom f112 and is the answer not in the manual?
All safety and operating instructions should be read before subwoofer operation.
Safety and operating instructions should be retained for future reference.
All warnings on the subwoofer and in the instructions should be followed.
All operating and use instructions should be followed.
Subwoofer should not be used near water or moisture.
Ensure subwoofer location does not interfere with proper ventilation.
Subwoofer should be situated away from heat sources.
Connect subwoofer only to the specified power supply.
Route power cords to prevent them from being walked on or pinched.
Subwoofer should be cleaned as recommended in operating instructions.
Unplug power cord when subwoofer is unused for long periods.
Disconnect subwoofer during electrical storms to prevent damage.
Take care to prevent objects falling into or liquids spilling onto the subwoofer.
List of conditions requiring service by qualified personnel.
User should not attempt servicing beyond manual instructions.
Do not overload outlets or strips to avoid fire or shock risk.
Use the three-prong grounded power cord and do not defeat grounding.
Warning about high sound pressure levels and hearing protection.
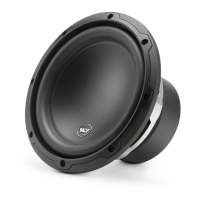
Improves dynamic motor behavior for reduced distortion and faithful transients.
Utilizes available diameter for wider roll to control high-excursions.
Unit-body cone assembly for stiffness with minimal mass.
Ensures proper surround geometry for excursion control.
High-integrity suspension attachment for enhanced reliability.
Delivers cool air to voice coil to enhance power handling.
Enhances thermal dissipation and power handling via venting.
Proprietary circuit for excellent damping factor and transient behavior.
Read next section before unpacking; unpack near final location.
Avoid seating positions in standing wave peaks/dips; experiment with subwoofer placement.
Corner placement maximally excites room modes, creating strongest output.
Placing near walls reinforces bass; pulling away decreases it.
Avoid placing near windows to prevent rattling and sound transmission.
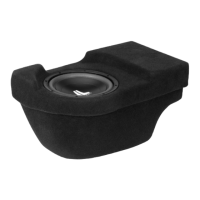
Refer to page 8 for guidelines if installing inside a cabinet.
Maintain specific clearance for cooling and ventilation.
Recommend inclusion of heat vents in custom cabinets for cooling.
Specify minimum vent area for custom grilles to avoid choking output.
Warning about subwoofer weight and advice to enlist help.
Step-by-step guide for carton opening and subwoofer removal.
Keep all packaging for safe transportation and future service needs.
Automatic Room Optimization control.
Power switch for unit operation.
Input mode selection switch.
Selects between Reference and Variable level modes.
Controls front panel indicator light brightness.
Low Pass filter selection.
Low Pass filter cutoff frequency adjustment.
Extreme Low Frequency trim control.
Phase adjustment control.
Polarity selection switch.
XLR and 1/4-inch combo jacks for balanced audio input.
RCA jacks for unbalanced audio input.
Balanced XLR output for connecting to slave units.
Power input for the IEC AC power cord.
Switches for grounding and master/slave operation.
Explains the three positions of the power switch (On, Off, Auto).
Describes the one-touch system for optimizing room acoustics.
Input for the supplied JL Audio calibration microphone.
Triggers a tone sequence to demonstrate A.R.O. calibration signals.
Turns off or "defeats" the A.R.O. calibration system and equalizer.
Activates the ARO test sequence for calibration.
LEDs indicating Master or Slave mode selection.
Selects between Reference (fixed gain) and Variable (adjustable gain) modes.
Controls output level when Variable Level mode is selected.
Selects indicator light modes (Off, Dim, On).
Determines the operating mode and roll-off slope of the low pass filter.
Sets the cutoff frequency for the internal low pass filter.
Adjusts extreme low frequency equalization at 25 Hz.
Selects between normal (0 deg) and reversed (180 deg) signal polarity.
Adjusts subwoofer output timing relative to main speakers.
Preferred connection using XLR or 1/4-inch TRS for noise rejection.
Notes on using balanced inputs, including connector pinouts.
RCA inputs for systems without balanced outputs, with optical isolation.
Notes on unbalanced inputs, impedance, and noise minimization.
Controls grounding (Grounded/Isolated) and system operation (Master/Slave).
Enables system control of multiple Fathoms from a single master unit.
Balanced XLR output for daisy-chaining slave Fathoms.
Power connection and recommendations for electrical circuits.
Confirms initial system settings on receiver/preamp before setup.
Set high-frequency speakers to "small" with an 80 Hz crossover.
Properly set speaker distances, including subwoofer, for time coherence.
Set subwoofer level in receiver to "0" or middle position.
Set tone controls to "0" and defeat all equalizer features.
Settings for low-pass filter frequency and output level.
Turn Fathom's power switch to "On" position.
Turn Fathom's lights switch to "On" position.
Confirm Master/Slave indicator lights on front panel.
Flip master Fathom's Level Mode switch to "REF".
Set LP Filter switch to "OFF" or "12 dB".
Rotate LP Freq knob to the "80 Hz" position.
Rotate e.l.f. trim knob to "0".
Flip the Polarity switch to "0".
Rotate phase knob to "0" degrees.
Press A.R.O. defeat switch so red light remains lit.
Adjust subwoofer level to blend with other speakers using receiver or Fathom.
Adjust polarity and phase for optimal upper bass and midbass response.
Experiment with subwoofer placement for smoother bass performance.
Ensure room is quiet, turn off HVAC and noisy appliances during calibration.
Detailed steps for using the A.R.O. system to tame room modes.
Steps for positioning microphone, pressing calibrate, and adjusting level.
Adjust e.l.f. trim to manage low bass extension in small rooms.
Do not place items on cabinet; no liquids on cabinet.
Fathoms are not magnetically shielded; maintain distance from TVs.
Auto mode draws negligible power when idle.
Unplug during thunderstorms and absences to prevent damage.
Use a clean, soft microfiber cloth or feather duster.
Cleaning and polishing recommendations for gloss-black finishes.
Troubleshooting steps for when the subwoofer produces no sound.
Checks for changes in level settings or ELF Trim.
Addresses hums, noise, and input mode settings.
Adjustments for muddy bass, including ELF Trim and placement.
Tips for reducing sound leakage outside the listening room.
Explains what is covered and what is excluded under the warranty.
How to obtain service, including shipping and proof of purchase.