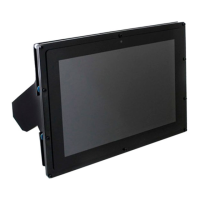
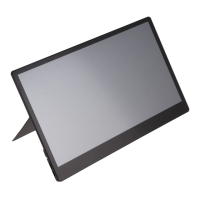
This document describes the 10.1" LCD Display Version B, model RB-LCD-10B, a versatile display unit designed for use with various single-board computers and PCs.
Function Description:
The RB-LCD-10B is a 10.1-inch LCD display with a capacitive touch screen, offering a resolution of 1280x800 pixels. It is primarily designed to serve as a visual output and interactive input device for single-board computers like Raspberry Pi and Banana Pi, as well as standard PCs running Windows operating systems. The display is capable of showing visual information and accepting touch input, making it suitable for a wide range of applications from educational projects to embedded systems and interactive kiosks. It supports various display orientations (normal, left, right, inverted) which can be configured through software settings, and its backlight can be manually activated or deactivated via a physical switch on the PCB.
Important Technical Specifications:
- Display Size: 10.1 inches
- Resolution: 1280x800 pixels
- Touch Screen Type: Capacitive
- Touch Points: Up to 10 points for Windows 8 and above; single-touch for some Windows 7 systems.
- Connectivity:
- Power: 5V 2.4A via microUSB (Type A to microUSB cable recommended)
- Video Input: HDMI
- Touch Input: USB
- Compatibility:
- Single-Board Computers: Raspberry Pi (A+, B+, 2B, 3B, 3A+, 3B+, 4B), BananaPi (M3, M2u, M2-Berry, M5), Raspberry Pi A, Raspberry Pi B, Beaglebone Black.
- Operating Systems: Windows 7 / 8 / 8.1 / 10 / 11, Raspbian OS (for Raspberry Pi and Banana Pi), Ubuntu Mate.
- Backlight Control: Manual ON/OFF switch on the PCB.
- Mounting: Features numbered mounting holes compatible with various single-board computer models.
Usage Features:
- Versatile Mounting: The display comes with mounting holes that allow for the secure attachment of different single-board computers, including various Raspberry Pi and Banana Pi models. The manual provides a table mapping specific single-board computers to their corresponding mounting hole numbers.
- Easy Assembly: The bracket assembly process is straightforward, involving loosening screws, removing protective films from the feet and cover, fastening spacers with nuts, and then screwing the single-board computer onto the plate. The leg with the larger cutout should be placed on the side with the connections.
- Plug-and-Play for Windows: For Windows operating systems, the LCD's resolution is automatically identified, requiring no further configuration. It supports multi-touch gestures (up to 10 points) on Windows 8 and newer, and single-touch on some Windows 7 systems.
- Raspberry Pi/Banana Pi Integration:
- Software Installation: Requires downloading and flashing an appropriate operating system image (e.g., Raspbian, Ubuntu Mate) to a microSD card (minimum 4GB). Tools like Win32 Disk Imager are recommended for this process.
- SSH Access: For advanced configuration, establishing an SSH connection to the Raspberry Pi using tools like MobaXterm is necessary.
- Configuration File Editing: Manual adjustments to the
/boot/config.txt file are required to set the correct HDMI group, mode, and CVT parameters for optimal display operation. Specific lines for max_usb_current, hdmi_group, hdmi_mode, and hdmi_cvt must be inserted under the [all] section.
- Device Connection: Connect the LCD's power (5V 2.4A microUSB), HDMI, and touch (USB) interfaces to the Raspberry Pi. Insert the microSD card and power on the Raspberry Pi.
- Display Rotation: The display orientation can be changed through the operating system's settings. For Raspberry Pi, this involves navigating through the application menu to "Settings" and then "Screen Configuration" to select the desired rotation (normal, left, right, inverted).
- Touchscreen Calibration: After changing the display orientation, the touchscreen needs calibration to ensure accurate touch registration. This involves installing
xinput (using sudo apt-get install xinput), identifying the display's ID (using xinput list), and then applying specific xinput --set-prop commands with a 'Coordinate Transformation Matrix' corresponding to the chosen rotation.
- Autostart Calibration: To ensure calibration persists across reboots, a shell script (e.g.,
fliptouch.sh) containing the calibration command must be created, made executable (sudo chmod 777), and added to the autostart configuration files (/etc/xdg/lxsession/LXDE/autostart and /etc/xdg/lxsession/LXDE-pi/autostart).
- Cursor Control: When used with a PC, if multiple screens are registered, the LCD will control the cursor of the main screen. A single tap performs a left-click, and holding it down performs a right-click.
Maintenance Features:
- Support: Joy-IT provides comprehensive support via email (service@joy-it.net), a ticket system (http://support.joy-it.net), and telephone (+49 (0)2845 9360 - 50, 10-17 o'clock).
- Troubleshooting: The manual advises contacting support for any unexpected problems during use.
- Environmental Responsibility: As per the Electrical and Electronic Equipment Act (ElektroG), the product is marked with a crossed-out dustbin symbol, indicating that it should not be disposed of with household waste but returned to a collection point. Information on return options for old devices and packaging is provided.
- MicroSD Card Management: The installation process for single-board computers involves flashing operating system images to a microSD card. Users are advised to use microSD cards with a memory size greater than 4GB and may need to purchase a microSD card reader separately.