Lighthouse function on the rear of the alarm:
The extremely clever Lighthouse function serves as a beacon to find your spot back during
nocturnal activities on the water. When activated, this function consists of regular, brief flashes of
the high intensity white LED’s placed on the backside of the bite alarm.
At night of in poor visibility you can enable the “Lighthouse” by pressing and holding the “LED”
button for 2 seconds (The same procedure is also used to switch it off)
Battery replacement:
Even if the indicator is designed for very low battery consumption. You must replace the battery
at some point in time.
Low batteries become evident with lower LED brightness. Lower sound volume and the indicator
can even switch-off spontaneously (automatic protection of inner processor).
You can recognize the lower voltage at blue LED’s in a
more significant way- the blue LED’s are very popular, however, their disadvantage is higher
voltage they need. Therefore, the fade away sooner than other colors do. The indicator with
blue LED’S you will probably replace the batteries more often.
Two battery cells LR1 LADY (not included) and are placed under the rear cap of the indicator. After
pushing the batteries down-wards they are ready for use.
When replacing the batteries with new ones, make sure to check if they are positioned in the
proper way. With reversed polarity the indicator will not work properly, and it can even be
damaged. Alarms damaged due to the wrong positioning of the batteries cannot be claimed
under warranty!
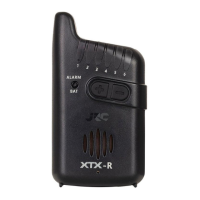
DESCRIPTION OF TH JRC RADAR XTX RECEIVER
The extremely compact receiver is powered by two AAA batteries. Make sure to purchase quality
batteries as quality battery power lets the receiver last up to one month during continuous
operation. The receiver is equipped with six optical and audio channels so you can connect to
six different devices: bite indicator XTX or MICRO TRANSMITTER.
Switch ON/OFF:
The receiver switches on by sliding the switch located on the top next to the antenna. Activation
is indicated briefly by the illuminated ALARM/BAT LED and vibration. If the ALARM/BAT LED lights
up green, the battery is OK. If the power light is blue, the battery is empty, and it will need to be
replaced soon. The receiver is turned off by sliding the switch towards the antenna.
Volume control:
You can adjust the volume by pressing the plus or minus button several times until you have
reach the level of your preference.
Vibration:
Vibrating alarm is activated by holding the PLUS button (for about 2 seconds). Deactivation occurs
by pressing the MINUS button (for about 2 seconds).
How to add an extra device:
(The basic matching of the set should be done by the producer. Please consider this
paragraph just in case your indicator does not communicate with the receiver, you have bought
an additional indicator, or your indicator has been replaced by a service center. Switch on the
indicator and the receiver. Upon switching on, push the PLUS and the MINUS buttons
simultaneously. After a moment, a short acoustic signal resounds and LED number 1 comes on.
Using the PLUS and MINUS buttons move to the position you want to store the new Radar XTX
indicator simulate the bite so that the receiver puts into operation (the LED on the indicator
comes on and the bite acoustic signal resounds). The receiver locks the signal, storing it. This fact
is indicated by a short flash of the chosen LED on the receiver. Now, confirm the choice by the
simultaneous pushing of the PLUS and MINUS buttons on the receiver. The LED switches off. The
alarm is stored and your indicator can communicate with your receiver. Deletion, if it is necessary
to delete the indicator, enter the “learning” mode by simultaneous pushing of the PLUS and
MINUS buttons. You can hear a short beep again and the first green LED comes on. By using the
PLUS and MINUS buttons move the position you want to delete. Now, you can delete the
indicator by holding the PWR button (bottom left button to switch on and off the receiver) for a
longer time. After a moment, a deeper acoustic signal resounds- the memory spot was deleted.
Leave the learning mode by the simultaneous pushing the PLUS and MINUS buttons. The LED
switches off. The receiver is in its usual working mode. After you have completed any of the
above, please verify the activity of the whole set before fishing.
 Loading...