EasyManua.ls Logo

JVC SR-V101US - User Manual

JVC SR-V101US
28 pages
Print Icon
To Next Page IconTo Next Page
Loading...
Page 1 December 26, 2003 2:23 pm
VIDEO CASSETTE RECORDER
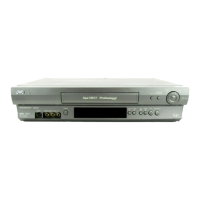
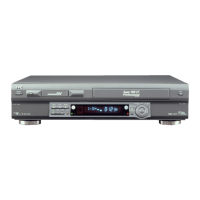
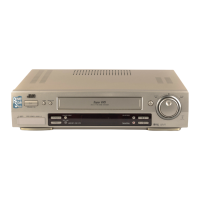
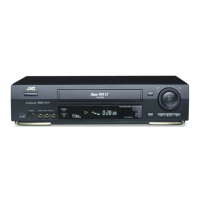
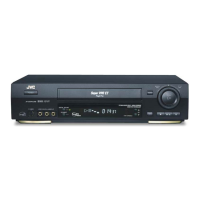
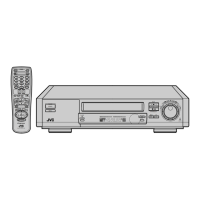
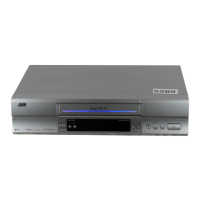
SR-V101US
INSTRUCTIONS
LPT0887-001A
REW
FF
REC LINK
24HR QUICK
PROGRAM
S-VIDEO
POWER
INSERT
A.DUB
CAUTIONS
Dear Customer,
Thank you for purchasing the JVC S-VHS video cassette
recorder. Before use, please read the safety information and
precautions to ensure safe use of your new VCR.
The lightning flash with arrowhead symbol, within
an equilateral triangle, is intended to alert the user
to the presence of uninsulated “dangerous voltage”
within the products enclosure that may be of
sufficient magnitude to constitute a risk of electric
shock to persons.
The exclamation point within an equilateral triangle
is intended to alert the user to the presence of
important operating and maintenance (servicing)
instructions in the literature accompanying the
appliance.
WARNING:
TO PREVENT FIRE OR SHOCK HAZARD, DO NOT EXPOSE
THIS UNIT TO RAIN OR MOISTURE.
CAUTION:
This video cassette recorder should be used with AC 120Vd,
60Hz only.
To prevent electric shocks and fire hazards, DO NOT use any
other power source.
CAUTION:
TO PREVENT ELECTRIC SHOCK, MATCH WIDE BLADE OF
PLUG TO WIDE SLOT, FULLY INSERT.
ATTENTION:
POUR ÉVITER LES CHOCS ÉLECTRIQUES, INTRODUIRE LA
LAME LA PLUS LARGE DE LA FICHE DANS LA BORNE
CORRESPONDANTE DE LA PRISE ET POUSSER JUSQU’AU
FOND.
Note to CATV system installer:
This reminder is provided to call the CATV system installer’s
attention to Article 820-40 of the NEC that provides guidelines
for proper grounding and, in particular, specifies that the cable
ground shall be connected to the grounding system of the
building, as close to the point of cable entry as practical.
For Customer Use:
Enter below the Model No. and Serial No. which are located
on the rear of cabinet. Retain this information for future
reference.
Model No.
Serial No.
SR-V101US.fm Page 1 Friday, December 26, 2003 2:24 PM

Other manuals for JVC SR-V101US

Questions and Answers

  • R
    Ricky WilliamsAug 17, 2025
    Why is my JVC SR-V101US VCR remote not working?
    • I
      ijohnsonAug 17, 2025
      Your JVC VCR remote might not be working because the batteries are discharged (replace them), the VCR is in timer recording standby mode (press TIMER to disengage), or the remote control A/B code is wrong (reset the A/B code).
  • P
    petersenbrandonAug 20, 2025
    What to do if my JVC VCR power will not come on?
    • E
      Evan WagnerAug 20, 2025
      If your JVC VCR's power won't turn on, it could be due to a disconnected AC power cord (connect it) or the Child Lock function being activated (press and hold POWER 1 for more than 10 seconds to release it).
  • H
    hannah71Aug 23, 2025
    Why won't my JVC VCR timer recording work?
    • U
      uthompsonAug 23, 2025
      Timer recording on your JVC VCR might fail because the clock and/or timer program have been set incorrectly (correct them), the timer is not engaged (press TIMER to engage it and ensure '#' appears on the display), or the VCR hasn't been set up properly (re-perform the set-up procedures, compensating for guide channel and VCR channel number mismatches).
  • S
    Susan CarlsonAug 26, 2025
    What to do if the clock works but the JVC SR-V101US VCR’s power will not come on?
    • B
      Bruce PorterAug 26, 2025
      If the clock is working, but the JVC VCR’s power won’t come on, it could be because the VCR is in timer recording standby mode with “AUTO TIMER” set to “OFF” (press TIMER to disengage the timer) or the Child Lock function is activated (press and hold POWER 1 for more than 10 seconds to release the Child Lock function).
  • F
    frank87Aug 28, 2025
    Why won't my JVC SR-V101US record?
    • T
      Tyrone CallahanAug 28, 2025
      Recording on your JVC VCR might not start if there is no cassette loaded (insert a cassette with an intact record safety tab) or if “REC SAFETY” is set to “ON” and the loaded cassette has had its record safety tab removed (set “REC SAFETY” to “OFF”).
  • B
    Breanna RoachAug 31, 2025
    What to do if the JVC SR-V101US VCR channel cannot be changed?
    • T
      Tommy OliverAug 31, 2025
      If the channel on your JVC VCR cannot be changed, it is likely because recording is in progress. To change channels, press PAUSE (9) to pause the recording, change channels, then press PLAY (4) to resume recording.
  • D
    Daniel MooneySep 3, 2025
    What to do if buttons and controls do not function at all on my JVC SR-V101US?
    • R
      Rachael JohnsonSep 3, 2025
      If the buttons and controls on your JVC VCR aren't working, Mode Lock might be activated. Press and hold OK on the Remote for more than 5 seconds to deactivate Mode Lock.
  • S
    Sarah PerrySep 5, 2025
    What to do if my JVC VCR tape is running but the picture will not appear?
    • M
      Michael BryantSep 5, 2025
      If the tape is running on your JVC VCR but the picture is not appearing, check the following: * If using an RF connection, ensure the TV is set to channel 3 or 4. * If using an AV or S-video connection, ensure the TV receiver is set to the AV mode.
  • C
    chowardSep 8, 2025
    How to fix VCR Plus+ system on JVC SR-V101US after moving?
    • G
      Garrett RichardsonSep 8, 2025
      If the VCR Plus+ system on your JVC VCR isn't working properly after you've moved, it’s likely because the receivable stations in the new area are received on different channels than in your previous location. Re-perform the procedure in “Changing VCR Plus+® Setting.”
  • T
    tinacampbellSep 12, 2025
    Why is the clock incorrect on my JVC VCR after Auto or Semiauto Clock Set?
    • J
      Jodi HowardSep 12, 2025
      If the clock on your JVC VCR is incorrect after performing Auto or Semiauto Clock Set, the clock setting data received from the host channel might be incorrect. Select a different host channel during Semiauto Clock Set, or perform Manual Clock Set.

Summary

CAUTIONS

Risk of Electric Shock

Details precautions to prevent electric shock and hazards from internal components.

Safety Symbol Explanations

Explains the meaning of the lightning flash and exclamation point warning symbols.

General Warnings

Covers fire/shock hazards from rain/moisture and correct power source usage.

Customer Information

Prompts for recording model and serial numbers for future reference.

IMPORTANT PRODUCT SAFETY INSTRUCTIONS

Installation Safety

Covers grounding, power sources, overloading, cord protection, ventilation, and mounting precautions.

Antenna Installation Safety

Details grounding and lightning protection for outdoor antennas and related components.

USE

General Usage Precautions

Covers handling accessories, carts, water, objects, cleaning, and heat placement.

Servicing and Repair Advice

Details when to seek qualified service, damage requiring service, and part replacement.

Remote Control Operation

Explains basic remote usage, including phone interference and VCR placement.

Buttons, Connectors and Indicators

Front Panel Overview

Identifies the buttons, input connectors, and indicators on the VCR's front panel.

Display Panel Indicators

Explains the various indicators shown on the VCR's front display panel.

Rear Panel Connections

Details the input and output connectors located on the rear panel of the VCR.

Remote Control Functions

Remote Control Layout

Details the buttons and their functions on the remote control for various operations.

On-Screen Display Information

Explains how to view VCR status information on the TV screen and recall indications.

Connections and Plug&Play Setup

Initial Connections Guide

Covers checking contents, VCR placement, and connecting to TV via RF, AV, or S-Video.

Plug&Play Setup Procedure

Details automatic clock/channel setup and troubleshooting steps if it fails.

Final Setup and Preparation

Guides on setting the VCR channel and final preparations before basic playback or recording.

Initial Settings

Clock Setting Procedures

Explains how to set the clock automatically, semiautomatically, or manually.

Semiauto Clock Set Details

Provides steps for setting host channel, DST, and time zone for semiautomatic clock setup.

Manual Clock Set Details

Guides on manually setting the time, date, year, and DST for precise clock configuration.

Tuner Setting

Automatic Channel Setup

Describes the Auto Channel Set process for automatically finding and tuning TV channels.

Manual Channel Setup

Explains how to add desired channels or skip unwanted ones manually.

Basic Playback Operations

Loading and Starting Playback

Guides on inserting cassettes and initiating playback, including automatic functions.

Playback Control Functions

Details stopping, pausing, frame-by-frame, and picture search during playback.

Tape Navigation and Power

Explains rewinding, fast-forwarding, ejecting, turning off, and mode lock during playback.

Advanced Playback Features

Tracking and Sound Adjustment

Covers automatic/manual tracking and selecting audio monitor modes for playback.

Automatic Operations and Navigation

Explains auto-rewind functions, repeat play, and index search for navigating tapes.

Special Playback Functions

Details skip search, playback resume, and locating timer recordings for playback efficiency.

Basic Recording Procedures

Preventing Accidental Erasure

Explains how to use the record safety tab to prevent accidental recording on tapes.

Step-by-Step Recording

Guides on loading cassettes, selecting channels, setting speed, and starting basic recording.

Recording Controls and Features

Details pausing, stopping, repeat recording, and the recording resume function.

Recording Modes and Series Playback

S-VHS, S-VHS ET, and VHS Recording

Explains how to select and use S-VHS, S-VHS ET, and standard VHS recording modes.

Series Playback Setup

Details connecting multiple VCRs for alternating playback of cassettes.

Series Recording Setup

Connecting for Series Recording

Guides on making connections between VCRs and other equipment for extended recording.

Executing Series Recording

Details loading cassettes, starting, stopping, and using Mode Lock for series recording operations.

Timer Recording and VCR Plus+ Setup

Timer Recording Overview

Introduces timer programming methods and initial notes for setting up recordings.

Changing VCR Plus+ Settings

Guides on setting up guide channel numbers for VCR Plus+ programming to ensure correct recording.

Timer Programming Methods

VCR Plus+ Timer Programming

Step-by-step guide for using PlusCode numbers to program recordings via the VCR Plus+ system.

Express and Quick Timer Programming

Covers manual timer entry and 24HR Quick Programming for setting recordings.

Program Management and Other Functions

Checking and Modifying Programs

Guides on checking, canceling, or changing programmed timer settings and resolving overlaps.

Program Overlap Warnings

Explains how to handle warnings indicating overlapping timer recording programs.

Additional Functions Overview

Details timer warning displays, tape position, display information, and function settings.

Advanced Function Settings

Picture Quality Settings

Explains Digital TBC/NR, Video Calibration, and Picture Control options for image enhancement.

Recording and Display Settings

Covers Auto Timer, On Screen displays, and Auto SP-EP Timer for recording optimization.

Video Enhancement Settings

Details Digital R3 and Video Stabilizer functions for improving video signal quality.

Configuration Options

Audio and Recording Mode Settings

Covers 2nd Audio, Audio Monitor, S-VHS Mode, and S-VHS ET for audio and recording configuration.

Input and Recording Control Settings

Details Aux Inputs, Rec End Return, Day/Time Insert, Rec Safety, and Daily T. Record functions.

Special Recording and Control Features

Satellite Auto Recording Setup

Guides on automatically recording satellite programs by linking with a DBS receiver.

Child Lock Function

Explains how to enable and disable VCR operation lock to prevent unauthorized use.

Multi-Brand Remote Control Setup

TV Brand Code Setting

Instructions for programming the remote control to operate a specific TV brand.

Cable Box;DBS Receiver Setup

Guides on programming the remote to control cable boxes or DBS receivers.

Remote and Editing Operations

Changing Remote Control Codes

How to switch control codes for the remote and VCR to operate multiple units separately.

Editing with Another VCR

Guides on connecting and performing video editing operations with another VCR.

Audio Dubbing Procedures

Audio Dubbing Connections and Setup

Guides on making connections, selecting modes, and preparing the VCR for audio dubbing.

Performing Audio Dubbing

Details the steps for starting, pausing, and ending audio dubbing to replace soundtracks.

Insert Editing and AV Dubbing

Insert Editing Process

Explains how to replace recorded scenes and sounds with new material during editing.

AV Dubbing Process

Details performing AV dubbing to replace pictures and sounds simultaneously from different sources.

Product Specifications

General and Tuner Specifications

Details power requirements, dimensions, signal system, and tuner coverage for the VCR.

Timer and Accessories Information

Lists timer capacity, memory backup time, and included accessories provided with the VCR.

Troubleshooting Guide

Power and Playback Issues

Addresses common problems with power, picture display, and general playback failures.

Recording and Timer Problems

Provides solutions for recording failures, timer programming issues, and VCR Plus+ system errors.

Control and Clock Errors

Helps resolve issues with button functionality, incorrect clock settings, and mode lock activation.

JVC SR-V101US Specifications

General IconGeneral
BrandJVC
ModelSR-V101US
CategoryVCR
LanguageEnglish

Related product manuals