EasyManua.ls Logo

Kärcher RCV 3 - User Manual

Kärcher RCV 3
88 pages
Print Icon
To Next Page IconTo Next Page
Loading...
RCV 3
97781860
(03/24)
English 2
Français 28
Español 58

Table of Contents

Questions and Answers

  • A
    aaronjohnsJul 28, 2025
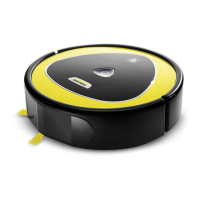
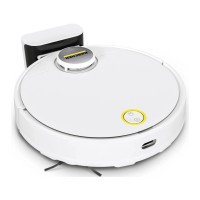
    Why won't my Kärcher Vacuum Cleaner start?
    • K
      Karen CrossJul 28, 2025
      The cleaning robot may not start if the ambient temperature is too low (below 0 °C) or too high (above 35 °C). Ensure the robot is used within a temperature range of 0 °C to 35 °C. Additionally, the battery charge might be too low, so ensure the cleaning robot is adequately charged. The laser distance sensor (LiDAR) could be blocked; clean it with a dry cloth and remove any obstructions. The collision or fall sensors could be dirty, so clean them as well. Also, ensure that the 2-in-1 dust container or dust container and the filter are correctly installed. The wiper cloth or wiper cloth holder must also be correctly installed. Finally, the robot may be jammed or one of its wheels may not have floor contact; remove any obstacles and place the robot on a flat surface.
  • W
    Wesley MannAug 1, 2025
    How to fix Kärcher Vacuum Cleaner battery not charging?
    • E
      Edward MillsAug 1, 2025
      Your Kärcher Vacuum Cleaner might not be charging because the charging contacts are dirty. Wipe the charging contacts on both the charging station and the cleaning robot with a dry cloth. Also, the ambient temperature might be outside the acceptable range. The cleaning robot should be used at temperatures above 0 °C and below 35 °C.
  • M
    mcknightchristineAug 6, 2025
    What to do if Kärcher Vacuum Cleaner is not returning to charging station?
    • J
      Julie PageAug 6, 2025
      The Kärcher Vacuum Cleaner may not return to the charging station due to several reasons. The battery might be discharged; manually place the robot on the charging station to charge it fully. It could be too far from the charging station; move it closer or manually place it on the station. Insufficient space or too many obstacles around the charging station can also be a factor. Additionally, if the robot was moved a significant distance, it might be remapping its environment; manually place it on the charging station. If the cleaning robot was not started from the charging station it will return to the place from which it was started; manually place the cleaning robot on the charging station.
  • T
    Thomas FisherAug 9, 2025
    Why is my Kärcher Vacuum Cleaner not cleaning efficiently?
    • M
      Michael PerezAug 9, 2025
      If your Kärcher Vacuum Cleaner is not cleaning efficiently or leaves dust behind, the 2-in-1 dust container with water reservoir or the dust container might be full. Empty the dust container. Alternatively, the filter could be clogged; clean the filter. Also, a foreign object may be caught in the brush; clean the brush and the side brush.
  • H
    Heidi FernandezAug 14, 2025
    What to do if Kärcher Vacuum Cleaner does not continue cleaning?
    • B
      Bethany LawsonAug 14, 2025
      The cleaning robot may not continue cleaning if it is in "Do not disturb" mode. Ensure that the cleaning robot is not in "Do not disturb" mode. Also, the cleaning robot might be charging manually or placed in the charging station. Wait until the cleaning robot is fully charged.
  • J
    John PatelAug 19, 2025
    Why does my Kärcher Vacuum Cleaner make unusual noises?
    • F
      Frank JonesAug 19, 2025
      If your Kärcher Vacuum Cleaner produces unusual noises, a foreign object could be caught in the brush, the side brush, or in a wheel. Switch off the cleaning robot and remove any foreign objects.
  • C
    carol94Aug 23, 2025
    How to fix Kärcher Vacuum Cleaner cannot connect to WLAN?
    • J
      Julia SullivanAug 23, 2025
      Your Kärcher Vacuum Cleaner may fail to connect to WLAN, or go offline, if it is not connected to the network or is out of the WLAN signal range. Ensure the cleaning robot is within range and connected to the network, and verify the WLAN password is correct. Reset the WLAN and reconnect, noting that 5 GHz WLAN networks are not supported. A weak WLAN signal may also be the cause; ensure the cleaning robot is within range.

Summary

Safety and Usage Guidelines

General Safety Precautions

Essential safety measures to prevent electric shock, fire, and injury when operating the device.

Hazard Warnings and User Responsibility

Understanding hazard levels, owner responsibilities, and intended use of the device.

Product Information and Support

Customer Service and Registration

How to register your product and contact customer support for assistance.

Warranty and Accessories

Information on warranty claims and purchasing genuine spare parts.

Technical Specifications

Electrical and Performance Data

Details on power, battery, wireless connections, and operational performance.

Capacities and Dimensions

Specifications for dust container, water reservoir, and physical size.

Environmental Considerations

Recycling and Disposal

Guidelines for recycling packaging and disposing of the device and batteries.

Device Overview

Component Identification

Diagram illustrating all parts of the robot and charging station.

Robot Functionality

Operational Description

How the robot cleans, navigates, and charges automatically.

Status Indicators and Sleep Mode

Understanding LED displays and the robot's sleep mode behavior.

Initial Setup and Operation Modes

Error Handling and Modes

Managing errors, 'Do not disturb', and low power consumption modes.

Charging Station Setup

Guidelines for placing and setting up the charging station.

Robot Connection

Connecting to Charging Station

Step-by-step guide to connecting the robot to its charging base.

Connecting to WLAN and App

Instructions for Wi-Fi setup and app integration for robot control.

Maintenance and Setup Procedures

Dust Container Removal

How to detach the 2-in-1 dust container with water reservoir.

Installing Wiper Cloth Holder

Attaching the wiper cloth holder and cloth for cleaning.

Robot Maintenance Tasks

Wiper Cloth Holder Removal

Steps to remove the wiper cloth holder and cloth.

Dust Container Installation

How to install the dust container for dry cleaning.

WLAN and Factory Reset

Resetting WLAN connection and restoring factory default settings.

Advanced Operation and Cleaning

Setting Cleaning Zones and Virtual Walls

Defining cleaning areas and restricted zones via the app.

Activating Mapping and Cleaning Modes

Initiating map creation and selecting cleaning modes.

Cleaning Settings and Control

Suction and Water Quantity

Adjusting suction performance and water usage levels.

Robot Control Functions

Switching off, interrupting cleaning, and manual recharging.

Wiping Operations

Dry Wiping Procedure

Steps for performing dry wiping with the robot.

Wet Wiping Procedure

Steps for performing wet wiping with the robot.

Wet Wiping Maintenance

Refilling Water Reservoir

Instructions for refilling the water reservoir for wet cleaning.

Dust Container Maintenance

Emptying Combined Container

How to empty the 2-in-1 dust container with water reservoir.

Emptying Standard Container

How to empty the standard dust container.

Wiper Cloth and Transport

Cleaning the Wiper Cloth

Procedure for cleaning the robot's wiper cloth.

Safe Transport Guidelines

Safety precautions for transporting the robot and its battery.

Storage and General Care

Robot Storage Instructions

Proper methods for storing the robot in a cool, dry place.

General Cleaning Procedures

Guidelines for cleaning the robot and its components.

Cleaning 2-in-1 Dust Container

Detailed steps for cleaning the combined dust and water container.

Container and Filter Cleaning

Cleaning the Dust Container

Instructions for cleaning the standard dust container.

Cleaning the Filter

How to clean the robot's filter for optimal performance.

Brush Maintenance

Cleaning the Main Brush

Steps for removing and cleaning the robot's main brush.

Cleaning the Side Brush

Instructions for removing and cleaning the robot's side brush.

Sensor and Part Replacement

Cleaning Fall Sensors

Monthly cleaning procedure for the robot's fall sensors.

Replacing Filter and Brush

Guidance on replacing the filter and main brush.

Part Replacement and Troubleshooting

Replacing Side Brush and Battery

How to replace the side brush and information on battery replacement.

Troubleshooting Guide

Common Error Solutions

Resolving common malfunctions like charging issues or unusual sounds.

Disposal Procedures

Battery Disposal and Recycling

Instructions for safe removal and disposal of the lithium-ion battery.

Kärcher RCV 3 Specifications

General IconGeneral
Product typeAccessory kit
Brand compatibilityKärcher
Suitable for vacuum cleaner typeRobot vacuum
Number of pads1
Number of brushes3
Number of filters2 pc(s)
Quantity per pack6 pc(s)
Package weight400 g
Weight and Dimensions IconWeight and Dimensions
Depth190 mm
Width125 mm
Height82 mm
Weight100 g

Related product manuals