Do you have a question about the Kemper Profiling Amplifier and is the answer not in the manual?
Details connectivity options for studio and stage use, including input/output configurations.
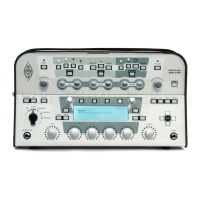
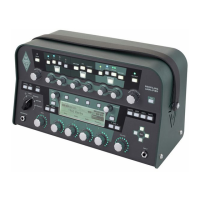
Explains how to navigate and select rigs, manage modules, and use soft knobs and page buttons.
Details the stomp section, its four slots (A, B, C, D), and LED color coding for algorithms.
Explains the color coding of stomp LEDs to identify algorithm types like Distortion, Wah, Chorus, etc.
Describes the "stack" section for amplifier, EQ, and cabinet profiles and how to combine them.
Details the effects section, including Delay, Reverb, X, and Mod modules, and their controls.
Explains how to navigate through rigs using LEFT/RIGHT and UP/DOWN buttons for sequential and step changes.
Describes the TYPE knob's function for selecting effect algorithms and retaining common parameters.
Explains the BROWSE knob for selecting local presets, performances, or rigs.
Details how PAGE buttons switch between module parameter pages when available.
Describes the EXIT button's function to return to the "play" page or cancel operations.
Explains the ON/OFF button for activating/bypassing selected modules or sections.
Details the LOCK button's function to preserve section/module settings during rig changes.
Describes using COPY and PASTE buttons to duplicate module settings between locations.
Explains the STORE button for saving module presets or entire rigs, including options like "Replace".
Details the GAIN knob's control over distortion and its wide range from clean to distorted.
Explains the INPUT button for setting input sensitivity, including "Clean Sens" and "Distorted Sens".
Explains adjusting input sensitivity for different guitar pickups and output levels.
Describes the Input LED's function to reflect the input signal level (Green, Yellow, Red).
Details the NOISE GATE knob for eliminating guitar noise and hum.
Explains the MASTER button for accessing global settings like Master Volume and Output Routing.
Describes the Master Volume knob's global function and headphone volume control.
Explains the VOLUME knob for controlling relative rig volume, stored per rig.
Describes the MAIN STEREO outputs for connecting to mixers in studios or live situations.
Details the mono output for stage monitors or connecting to a power amp and cabinet.
Explains the direct mono output for profiling or creating an effects loop (mono send).
Describes inputs for connecting external equipment, including reference amps and effects loops.
Details the connection for the power cable and the universal power supply.
Explains the USB host port for backups and OS updates.
Describes connecting pedals and switches for controlling various functions like volume or effects.
Details MIDI ports for connecting to MIDI equipment and switching rigs.
Explains the digital S/PDIF input/output for connecting compatible devices.
Explains the "Mute Signal" function for silent tuning in Tuner mode.
Describes using "Master Tune" to adjust the base pitch of the tuner.
Details the mono stomp section for placing stomp box simulations before the amp stack.
Lists various stomp types available, including Wah, distortion, and modulation effects.
Explains the "stack" section comprising amp, cabinet, and EQ profiles.
Details the AMPLIFIER module and its "Definition" parameter for preamp distortion characteristics.
Explains "Power Sagging" for modeling tube amp sag and expanding dynamic range.
Describes the "Pick" feature for controlling pick attack and sharpness independently.
Details the compressor within the stack section, affecting clean signals differently.
Explains the EQ button and soft knobs for adjusting low, mid, treble, and presence.
Details the CABINET button and parameters like "High Shift", "Low Shift", and "Character".
Introduces the Effects section with X, Mod, and Delay modules for stereo effects.
Describes the X stomp for stereo effects, useful for chorus.
Details the Mod module for modulation effects, with dedicated RATE and INTENSITY knobs.
Explains the built-in delay effects, including stereo placement and rhythmic values.
Describes Tap Delay linked to tempo, Free Delay, and Analog Delay.
Details the built-in reverb effect, including room/hall types and TIME/MIX controls.
Explains the TAP button and its use for timing parameters in effects like delay and modulation.
Explains accessing global settings pages via the SYSTEM button.
Details changing module button behavior, including "Direct Edit" mode.
Describes assigning MIDI program changes to rigs for switching via a pedal.
Explains the RIG button for accessing rig-related parameters not on the front panel.
Describes the QUICK button for accessing a user-selectable page instantly.
Explains organizing rigs into "performances" for live playing and switching.
Step-by-step guide to updating the KPA's operating system via USB.
Instructions on backing up and restoring user rigs, performances, and presets.
Details the backup process for user rigs, performances, and presets.
Explains how to restore backups from a USB stick to the KPA.
Describes importing downloaded profiles, rigs, and presets from a USB stick.
Discusses general considerations for profiling, including connections and signal flow.
Details profiling with effects in the chain and which effects to bypass.
Explains how to monitor the reference amp and KPA/profile during the profiling process.
Discusses identifying and resolving noise and hum issues during profiling.
Provides additional tips for A/B comparison and using cabinets during profiling.
Illustrates and describes connections for profiling a physical guitar amp.
Illustrates and describes connections for profiling a physical guitar amp.
Shows and describes connections for profiling a setup including an amp and a stomp box.
Details connections for profiling computer-based amp simulations via an audio interface.
Guides through the process of capturing a profile, including output level adjustments.
Explains setting output levels of the reference amp and KPA for optimal profiling.
Describes the "Refine profile" function for adjusting and improving captured profiles.
Discusses storing the profile, its automatic settings, and potential adjustments.
Details the process of profiling a rotary speaker cabinet using microphones.
| MIDI | MIDI In/Out/Thru |
|---|---|
| Digital Input/Output | S/PDIF In/Out |
| Display | LCD |
| Type | Digital Profiling Amplifier |
| Technology | Digital |
| Power Output | 600 W |
| Amplifier Modeling | Yes |
| Profiling | Yes |
| Profiling Modes | Direct |
| Inputs | S/PDIF Input |
| Outputs | Headphone Output |
| Effects | Built-in effects |
| USB | Yes |
| Storage | Internal |
| Connectivity | Ethernet |