-
BRANCHEMENT
ELECTRIQUE
L'installation
electrique
existante
doit
etre
reliee
a la
terre
et
protegee
par un
dispositif
regie
a :
20 A
pour
les
machines
en 230 V
monophase
16
A
pour
les
machines
en 380 V
triphase.
-
Brancher
le
cable (type
H07RN-F/l,5mm
2
»
de
raccordement avec
sa fiche
normalisee
obligatoirement
sur une
prise
de
courant
correctement
reliee
a la
terre
et
bien acces-
sible.
-
Si la
longueur
du
prolongateur
excede
10m,
prevoir
un
cable
en 2,5
mm
2
.
Toute intervention
sur
1'equipement
electrique doit etre
faite
par un
professionnel.
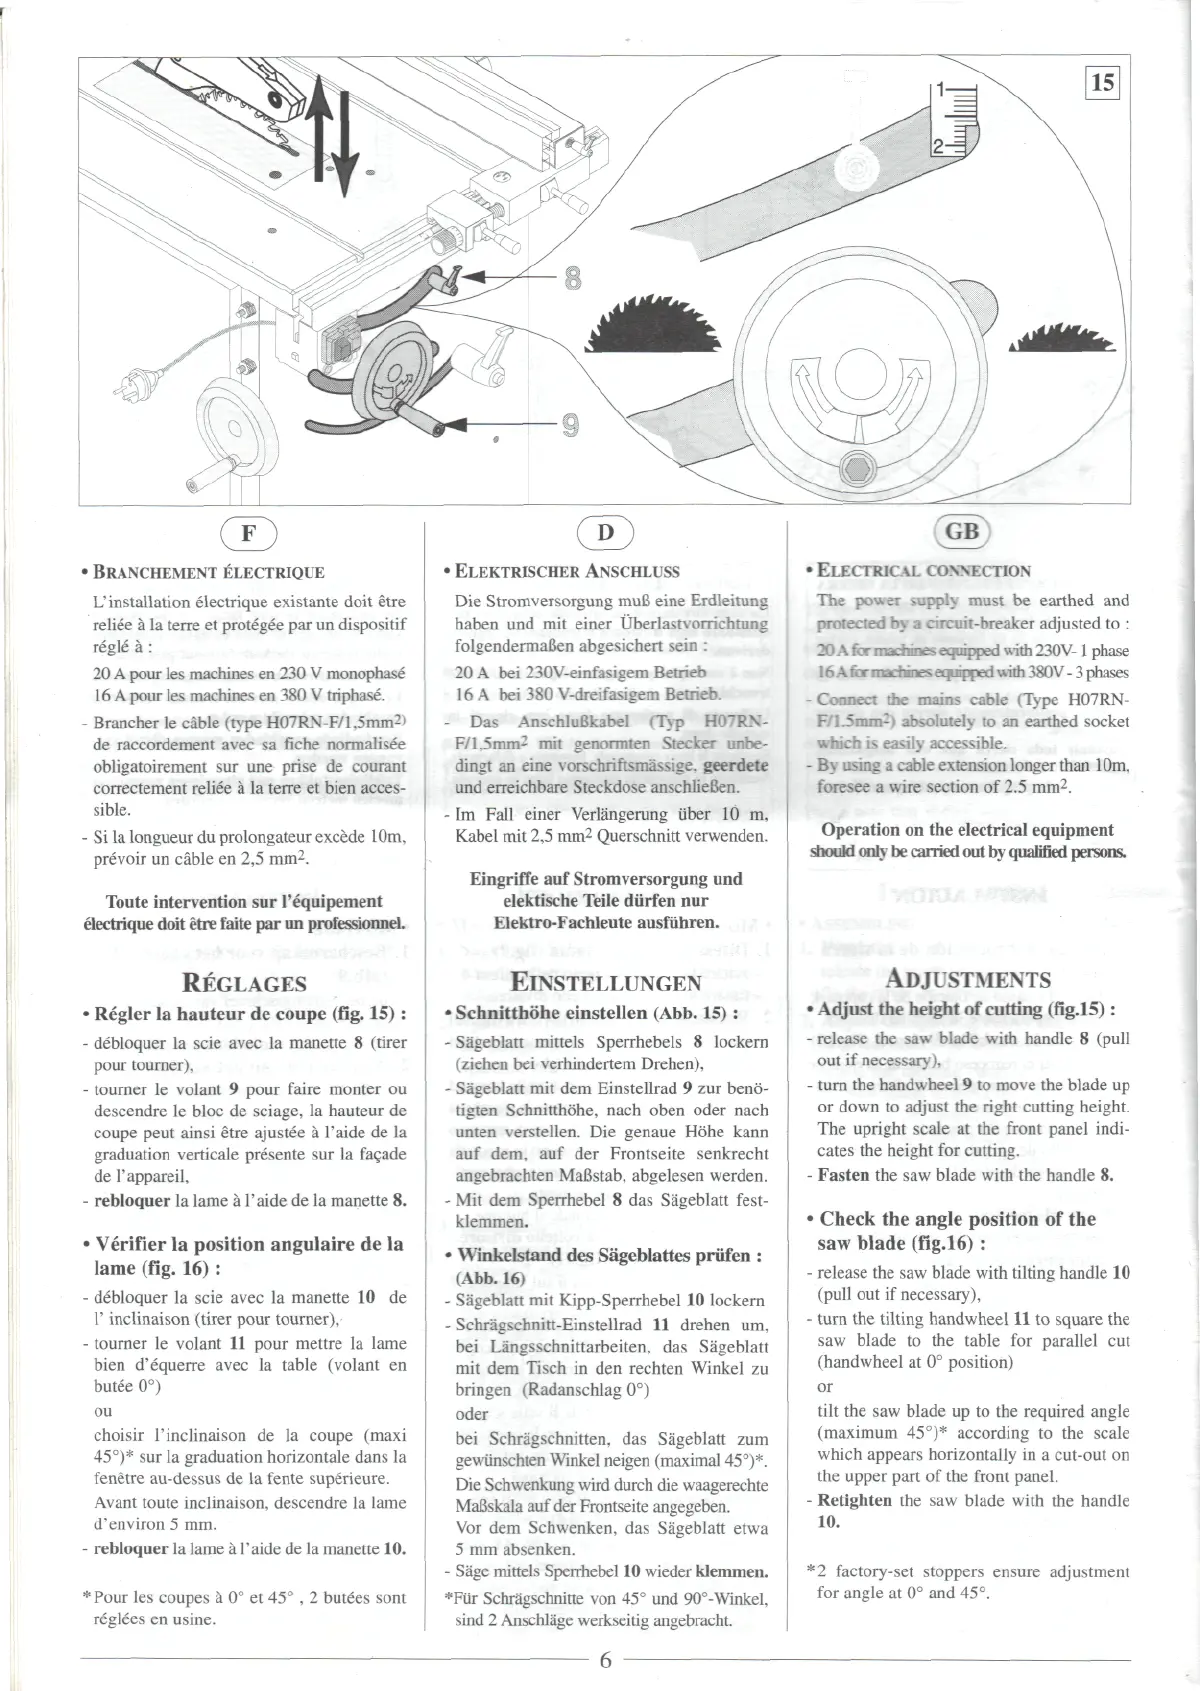
REGLAGES
-
Regler
la
hauteur
de
coupe (fig.
15):
-
debloquer
la
scie
avec
la
manette
8
(tirer
pour
tourner),
-
tourner
le
volant
9
pour faire monter
ou
descendre
le
bloc
de
sciage,
la
hauteur
de
coupe peut ainsi etre
ajustee
a
1'aide
de la
graduation
verticale
presente
sur la
fagade
de
1'appareil,
-
rebloquer
la
lame
a
1'aide
de la
manette
8.
-
Verifier
la
position angulaire
de la
lame
(fig.
16) :
-
debloquer
la
scie avec
la
manette
10 de
1'
inclinaison
(tirer
pour
tourner),
-
tourner
le
volant
11
pour mettre
la
lame
bien
d'equerre
avec
la
table (volant
en
butee
0°)
ou
choisir
1'inclinaison
de la
coupe (maxi
45°)*
sur la
graduation horizontale dans
la
fenetre
au-dessus
de la
fente
superieure.
Avant
toute inclinaison, descendre
la
lame
d'environ
5 mm.
-
rebloquer
la
lame
a
1'aide
de la
manette
10.
-
Pour
les
coupes
a 0° et 45°
,2
butees
sont
reglees
en
usine.
-
ELEKTRISCHER
ANSCHLUSS
Die
Stromversorgung
muB
eine
Erdleitung
haben
und mit
einer
Uberlastvorrichrung
folgendermaBen
abgesichert
sein
:
20 A
bei
230V-einfasigem
Betrieb
16
A bei 380
V-dreifasigem
Betrieb.
-
Das
AnschluBkabel
(Typ
FKTRN-
F/1.5mm-
mit
genormten
Sleeker
unbe-
dingt
an
eine
vorschriftsmassige.
geerdete
und
erreichbare
Steckdose
anschlieBen.
-
Im
Fall einer
Verlangerung
iiber
10
m,
Kabel
mit 2,5
mm
2
Querschnitt
verwenden.
Eingriffe
auf
Stromversorgung
und
elektische
Teile
diirfen
nur
Elektro-Fachleute
ausfuhren.
ElNSTELLUNGEN
-
Schnitthohe einstellen
(Abb.
15):
-
Sageblatt
mittels
Sperrhebels
8
lockern
(ziehen
bei
verhindertem
Drehen),
-
Sageblatt
mil
dem
Einstellrad
9 zur
beno-
tigten
Schnitthohe,
nach oben oder nach
unten
verstellen.
Die
genaue
Hohe
kann
auf
dem,
auf der
Frontseite senkrecht
angebrachten
MaBstab,
abgelesen werden.
-
Mit dem
Sperrhebel
8 das
Sageblatt fest-
klemmen.
-
\\inkelstand
des
Sageblattes
priifen
:
(Abb.
16)
-
Sa'geblatt
mit
Kipp-Sperrhebel
10
lockern
-
Schragschnitt-Einstellrad
11
drehen
um,
bei
Langsschnittarbeiten,
das
Sageblatt
mit dem
Tisch
in den
rechten Winkel
zu
bringen
(Radanschlag
0°)
oder
bei
Schragschnitten,
das
Sa'geblatt
zum
gewiinschten
Winkel
neigen (maximal
45°)*.
Die
Schwenkung
wird
durch
die
waagerechte
MaBskala
auf der
Frontseite angegeben.
Vor
dem
Schwenken,
das
Sageblatt etwa
5 mm
absenken.
-
Sage mittels Sperrhebel
10
wieder
klemmen.
*Fiir
Schragschnitte
von 45° und
90°-Winkel,
sind
2
Anschla'ge
werkseitig angebracht.
-
ELECTRICAL CONNECTION
The
power
supply
must
be
earthed
and
protected
by a
circuit-breaker
adjusted
to :
20
A
for
machines
equipped
with
230V-1
phase
16
Afor
machines equipped
with
380V
- 3
phases
-
Connect
the
mains
cable
(Type H07RN-
~rnm-)
absolutely
to an
earthed
socket
which
is
easily
accessible.
-
By
using
a
cable extension longer than 10m,
foresee
a
wire section
of 2.5
mm
2
.
Operation
on the
electrical equipment
should
only
be
carried
out by
qualified
persons.
ADJUSTMENTS
-
Adjust
the
height
of
cutting
(fig.15):
-
release
the saw
blade with handle
8
(pull
out if
necessary
i.
-
turn
the
handwheel
9 to
move
the
blade
up
or
down
to
adjust
the right
cutting height.
The
upright scale
at the
front
panel indi-
cates
the
height
for
cutting.
-
Fasten
the saw
blade
with
the
handle
8.
-
Check
the
angle position
of the
saw
blade
(fig.16)
:
-
release
the saw
blade with tilting handle
10
(pull
out if
necessary),
-
turn
the
tilting
handwheel
11 to
square
the
saw
blade
to the
table
for
parallel
cut
(handwheel
at 0°
position)
or
tilt
the saw
blade
up to the
required angle
(maximum
45°)*
according
to the
scale
which appears horizontally
in a
cut-out
on
the
upper
part
of the
front
panel.
-
Retighten
the saw
blade with
the
handle
10.
*2
factory-set stoppers ensure adjustment
for
angle
at 0° and
45°.